

Overview
Once you have installed your servers and clients, you'll need to configure initial settings. You can change these settings later to optimize processing across your site.
Initial Enterprise settings
The Site Settings are defaults for all projects run on any Execution Server attached to the Site Server. We recommend that you configure certain settings at the site level.
To configure initial Site Server settings
The Execution Server settings are defaults for all projects that run on a specified Execution Server. We recommend that you configure certain settings at the Execution Server level. Perform these actions in the client after installing and starting all Execution Servers.
To configure initial Execution Server settings
-
Start the Data Management client on any computer, and log in using the default logon and password (Administrator/Administrator). Specify the Site Server Hostname, and select the desired Execution Server from the list.
-
In the repository, open the Settings folder, and then select Machines. Under Machines, you should see a list of every Execution Server in your site. If a server does not appear on the list, check the computer on which the Server is installed, and ensure that the RedpointDM9_ExecutionService is running.

-
For each server listed under Machines:
-
Select the server and go to the Properties pane.
-
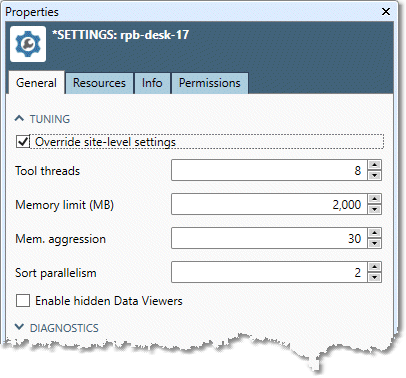
On the General tab, scroll to the TUNING section.
-
Select Override site-level settings, and then specify Tool threads to equal the number of CPU cores in the computer.
-
-
Go to the Resources tab, and configure temporary disk space.
Initial Workstation settings
Once you have installed your workstation, you'll need to configure initial settings. The site settings are defaults for all projects run on any Execution Server attached to the Site Server. We recommend that you configure certain settings at the site level.
To configure initial Site Server settings for a workstation
-
Start the Data Management client.
-
In the repository, open the Settings folder, and then select Site.
-
On the Properties pane, go to the General tab.
-
In the TUNING section, select Tool threads and specify the number of CPU cores in the computer.
-
Go to the Resources tab, and configure temporary disk space.
Select temporary disk space
Data Management requires a significant amount of temporary storage space on disk for use while performing its operations. Data Management compresses temporary storage by default, which reduces temporary space size and bandwidth requirements. However, Data Management still performs better when temp space is properly configured on appropriate hardware.
The amount of temp space needed varies depending on the data being processed and the nature of your projects. As a general rule, you will need about 2x to 3x more temp space than the total data set size processed at one time. Simpler projects with fewer sort, joins, summaries, and branches require less temp space; more complex projects require more temp space.
The Data Management Execution Server is designed to take advantage of multiple drives in parallel for use as temporary storage. Because of this architecture, we recommend one of the following configurations for temporary storage.
It is always better to have three or four independent temp space volumes than to have one large volume.
Locally-attached non-RAID disk
This is the recommended configuration for temp space. Since temporary storage does not require the redundancy of RAID, the best temp space configuration is multiple locally-attached non-RAID disk drives mapped as separate drive letters (or mount points on Linux/UNIX). For large data sets (>30MM entity records) or multi-user servers, we recommend four independent RAID or SCSI disks, locally attached.
Use SSDs for temporary space if possible.
SAN
High-performance SAN performs well for temp space, but not as well as multiple non-RAID disks. However, many organizations require the use of SAN. If you must use SAN, map multiple volume slices onto separate drive letters (or mount points on Linux/UNIX), with volumes on independent physical spindles.
Local RAID
Locally attached high-performance RAID is acceptable but generally is slower than raw disk, because it is usually configured as one large volume. If you must use locally-attached RAID, configure it as multiple RAID0 volumes with maximal caching where each volume has an independent set of physical disks.
Network
Do use not use network shares as temporary disk space! This includes cloud-based storage technologies like AWS EBS that present themselves as local storage, but are actually network-attached.
Configure temporary disk space
When you first start the Data Management client, you are asked to define an initial temporary directory.
Do use not use network shares as temporary disk space! This includes cloud-based storage technologies like AWS EBS that present themselves as local storage, but are actually network-attached.
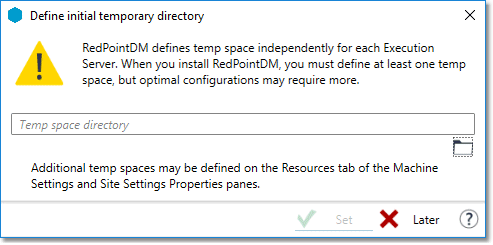
If you define a temp space in Site Settings, all Execution Servers inherit that temp space specification unless a different one is specified in Machine Settings. If the temp folder defined in Site Settings does not exist on the Machine Server's local file system, the specified folder (including its containing path, if necessary) is created. If an Execution Server cannot create the specified path, it uses the system's default temporary folder.
In mixed environments where some execution servers are running Windows and others are running Linux, the temporary space specification inherited from the Site Settings is filtered. Linux servers ignore a temporary space specification that contains a drive letter. Windows servers ignore a temporary space specification that does not begin with either a hostname or a drive letter.
If you have Execution Servers other than one co-located with the Site Server, you should override the temp spaces for those Execution Servers and configure temp space settings appropriate to those computers.
To configure temp space settings on an Execution Server
-
Start the Data Management client and log in to the Data Management Site Server.
-
In the repository, open Settings>Machines.
-
Select the desired Execution Server, and then go to the Properties pane.
-
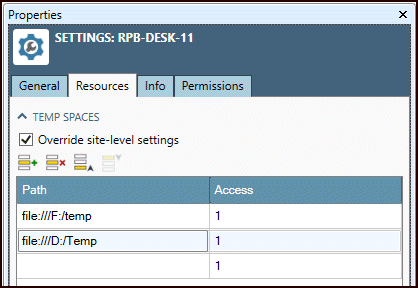
Go to the Resources tab.
-
Locate the Temp spaces grid. For each available temp space, select a row in the Temp spaces grid, and then specify a Path.
-
Path is a folder on a separate physical disk (or separate volume, for SAN- or RAID-based temp storage). Data Management performs best when there are multiple independent temp spaces, and when the temp spaces are physically separate from the storage of the live data being read or written.
-
If one temp space is significantly faster than the others, set its Access value to 2 instead of 1.
-
-
Close and reopen any open projects to use the new settings.