

Overview
To view the default settings for the entire site:
-
Open the Settings folder in the repository.
-
Select Site.
-
Go to the Properties pane.
-
Use the General tab, Resources tab, Security tab, Variables tab, and Appearance tab to configure settings.
Site Settings General tab
The settings on the General tab control general Site Server operation.
Repository
Select Require repository lock to require that a repository object be unlocked in the repository before it can be changed. This prevents multiple users from changing a file at the same time, but makes a little more work for the users.
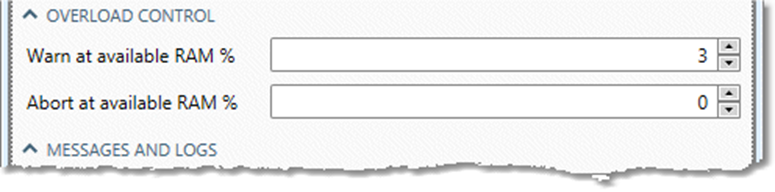
Overload control
These settings guard against system overload.
-
Warn at available RAM %: If available system memory is less than this, the server will issue warnings from running projects. The default setting is 3%.
-
Abort at available RAM %: If available system memory is less than this, the server will abort running projects. The default setting is 0%, which means "never abort."
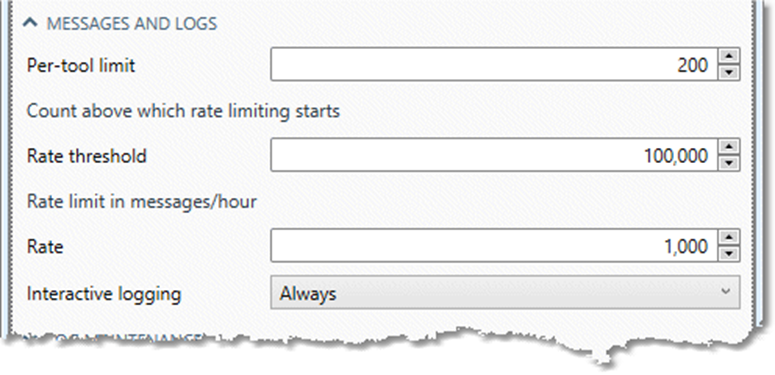
Messages and logs
-
Per-tool limit limits the number of messages each tool can write to the logs during during a project run, with some exceptions (for example, switching to another input file will reset the message count). Messages over this limit are discarded until the end of the run, when the last ten messages are appended. You can override this limit in Project Settings when the full message list is needed.
-
Rate threshold is the number of total messages that can be written by a project before the Rate limit is enforced.
-
Rate is the rate limit (in messages per hour) that is enforced once the Rate threshold is reached.
The Rate threshold and Rate jointly serve to keep the log database size and resource use under control. For example, with the defaults shown above, once 100,000 messages are output, subsequent messages generated at a Rate exceeding the rate limit are ignored.
-
Interactive logging controls whether logs are generated for projects that are run interactively. (Projects run from the command-line or via scheduling always create a log.) Options are:
-
Always: Create a new log each time the project is run.
-
Session: Create a new log for the project when it is opened, but clear and re-populate the same log each time the project is run.
-
Log maintenance
These settings determine how long the repository log is maintained and the disposition of old logs.
-
Expired log action specifies what to do with logs older than a configurable Expiration age:
-
Delete the logs: the default.
-
Archive the logs: by default Data Management archives log entries older than 90 days in the
/log_archivefolder of the Data Management installation directory. You may optionally adjust the Expiration age, and specify a different Archive directory. -
Do Nothing: if Archive is selected, by default Data Management archives log entries older than 90 days in the
/log_archivefolder of the Data Management installation directory. You may optionally adjust the Expiration age, and specify a different Archive directory.
-
-
Max log count: specifies the maximum number of logs that can exist.
-
Max log detail count: specifies the maximum number of entries permitted in a single log. If this number is exceeded, the oldest log entries will be archived or deleted (depending on the selected Expired log action). This lets you manage the size of the logs generated by long-running active projects.
Server debug logs
The Trace level setting lets you explicitly set a trace level for all servers—site, execution, project, and automation. Trace levels may be defined in individual configuration files for each server, with a default trace level of 1. Higher trace levels produce more verbose logging. You may also override the trace level for a specific project or automation via its properties settings or the command line. This is useful if you want to run a project or automation at a higher trace level, but don't want to flood the server with increased trace levels for all projects. You should change these settings only if recommended by Redpoint Global Inc. support staff.
Diagnostics
These settings let you save diagnostic information into an archive to aid in troubleshooting with Redpoint Global Inc. support staff. This archive may contain the proximal project or automation and all referenced macros, server trace logs, project messages, YARN logs, and subtask logs (for automations). You should only turn on diagnostic reporting when working with Redpoint Global Inc. support staff. Be sure to turn off diagnostic reporting when finished troubleshooting. To capture diagnostics information about an active project or automation, use the Capture Diagnostics command.
-
Trigger on abnormal project/automation termination: creates an archive file when a project or automation crashes.
-
Trigger on abnormal execution server termination: creates an archive file when the execution server crashes.
-
Capture msinfo32 on Windows servers: uses the Microsoft System Information tool to gather information about your computer.
-
Do not stage to temp space: causes diagnostic information to be staged into a temporary folder created in the Default archive location, which must be defined. This temp folder is deleted immediately after the diagnostics archive is created in the Default archive location.
-
Default archive location: specifies the location for the archive file. If a location is not specified, the server's temp file location will be used. By default, archive files are named
DiagnosticsReport_Mmm_dd_yyyy_hh_mm_ss.zip(using the current date/time). -
Diagnostics window: specifies the amount of time before and after a trigger event to collect information. The default setting of one hour is usually correct.
-
Alternate Linux core dump location: if you are connected to a site server running on Linux, this lets you specify a location and file pattern to be used when searching for core dumps on Linux platforms where core dumps may be written to a directory other than the current working directory.
Tuning, output files, and testing
See Configuring Machine Settings. These may need to be specified differently for each Execution Server and computer installed on the site.
Database
If Only use SELECT* is selected, RDBMS Input tools configured for Direct table read will actually execute a query of the form SELECT * FROM TABLE instead. Turn on this option at the Site or Machine level if you have existing projects that read from complex database views which take a long time to initialize.
Some database tables are actually database views, and some views take a very long time to produce meta-data because they contain internal joins. In such cases, you should reconfigure the RDBMS Input tools to perform a SELECT query.
Live automations
Use “Disable live automations after” and “Failures in” to specify how many times live automations can fail within a specified period of time before being turned off. You can override this setting in live automation properties by selecting Override site-level failure settings.
Web services
Use the following options to specify web service retry and restart policies.
-
Set request body size limit - Size limit: maximum size of SOAP and REST request messages.
-
Retry interval: seconds that should elapse between each attempt to restart a web service.
-
Startup failures - Maximum retries: the maximum number of attempts that will be made to load and run a web service before it is turned off.
-
Running failures - Maximum retries: the maximum number of attempts that will be made to restart a web service that failed for any reason while running.
-
Running failures - Within period: the time period within which Running failures - Maximum retries failures must occur for the web service to be turned off.
-
Restart service on any error: if selected, any error that occurs while a web service is processing a transaction will cause the web service to be stopped and restarted, even if the error is non-fatal. For example, with this option turned on, failing to insert into a database would result in a failure/restart whereas normally it would only result in an error return from the transaction. Use this option on services with tools that keep RDBMS connections open or continuously write to files.
-
Restart service when project is modified: if selected, any change to a turned on web service project will cause the web service to be stopped and restarted. Enabling this option allows for smoother upgrades, since you never have to turn off the service.
Network
The Network timeout, Network ping wait, and Async task timeout settings can be increased to work around certain exceptional network conditions. Please contact Data Management support if you are experiencing network/bandwidth issues.
Site Settings Resources tab
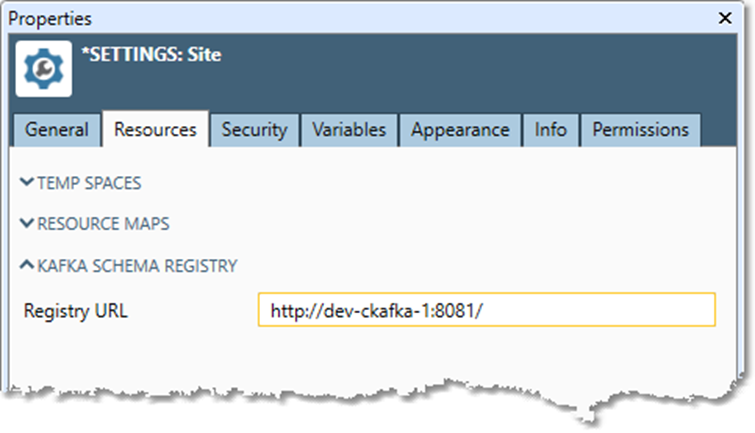
The settings on the Resources tab are typically used to define Temp spaces and Resource maps for each Machine or Execution Server in a site, although you can also define resource maps that apply to the entire site in the Site Server settings. See Configuring Resources for details.
If you will be accessing Avro data by referencing a Kafka schema registry, ask your systems administrator for your organization's Confluent Schema Registry URL and enter that Registry URL on the Site Settings Resources tab.
Site Settings Security tab
The settings on the Site Settings Security tab control a variety of security-related behaviors in Data Management.
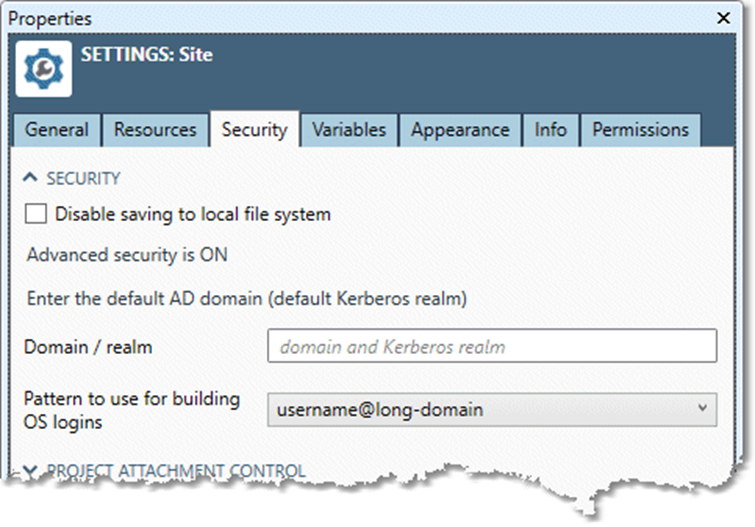
Security
-
Turn off saving to local file system prevents users without Administrator privileges from saving most data or files to a local computer file system. Exceptions are palette configuration files, client layout files, and project performance logs.
-
If advanced security mode is turned on on the site, you may also define the Default domain and Pattern to use for OS logins. See enabling advanced security and setup with Active Directory integration.
Project attachment control
These settings determine which users are allowed to connect to the projects of other users and whether they can edit and run those projects.
Administrators always have full project attachment rights.
-
Same-group users controls what users in the same group are allowed to do to the projects of other users.
-
Any user controls what unrelated users are allowed to do to the projects of other users.
-
None: no attachment allowed.
-
View: attach in view-only mode.
-
Control: attach in control mode.
-
Web service client authentication
To require client authentication in published web services:
-
Select Authentication type:
-
Choose OAuth2 and configure OAuth2.
-
Choose2-Way SSL and specify a Trusted CA certificate. You may optionally select Validate client certificate to ensure that client certificates are not self-signed. Expired client certificates are considered inherently invalid, and will always trigger a "certificate expired" warning.
-
Client sessions
Use the following options to configure user logon limits and timeout intervals.
-
Concurrent user logons: controls whether users are allowed to have more than a single active client session.
-
Allow: user may have multiple active client sessions.
-
Prohibit: user may have a single active client session. Multiple logons are prohibited.
-
Supersede: user may have a single active client session. New logon will become active client session, preempting any previous client session.
-
-
Disconnect inactive clients: if selected, client sessions that are inactive for a period exceeding Inactivity timeout will be ended.
Secrets management support
Data Management supports several third-party credential vaults, including AWS Secrets Manager, Azure Key Vault, and Google Secret Manager. With Data Management key vault integration, you have the option of storing secrets such as passwords as either encrypted values (the default in Data Management version 9.0 and later) or as key vault references. See AWS Secrets Manager integration, Azure Key Vault integration, Google Secret Manager integration.
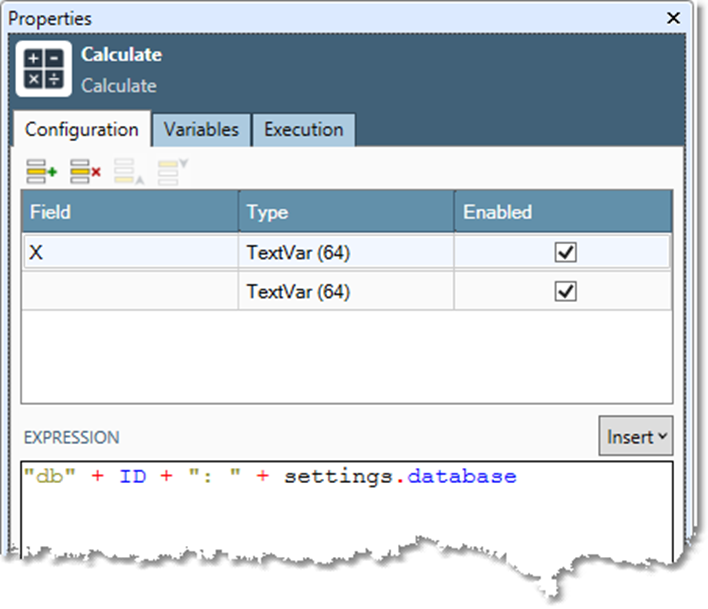
Site Settings Variables tab
Use the Site settings Variables tab to define system-wide read-only variables that are available to all projects running on the Data Management Site server.
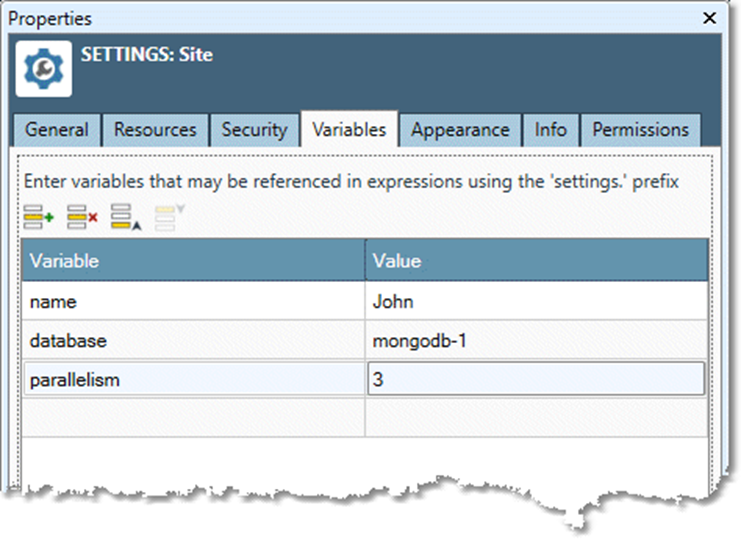
Each variable is of type Unicode(1024). Once defined, you can access these variables like system variables in projects and automations, prefacing the variable name with the settings. prefix.
-
Use in the Calculate tool and other tools where you can define expressions.
-
Use with the global variables ${…} syntax for expression replacement.
Site Settings Appearance tab
To configure a title bar below the Data Management client toolbar, select the Site Settings Appearance tab, and then select Custom server appearance. This is useful if you have multiple Site Servers and want to visually distinguish between them.
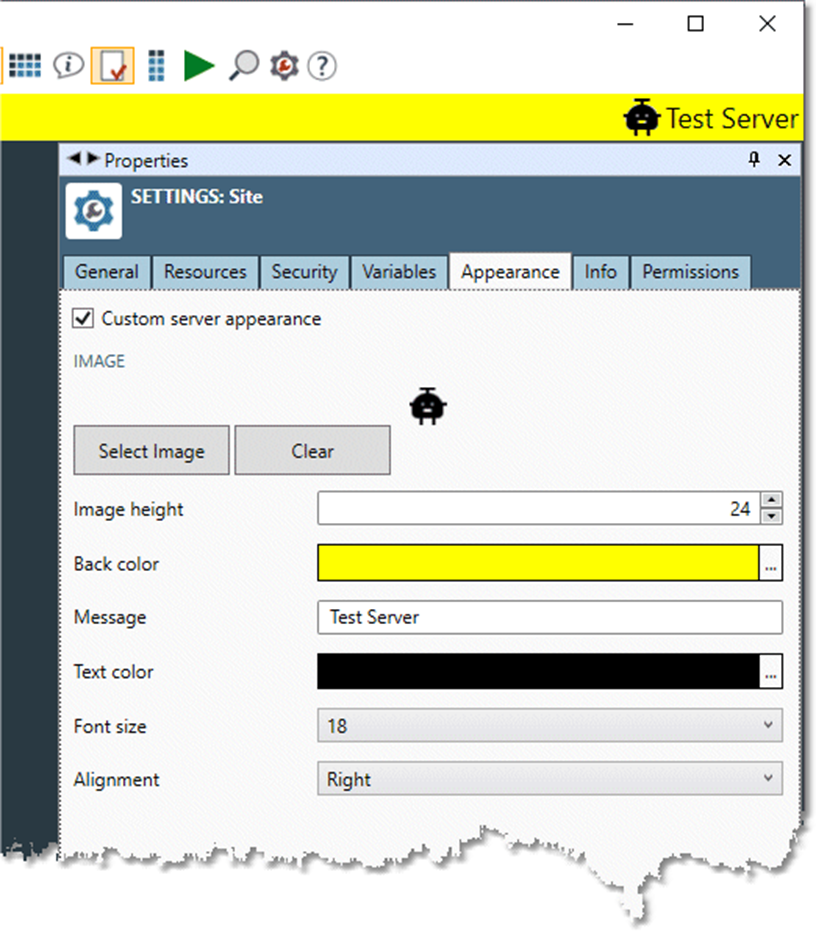
You can upload an Image (24x24 pixels, GIF, JPG, PNG, or BMP formats), select a Back color, and configure a text Message.