

DLD Input
DLD (Data Management Data) files are Data Management's own data format. They are compact, auto-configuring, have no field size limitations, and handle all of Data Management's data types without conversion. DLD files are the fastest input and output format. Use DLD files to store data that will be read by another Data Management project. Some typical uses:
-
Storing data to pass between different Data Management projects (ideal for multi-phase jobs).
-
Storing intermediate results of a lengthy process, such as database extraction. If you process the same database table many times, storing it in a temporary DLD file will save time and reduce the server load.
-
Creating "placeholder" inputs for processes under development, to avoid repeated database access.
DLD Input tool configuration parameters
The DLD Input tool has two sets of configuration parameters in addition to the standard execution options.
Configuration
|
Parameter |
Description |
|---|---|
|
Input file |
The file containing the records, or a wildcard pattern matching multiple files. |
|
Text fields are variable length |
If selected, text fields within the input file are treated as variable length (trailing spaces are trimmed). |
|
Produce file name field |
If selected, the file name will be output as a record field. |
|
Output full path |
If Produce file name field is selected, optionally outputs the entire path to the record file name field. |
|
Field name |
If Produce file name field is selected, name of the column to be used for the file name. This is optional and defaults to FILENAME. |
|
Field size |
If Produce file name field is selected, size of the field to be used for the file name. This is optional and defaults to 255. |
Options
|
Parameter |
Description |
|---|---|
|
Limit records |
If selected, limits the number of records read. |
|
Read only the first |
If Limit records is selected, specifies the number of records to be read. |
|
Produce file name field |
If selected, the file name will be output as a record field. |
|
Output full path |
If Produce file name field is selected, optionally outputs the entire path to the record file name field. |
|
Output URI path |
If Output full path is selected, express path as a Uniform Resource Identifier (URI). |
|
Field name |
If Produce file name field is selected, name of the column to be used for the file name. This is optional and defaults to FILENAME. |
|
Field size |
If Produce file name field is selected, size of the field to be used for the file name. This is optional and defaults to 255. |
|
Staging connector in automation |
If selected, makes tool available to staging connections in automations. |
Configure the DLD File Input tool
-
Select the DLD File Input tool.
-
Go to the Configuration tab.
-
Specify the Input file.
-
Once you specify a file, Data Management displays a sample of the input data, automatically detecting field definitions and record layout. Field definitions and details are read-only; you cannot edit them. If the data changes after you've specified an input file, select


-
Optionally, select the Options tab and configure advanced options:
-
If you don't want to process the entire file, select Limit records and type the desired number of records to process.
-
To include the name of the input file as a new field, select Produce file name field and specify a Field name and Field size. Select Output full path to include the complete file specification. This can be useful when reading a wildcarded set of files. Select Output URI path to express the complete file specification as a Uniform Resource Identifier.
-
If you want this tool to be available to staging connections in automations, select Staging connector in automation. You can optionally select Stage data with file to use the file defined in the project for staging, rather than a temporary file.
-
-
Optionally, go to the Execution tab and Enable trigger input, configure reporting options, or set Web service options.
DLD Output
DLD (Data Management Data) files are Data Management's own data format. They are compact, auto-configuring, have no field size limitations, and handle all of Data Management's data types without conversion. DLD files are the fastest input and output format. Use DLD files to store data that will be read by another Data Management project. Some typical uses:
-
Storing data to pass between different Data Management projects (ideal for multi-phase jobs).
-
Storing intermediate results of a lengthy process, such as database extraction. If you process the same database table many times, storing it in a temporary DLD file will save time and reduce server load.
-
Creating "placeholder" inputs for processes under development, to avoid repeated database access.
DLD Output tool configuration parameters
The DLD Output tool has one set of configuration parameters in addition to the standard execution options.
|
Parameter |
Description |
|---|---|
|
Output file |
The output file name. |
|
Open file time |
Specifies when the output file will be opened:
|
|
Write empty file if no records are read |
If selected, writes an output file even when no records are read. This is unavailable if Open file time is When project is started. |
|
Target version |
Specifies the Data Management version that will read the resulting DLD file. This is optional and defaults to the current version. |
|
Staging connector in automation |
If selected, makes tool available to staging connections in automations. |
|
Use named file for staging |
If Staging connector in automation is selected, select this to use the file defined in the project for staging, rather than a temporary file. |
|
Split files |
If selected, splits the output file by Size, Record count, or Data. |
|
Split size (MB) |
If Split files by size is selected, specifies the maximum size of the split files. Output file names are appended with a sequence number between the file root and the extension. Defaults to 1024 MB (1Gb). |
|
Split count |
If Split files by record count is selected, specifies the maximum number of records in the split files. Output file names are appended with a sequence number between the file root and the extension. Defaults to 1,000,000. |
|
Split field |
If Split files by data is selected, name of the field to be used to split the data. A separate file will be created for each unique value of the specified field. Data must be grouped by the split field. |
|
Suppress split field |
If selected, the Split field is omitted from files created using Split files by data. |
|
Treat output file as folder |
If selected, the Split field value is used as file name for files created using Split files by data. |
|
Replication factor |
Number of copies of each block that will be stored (on different nodes) in the distributed file system. The default is 1. |
|
Block size (MB) |
The minimum size of a file division. The default is 128 MB. |
Configure the DLD File Output tool
-
Select the DLD File Output tool.
-
Go to the Configuration tab on the Properties pane.
-
Specify the Output file.
-
Optionally, specify Open file time.
|
Option |
Description |
|---|---|
|
Default |
Use the site/execution server setting. If you select this, you can optionally select Write empty file if no records are read. A warning will be issued if the tool setting conflicts with the site/execution server setting. |
|
When project is started |
Open output file when the project is run. |
|
When the first record is read |
Open output file when the first record is read. If you select this, you can optionally select Write empty file if no records are read. |
|
After the last record is read |
Output records are cached and not written to the output file until the tool receives the final record. If you select this, you can optionally select Write empty file if no records are read. |
-
Optionally, select a Data Management Target version other than v7 (the default).
-
If you want this tool to be available to staging connections in automations, select Staging connector in automation. You can optionally select Used named file for staging to use the file defined in the project for staging, instead of using a temporary file. This allows you to control where the file is written, but prohibits use of the same project twice, or running two of the same automation at once.
-
Optionally, you can split the output file into smaller, more manageable pieces. Select the Split files drop down list, and then select By size, By count, or By data.
-
If you select Split files by size, specify Split size as maximum file size (in megabytes). The resulting output files will have the name you specified, with a sequential number appended.
-
If you select Split files by record count, specify Split count as the maximum number of records to be written to each file.
-
If you select Split files by data, select the desired Split field name from the drop-down list. Data must be grouped by the split field. The resulting output files will have the name you specified, augmented by inserting the value of the specified field before the extension. For example, splitting output by ZIP Code produces file names of the form
output_file01234.csv.
-
-
To generate file names where the entire name is determined by the value of the specified field, select Treat output file as folder and specify the output directory in the Output file box, using the form:
F:\output_directory. -
If you do not want the specified field to appear in the output, select Suppress split field on output.
-
Optionally, go to the Execution tab and Enable trigger input, configure reporting options, or set Web service options.
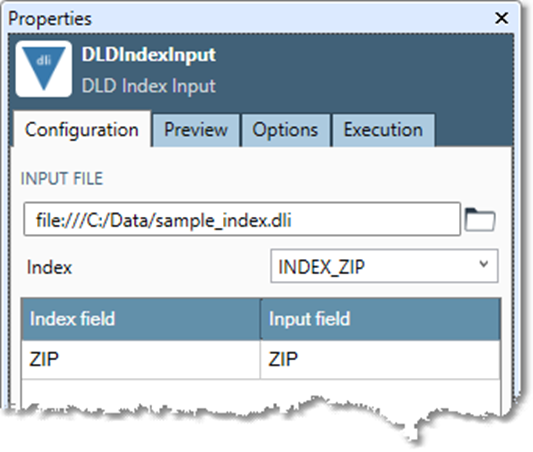
DLD Index Input
DLI (Data Management Data Index) files are an evolution of Data Management's own DLD format, with indexes included. The DLD Index Input tool can be configured to read records from a single upstream input, perform searches on an index using the mapped input fields, and produce the set of output records that match the input index values. If no input is connected, it reads the entire file. See About the DLD Index Output tool for details on creating and using DLI files.
DLD Index Input tool configuration parameters
The DLD Index Input tool has one set of configuration parameters in addition to the standard execution options.
|
Parameter |
Description |
|---|---|
|
Input file |
The file containing the index. |
|
Index |
If specified, the name of the index to use. |
|
Limit records |
If selected, limits the number of records read. |
|
Read only the first |
If Limit records is selected, specifies the number of records to be read. |
Configure the DLD Index Input tool
-
Select the DLD Index Input tool.
-
Go to the Configuration tab.
-
Specify the Input file.
-
Once you specify a file, Data Management displays a sample of the input data on the Preview tab, automatically detecting field definitions and record layout. Field definitions and details are read-only; you cannot edit them. If the data changes after you've specified an input file, select Analyze to re-analyze the input data file.
-
Optionally, specify which Index to use.
-
If you don't want to process the entire file, select the Options tab, select Limit records, and type the desired number of records to process.
-
Optionally, go to the Execution tab, and then set Report options.
DLD Index Output
The DLD Index Output tool creates DLI (Data Management Data Index) files, an evolution of Data Management's own DLD format, with indexes included.
A typical use is to index a master database or a demographic universe on a candidate key (which is similar to a match segment), and then use the index to identify candidates for a matching process. For example, suppose your match segmentation rules specify that records where the expression ZIP + Left(FirstName,2) + Left(StreetName,2) produces identical results should be compared. You'd perform a calculation to append the results of the expression onto your demographic/master data file as a key, and then index the master file on that key. As new records come into your project, you can calculate the same key and use it to extract all records from the master file that share the keys of the input records, and then perform a match.
DLD Index Output tool configuration parameters
The DLD Index Output tool has one set of configuration parameters in addition to the standard execution options.
|
Parameter |
Description |
|---|---|
|
Output file |
The output file name. |
|
Open file time |
Specifies when the output file will be opened:
|
|
Write empty file if no records are read |
If selected, writes an output file even when no records are read. This is unavailable if Open file time is When project is started. |
|
Index |
The name for each index desired. |
|
Field |
For each Index, the field to be indexed. |
|
Order |
Sort order, either Ascending or Descending. This is optional and defaults to Ascending. |
Configure the DLD Index Output tool
-
Select the DLD Index Output tool.
-
Go to the Configuration tab on the Properties pane.
-
Specify the Output file.
-
Optionally, specify Open file time.
|
Option |
Description |
|---|---|
|
Default |
Use the site/execution server setting. If you select this, you can optionally select Write empty file if no records are read. A warning will be issued if the tool setting conflicts with the site/execution server setting. |
|
When project is started |
Open output file when the project is run. |
|
When the first record is read |
Open output file when the first record is read. If you select this, you can optionally select Write empty file if no records are read. |
|
After the last record is read |
Output records are cached and not written to the output file until the tool receives the final record. If you select this, you can optionally select Write empty file if no records are read. |
-
Enter a Name for each Index desired.
-
For each Name, select the Field to be indexed, and specify whether to sort the index in Ascending or Descending order.
-
Optionally, go to the Execution tab, and then set Web service options.