

Overview
When you run an automation, it triggers each step in a sequence determined by the control flow connections and the success/failure status of each step. First, steps that have no input control-flow connections are triggered and execute. As each step completes it signals one set of output control-flow connections (usually the success or error connections) and sets the others to skipped. This "signaled" or "skipped" status propagates to the downstream steps, causing them to be triggered or skipped. Eventually the automation arrives at one of these states.
|
Status |
Description |
|---|---|
|
Completed successfully |
No steps failed (or if they did, they had a control-flow connection on the error connector). |
|
Paused for review |
Either a User Interface step or a Review step was triggered, and the automation is waiting for user input. |
|
Error |
One or more steps failed. |
|
Aborted |
The user aborted the automation. |
|
Paused |
The user paused the automation. |
To run an automation:
-
Select the green play button.
Review an automation
When a User Interface step or a Review step is triggered, the automation waits for user intervention before proceeding. If you have the automation open in the Data Management client, you will see the step requesting input turn yellow. A box at the bottom indicates the required action.
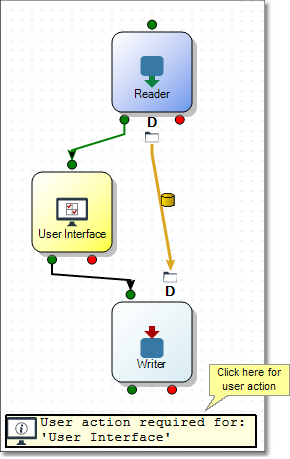
Select the User action required box to view the step's interface. Once you perform the requested action, processing continues.
Pause or abort automations
An automation can always be resumed after a pause, error, or abort.
To pause a running automation:
-
Select the green pause button.
Steps currently running continue until complete, except for the following cases:
-
A Wait step will abort immediately.
-
A Notification step configured for Email using SMTP that has failed to connect to an SMTP server and is waiting for a retry will abort immediately.
-
An FTP step that has failed and is waiting for a retry will abort.
To abort a running automation:
-
Select the red stop button.
Any long-running steps currently running (Wait, Project, FTP) will abort immediately and issue an error. Once an abort is requested, the job can't be paused.
When an automation is paused or aborted, all steps keep their state, and all staging connections keep their data, even after the automation is closed. When you reopen the automation later, it will show this previous state, allowing you to resume any automation at any time.
Resume automations
When an automation encounters an error that halts processing, it waits for running steps to complete and enters a suspended state pending user intervention. You can resume the automation, which will resume execution at the failed or aborted step(s).
Steps with connected error outputs do not fail. Instead, they issue a warning and continue execution along the error path.
Steps that fail within a group do not cause the entire group to fail unless the automation project's On error property is set to Fail container. Thus, resuming an automation where there was a failure in a group will resume execution at the failed step, not the entire group.
To resume an automation:
-
Select the green play button.
Rewind automations
You can interactively rewind successful steps or partially-complete groups. Rewinding a step or group causes it to execute again, as if it had not been run before. Failed or rewound steps always re-run when the automation is resumed.
Rewinding a step or group with control-flow outputs reverts the signaled state of downstream connections and reverts the completion state of downstream tools.
-
Rewinding a step or group that has staging output connector(s) removes the corresponding stage file(s).
-
Rewinding a step or group reverts all user variables to the values they had before the step was last started.
You can exert finer Resume control over For Each group steps that have partially completed. When restarting a For Each group, you can:
-
Rewind the current iteration.
-
Rewind to a specified row in the loop variables collection.
-
Rewind to the first row in the loop variables collection, but not reload the loop variables collection from rows of DLD or RDBMS sources.
-
Rewind and reload the loop variables collection from rows of DLD or RDBMS sources.
To rewind an automation:
-
Select the green rewind button.
Make automations live
A live automation is an automation that has been configured to run continuously. It typically contains a Wait step at the top that waits for a trigger, and then executes. The system then restarts the automation. It can be used for polling of conditions like:
-
File appears in folder
-
Record appears in database table
-
Calendar event
For example, you might build an automation that waits for a file to appear in an FTP upload directory, determines the file's format, checks the file for validity, and performs a series of transformations using Data Management projects. Add the final step of moving the file to a "processed" directory, and make the automation live. Now you have a service that will automatically process uploaded files.
To make an automation live:
-
Save the automation to the repository.
-
Right-click the automation's icon in the repository, and then select Make Live Automation. The automation now appears under the Live Automations folder in the repository.
-
Select the Live Automations icon and view the Properties pane.
-
Select Enabled to make the automation live.
-
Optionally, select Execution Server and choose a computer if you want the automation to run on a specific server.
-
Select Logon/Password and specify the User and Password (or Key Vault reference) under which the automation will run.
-
Select Commit.
A live automation is now visible in the Management console window. You can attach to a live automation to watch its progress interactively.
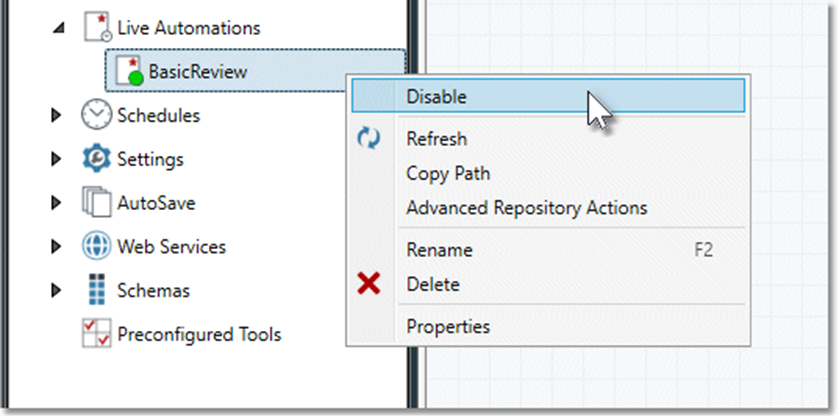
Disable live automations
To turn off a live automation, right-click the automation in the repository tree and then select Disable.
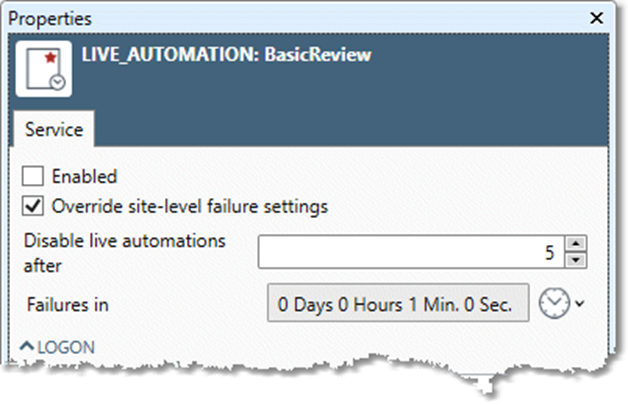
A live automation will run when the server starts, and will attempt to restart on failure. Site Settings control the number of times a live automation can fail within a specified period of time before being turned off. You can override the settings for individual live automations by selecting Override site-level failure settings and defining new Disable live automations after and Failures in values.
Enable and disable live automation from the command line
-
Command line tool to use:
rpdm_sync -
Path:
/opt/RedPointDM9/program/
Prerequisites
-
Create two (2) new folders:
-
sync_enabled -
sync_disabled
-
-
Update sync files as follows (Repository > Live Automation > Sync Repo to Disk):
-
Enable live automation (synced to disk
/tmp/sync_enabled) -
Disable live automation (synced to disk
/tmp/sync_disabled)
-
Enable/disable live automations
Linux
To Enable:
$cd /opt/RedPointDM9/program/

$sudo ./rpdm_sync -repo=repository:///"Live Automations" -disk=/tmp/sync_enabled -load -connect -login=Administrator -password=Administrator (-keyfile=<keyfile>)
To Disable:
$cd /opt/RedPointDM9/program/

$sudo ./rpdm_sync -repo=repository:///"Live Automations" -disk=/tmp/sync_disabled -load -connect -login=Administrator -password=Administrator (-keyfile=<keyfile>)
Windows
To Enable:
rpdm_sync -repo=repository:///"Live Automations" -disk=D:\tmp\sync_enabled -load -connect -login=Administrator -password=Administrator (-keyfile=<keyfile>)
To Disable:
rpdm_sync -repo=repository:///"Live Automations" -disk=D:\tmp\sync_disabled -load -connect -login=Administrator -password=Administrator (-keyfile=<keyfile>)
rpdm_sync usage
rpdm_sync -repo=folder -disk=folder <command> [<connect>] [<login>] [options]
|
Parameter |
Description |
|---|---|
|
|
The repository folder path |
|
|
The disk folder or ZIP file path. Use one of the following forms:
|
|
|
One of:
|
|
|
Optionally:
|
|
|
Optionally:
|
|
|
|
Keyfile
Run Data Management's command-line processing utility rpdm_shell.exe, and then type the command: GetKeyFile -login login -password password -filepath filepath.
Run projects where…
-
loginis the login. -
passwordis the password associated with the login. -
filepathis the path to the location where thekeyfileshould be stored.
Once the keyfile is created, it may be used with rpdm_cmd to authenticate logins without using a password.
Examples:
-
rpdm_cmd -login login -keyfile filepath -project project_file_path -
rpdm_cmd -login login -keyfile filepath