Overview
The Data Import Designer is displayed in a separate tab in the RPI framework.
You can invoke the Data Import Designer in the following ways:
-
The quick access menu’s Data Imports menu. From this menu, you can:
-
Create New Data Import
-
Open Data Import
-
-
Using the Tasks or File Type widget. Typically, these might be displayed at your Home Page. For more information on widgets, please see the Dashboard Designer documentation.
-
Double-clicking a data import file in the File System Dialog, or by highlighting a data import and selecting OK in the same context.
Access to the Data Import Designer is controlled via the Data Import – Design functional permission. If none of the user groups of which you are a member are associated with this permission, you will not be able to able to access the Data Import Designer.
Start Page
The Data Import Designer Start Page is shown upon invocation of Data Imports at the quick access menu, and also on selecting Create new Data Import at the Data Import Designer toolbar.
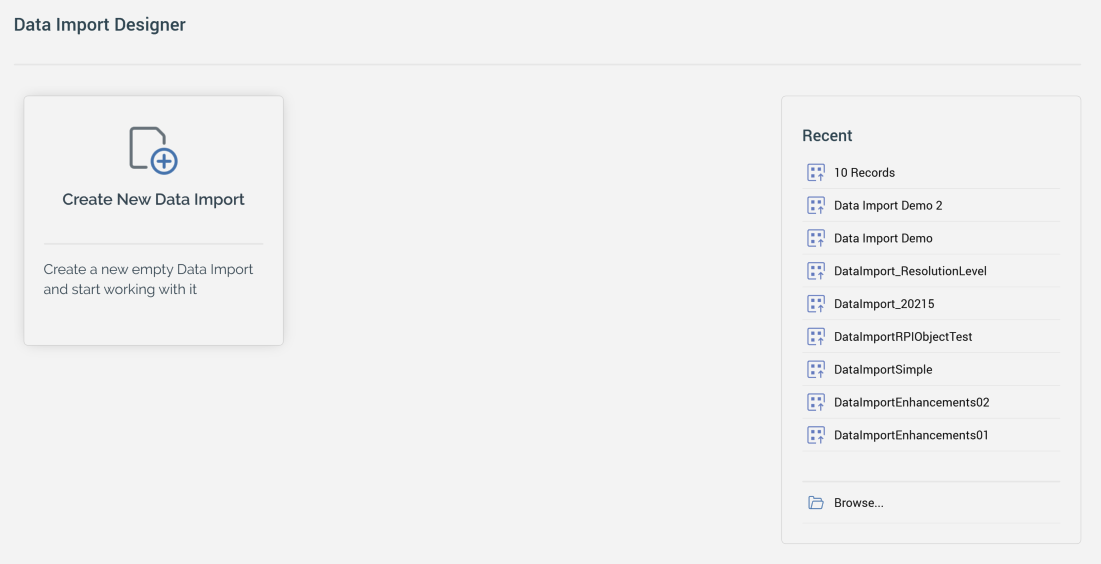
It contains the following:
-
Create New Data Import button: selecting the button displays a new, unconfigured data import in the Data Import Designer.
-
Recent: lists recently-accessed data imports, facilitating the opening of the same.
-
Browse: displays the Open Data Import File System Dialog, allowing you to select a data import to open.
A Close button is shown at the top of the Start Page. Selecting it removes the Start Page from display, and redisplays the Data Import Designer. The Close button is only shown on invocation of the Start Page by selecting Create new Data Import at the Data Import Designer toolbar.
Toolbar
The Data Import Designer toolbar exposes the following options:

-
Create new Data Import: selecting this button displays the Data Import Designer Start Page. A close button is shown to its top right; selecting it removes the overlay from display. If a data import containing unsaved changes is displayed at invocation of Create New, an "Are You Sure?" dialog is shown, from which you can:
-
Save the changes
-
Abandon the changes
-
Abandon creation of the new data import
-
The new Data Import’s name is “New Data Import”. Its other properties are set to their default values.
-
Open an existing Data Import: displays the File System Dialog, allowing you to navigate those folders within the RPI file system to which you have access in order to locate a data import to open. Only data import files are displayed in the File System Dialog. Select OK to open the data import. You can also cancel opening a data import.
-
Save the current Data Import: saves the selected data import to an existing filename. This option is only available if a data import to which changes have been made is displayed. If the data import has been saved previously, it is saved to its existing file, and its version number is incremented.
If the data import is yet to be saved, Save behaves like Save as…: the File System Dialog is displayed, allowing you to navigate accessible folders within the RPI file system to locate a folder to which to save the data import. Having done so, select OK to perform the save, which creates a new, independent data import file. You can also cancel saving a data import.
-
Save the current Data Import as...: invoking Save as… displays the File System Dialog, allowing you to navigate accessible folders within the RPI file system to locate a folder to which to save the data import. Having done so, select OK to perform the save. Data imports are persisted as “Data Import” files. You can also cancel saving a data import.
-
Analyze File: this button allows you initiate the analysis of the file currently selected at the File to be Imported property to determine the structure of its columns, and then import that information to populate the grid within the current data import's Columns tab. If columns are already present at invocation, an "Are You Sure?" dialog is shown. During file analysis RPI:
-
Automatically detects if the file contains a header row, and reflects the results at the data import's “Has header row” checkbox.
-
Uses data in the file's first 1000 rows to determine its columns' names, data types and lengths, populating their details in the Columns tab's grid. If one or more column's names contain spaces, they are replaced with underscores ('_'). At file analysis, if a column is determined as a string:
-
If its length is determined as 1, its Length property is set to 1.
-
If its length is determined as more than 1 and less than or equal to 64, its Length property is set to 64.
-
If its length is determined as more than 64, its Length property is set as per the discovered length.
-
-
Preview File: this button allows you to preview a the file selected currently at the File to be Imported property. It is available when at least one column has been defined and no outstanding changes are present in the current data import. At invocation, a warning is displayed if the number of columns in the selected file does not match the data import's column definition.
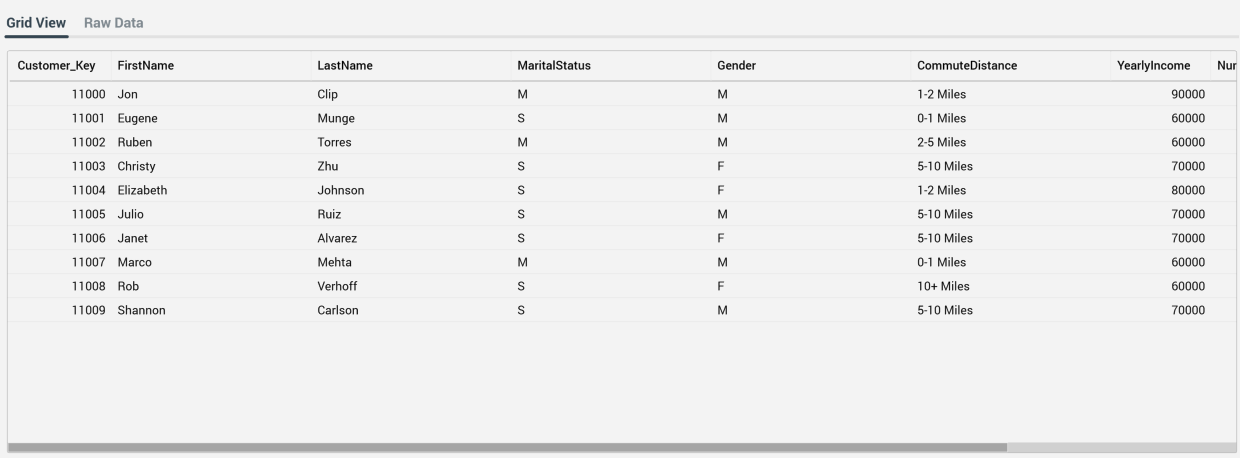
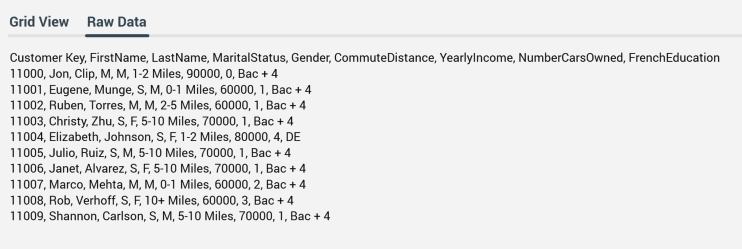
Data is previewed in the "File Preview - [Filename]" dialog. The first [n] rows are shown (where [n] is defined by system configuration setting DataImportPreviewRowsMax). Two read-only tabs are shown in the dialog:-
Grid View
-
Data is shown in red if in an error state due to a mismatched data type or string field length, with a tooltip describing the specific error on hover.
-
-
Raw Data
-
-
Load Data: this button allows you to load data from the file selected at the File to be Imported property. It is available when a valid data import contains no unsaved changes. At invocation, a Load Data job is created and displayed in the My Jobs dialog. The job is responsible for loading the data in the selected file into the data warehouse table specified in the data import. For more information please see the My Jobs documentation. A data import table’s schema is set as follows:
-
If the tenant’s data import schema property is set, the table is created within the same.
-
If the data import schema is not configured, the table is created within the tenant’s write schema.
-
If the write schema is not configured, the table is created within the tenant’s default schema.
-
If the data import’s specified table already exists, if the Overwrite existing table property is unchecked, the job fails. If it is checked, the existing table is dropped and recreated.
If an Attribute Folder has been provided and one or more columns have Create Attribute checked, an RPI database column attribute is created and saved in the specified folder for each checked column. An attribute's name as per its data import column, and its database column property references the corresponding column in the data import table.
When Create resolution level is checked, a new resolution level is created, facilitating the execution of selection rules against the data import table. The new resolution level's name is as per the data import's name, and its database table property is set to the data import table itself. If a database key already exists that matches the data import table's key, the resolution level uses the existing key; otherwise a new database key is also created.
When one or more joins are specified at data import columns, simple joins are created accordingly.
Configuring a Data Import’s name
A data import’s name is configured in the large property shown at the top of the Data Import Designer, below the toolbar. Provision of a name is mandatory, and the value provided may be a maximum of 100 characters. The data import’s name is the same as the filename under which it is saved within the RPI file system. As such, it must be unique amongst the data imports in the folder within which saved.
You can edit a data import’s name by selecting the property. Complete the edit by selecting off the property, or by hitting return.
Data Import validation
Before a data import can be used, it must be valid.
A validation status indicator is displayed to the right of the data import’s name and will display values of “Valid” or “Not Valid”. Specific validation errors are outlined in the data import documentation.
Selecting the indicator lists the validation errors in a dialog. You can use the button at the bottom left of the dialog to copy the validation error details to the clipboard. You can close the dialog using the OK button.
Tab set
The Data Import Designer contains two tabs, Options and Columns.
Options tab
The Data Import Designer’s Options tab contains a series of properties that define its behavior.
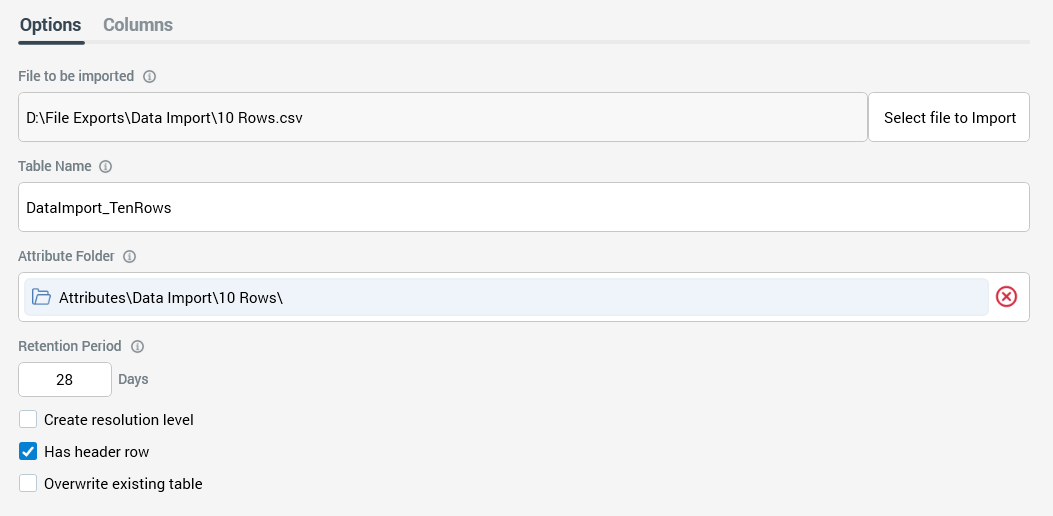
The following properties can be configured:
-
File to be imported: this read-only property is initially blank. A button accompanying the property allows you to select a file containing data to be imported by the RPI data import. On selecting a .csv to .txt file using a Windows file system dialog, the selected file's local path is displayed at the property.
The selected file is not saved as part of the data import; when you open an existing data import the property will be blank and a new File to be imported must be chosen.
-
Table Name: this mandatory property is used to specify the name of the data warehouse table into which data will be loaded. Only a maximum of 50 database-valid characters are allowed.
-
Attribute Folder: this optional property is used when RPI attributes are to be created on data being loaded. It allows you to choose a folder in which the attributes will be saved from the RPI file system. Having chosen a folder, you can clear your selection.
-
Retention period (Days): this property represents the time (in days) for which the data warehouse table into which data will be loaded will be retained before being dropped by RPI housekeeping. The property defaults to 28, and accepts a minimum value of 1 and a maximum value of 9,999.
-
Create resolution level: this checkbox, which is unchecked by default, allows you to specify whether to create an RPI resolution level based on the loaded table. A validation error is raised if the data import's Create resolution level is checked and no key has been defined.
-
Has header row: this checkbox, which is checked by default, allows you to specify whether the file to be loaded contains a header row.
-
Overwrite existing table: this checkbox is unchecked by default. At data load, if the specified table already exists, if the checkbox is unchecked, the job fails. If it is checked, the existing table is dropped and recreated.
Columns tab
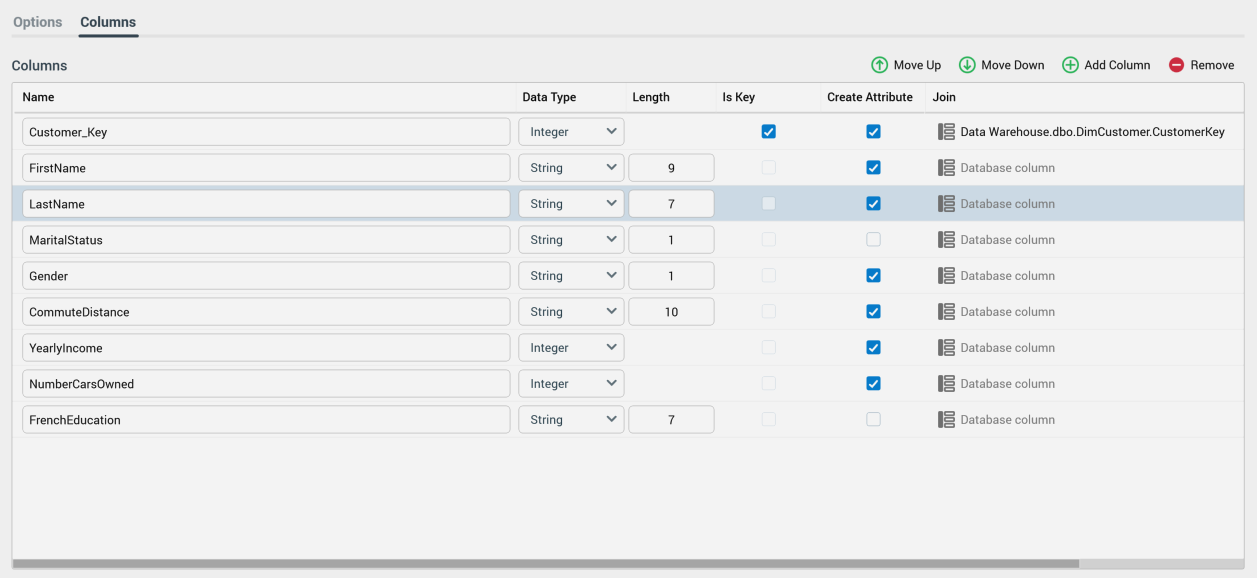
The Columns tab contains a grid that is used to define the columns within the table created during data import execution.
Columns toolbar
A toolbar is displayed above the Columns grid:

The toolbar exposes the following options:
-
Move Up: this option is only available when a column other than the first in the grid is selected. Invocation moves the column up one position.
-
Move Down: this option is only available when a column other than the last in the grid is selected. Invocation moves the column down one position.
-
Add Column: selecting this button adds a new column to the bottom of the grid. Note that the maximum number of columns allowed at a data import is controlled by system configuration setting
DataImportColumnsMax; when the maximum limit is reached, and informational message is displayed and you will be unable to add additional columns. -
Remove: invocation of this option removes the selected column(s) from the grid. An “Are You Sure?” dialog is not displayed.
Columns grid
When empty, a message is displayed in the columns grid:

Provision of one or more columns at a data import is mandatory. Any existing columns are displayed within the grid.
You can drag and drop existing columns up and down within the grid.
You can view the following columns within the columns grid:
-
Name: this mandatory property allows you specify the name of the column. Only a maximum of 50 database-valid characters are allowed.
-
Data type: this dropdown field allows you to specify the column's data type as one of DateTime, Decimal, Integer and String (the default).
-
Length: this integer property is only shown for string columns. It defaults to 50 (the maximum permissible value), and must be at least 1.
-
Is Key: this checkbox, which is unchecked by default, specifies whether the column will serve as the table's key. Only one column can be defined as a key.
-
Create Attribute: this checkbox, which is checked by default, specifies whether an RPI database column attribute will be created to represent the column when data is loaded. If checked, the new attribute will be written to the RPI file system folder defined by the data import's Attribute Folder property (a validation error is raised if a folder has not been selected).
A context menu, exposing Select All and Unselect All options, is available on right-clicking the column’s header.
-
Join: this property allows you to optionally select a column from a data warehouse table. If populated, on data load, an RPI simple join will be created between the selected column's parent table and the current data import column. Having chosen a column, you can clear your selection.
Closing the Data Import Designer
You can close the Data Import Designer by closing the tab within which it is displayed, or by shutting down RPI itself. If you do so when a data import to which changes has been made is shown in the Data Import Designer, a dialog is displayed, within which you can:
-
Save the changes and proceed with closing the Data Import Designer.
-
Abandon the changes and proceed with closing the Data Import Designer.
-
Cancel closing the Data Import Designer or RPI.

