

Overview
This page provides information about how to set up the connection to SendGrid. The steps below will show you how to configure a SendGrid channel within the RPI UI. Once these steps have been followed, you will then be able to process records out of RPI through to SendGrid and also receive the disposition data back from SendGrid.
These directions will work within RPI v6.x as well as v7.x.
Connector limitations and considerations
Options for SendGrid within Redpoint CDP implementation:
-
Bring your own SendGrid Account: You bring your own SendGrid account to Redpoint Global (RPG), and we provide callback service location for you to update in SendGrid UI.
(This is the recommended option.) There is no services work needed, so you can continue with the steps below both within the SendGrid UI and RPI.
-
Redpoint Created - Client Managed: RPG creates a subuser account for you and provides the log in and password to allow you to finish setup in SendGrid UI. Contact services for this option; they will complete the necessary steps within SendGrid UI.
-
Redpoint Managed: RPG does all of the SendGrid setup within the UI for you. This gives you no access into the SendGrid platform. Contact services for this option; they will complete any steps within SendGrid UI.
Things to consider:
-
Callback server location
-
Redpoint hosted
-
Client hosted
-
-
Suppression Tables
-
Best way of using them in RPI
-
Clients with Multiple Brands: how to set up brand-specific suppression tables
-
Suppressions controlled by sub account
-
Prerequisites
Redpoint CDP
-
Basic knowledge of SendGrid
-
Configured SendGrid API Key
-
Understanding of RPI interface
Redpoint Interaction and Redpoint Data Management (Client Hosted)
-
Basic knowledge of SendGrid
-
Configured SendGrid API Key
-
Understanding of RPI interface
-
SendGrid Callback Service Configured: RPI Admin guide
-
S3 Buckets: External content provider: Amazon AWS S3
-
EventHub: Queue provider: Azure Event Hubs
-
Configured SendGrid account: SendGrid UI configuration
Once all the required prerequisites have been fulfilled, follow the steps below.
Obtain the SendGrid API key
To establish the connection to the SendGrid application you must have an API key.
The RPI interface can use API (Application Programming Interface) keys to authenticate access to SendGrid services. We suggest that you use API keys for connecting to all of SendGrid’s services. They are the preferred alternative to using a username and password because an API key can be revoked at any time without having to change your username and password.
SendGrid API keys include the following:
-
Full Access: allows the API key to access
GET,PATCH,PUT,DELETE, andPOSTendpoints for all parts of your account, excluding billing and Email Address Validation. (REQUIRED FOR RPI).
Within SendGrid:
-
Navigate to Settings for the given subuser on the left navigation bar.
-
Select API Keys.
-
Create New API Key.
-
Copy your API key somewhere safe. For security reasons, do not put it directly in your code, or commit it somewhere public like GitHub.
Configure SendGrid Channel in RPI
The steps in this section need to be completed within the RPI UI to create a new SendGrid email channel.
-
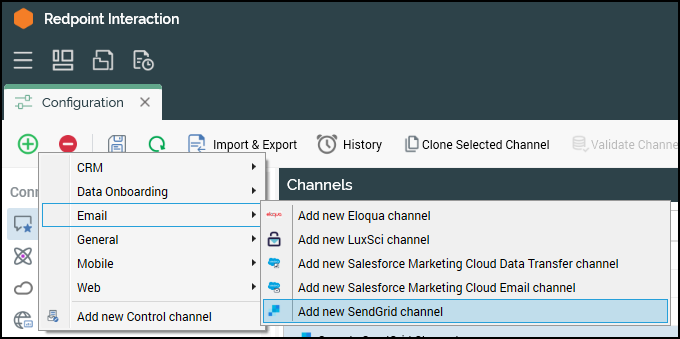
Navigate to Configuration>Channels.
-
Create new channel for SendGrid. Select the green plus button
.
-
Navigate to Email>Add New SendGrid Channel.
-
Name the Channel appropriately for your client and/or resolution level.

-
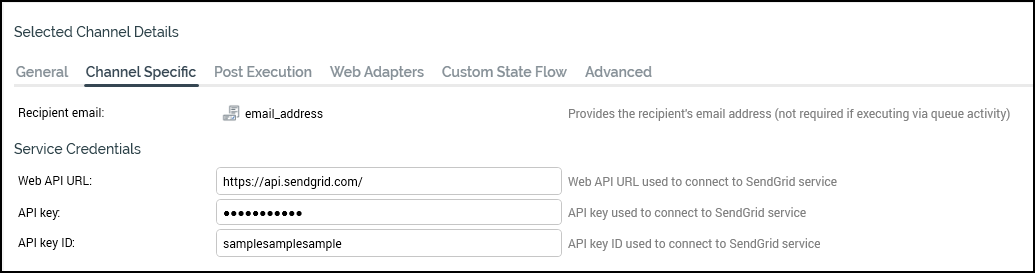
On the Channel Specific tab for the new channel, update the following settings:
-
Recipient email: resolution email address field.
-
API key: API key generated from SendGrid UI.
-
API key ID: API key ID generated from SendGrid UI.
-
Callback service URL: callback service web app location.
-

-
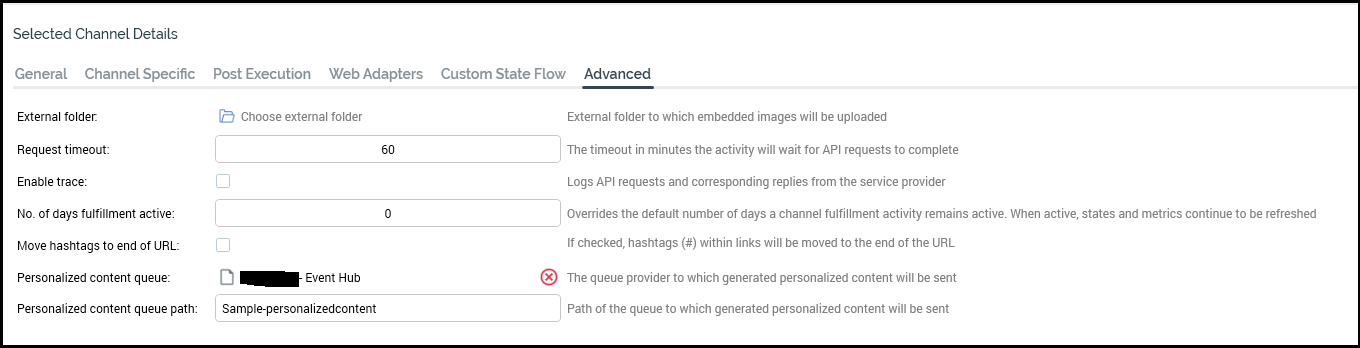
On the Advanced tab for the new channel, update the following settings:
-
Personalized content queue
-
Personalized content queue path
-
RabbitMQ is the only supported queue provider for personalized content queues.
For information about how to use SendGrid within an RPI Interaction, see Using SendGrid in RPI.