

Overview
The RDBMS Output tool is used to insert, update, and delete data in RDBMS tables, as well as any "file" data sources for which a provider or driver is available. With the RDBMS Output tool, you can:
-
Create a new table.
-
Insert new records into a table.
-
Update existing records.
-
Delete existing records.
RDBMS Output tool configuration parameters
The RDBMS Output tool has five sets of configuration parameters in addition to the standard execution options: Source, Output, Options, Create, and Pre/Post.
Source
The Source tab defines the connection to the RDBMS data destination.
|
Option |
Description |
|---|---|
|
Use data connection |
If selected, gets the connection parameters from the specified data connection in the Repository. |
|
Database |
Select a database provider to configure appropriate connection options and set up a fill-in-the-blank grid for defining necessary parameters. |
Output
The Output tab defines the record output parameters.
|
Parameter |
Description |
|---|---|
|
Table |
The name of the table to be loaded. |
|
Schema |
If defined, the output schema to use. |
|
Open table |
Specifies whether to open the table When the project is started, When the first record is read, or After the last record is read. |
|
Run scripts when no records are present |
If selected, runs scripts even if no records are present. |
|
Insert |
If selected, adds new records. |
|
Update |
If selected, changes columns in existing records. |
|
Delete |
If selected, removes existing records. |
|
Condition |
You must specify a Condition expression for each Insert, Update, and Delete operation you select. These expressions must be mutually exclusive—you can insert, update, or delete any record, but never more than one operation at a time. |
|
Use temp table |
Specifies how a temporary table should be used with Update or Delete processing. This is optional and defaults to Batch only. |
|
Table name |
If Use temp table is Always or Batch only, specify a temporary table. If the table doesn't already exist, or exists but is of the wrong schema, select Create table to create the temporary table. Each operation must have a unique temporary table; they cannot be shared. |
|
Drop after use |
If selected, the temp table is dropped when Update or Delete processing is finished, otherwise it will be truncated and re-used on the next run. |
|
Use chunking |
If selected, enables Update or Delete temp table updates to occur in chunks, which reduces the time that the target table is locked. |
|
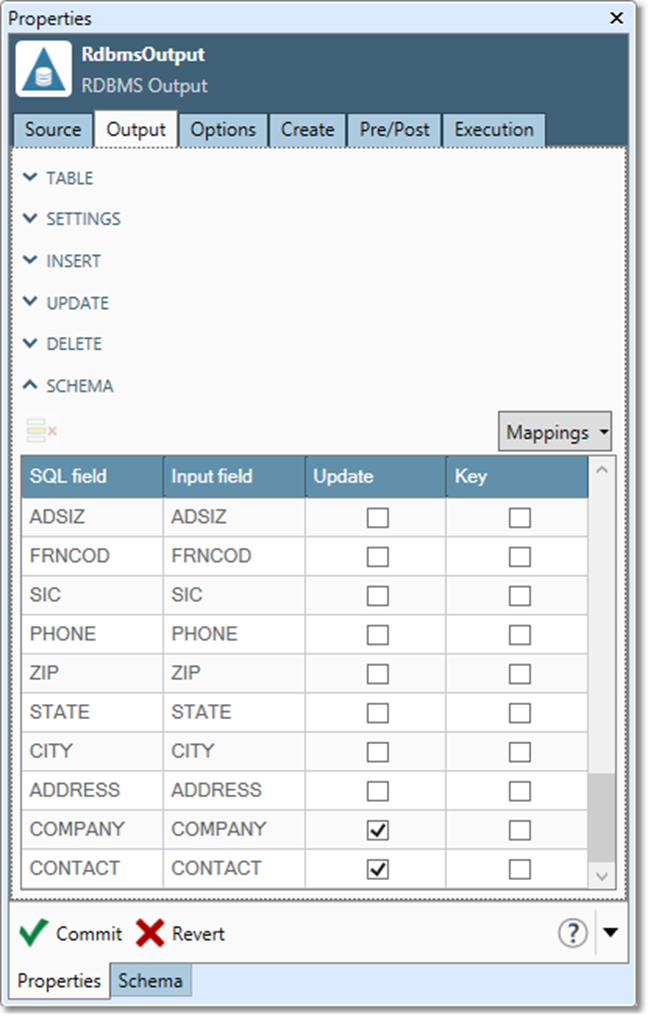
Mapping |
For each SQL field, select the corresponding Input field grid cell and select the field to which output should be mapped. This determines which upstream fields will be written to which database columns. Select Key for all key columns being updated or deleted, and Update for all columns being updated. |
Options
The Options tab controls behavior details of the database operations. See Configuring options.
Create
The Create tab optionally specifies how missing tables are handled.
|
Option |
Description |
|---|---|
|
Do not attempt to create missing tables |
If the target output table does not exist, the tool will not run. This is the default option. |
|
Automatically create missing tables |
If the target output table does not exist, creates it using the input records as the table schema, choosing the nearest data types supported by the RDBMS and creating the table with all columns nullable, no default values, and no indexes. |
|
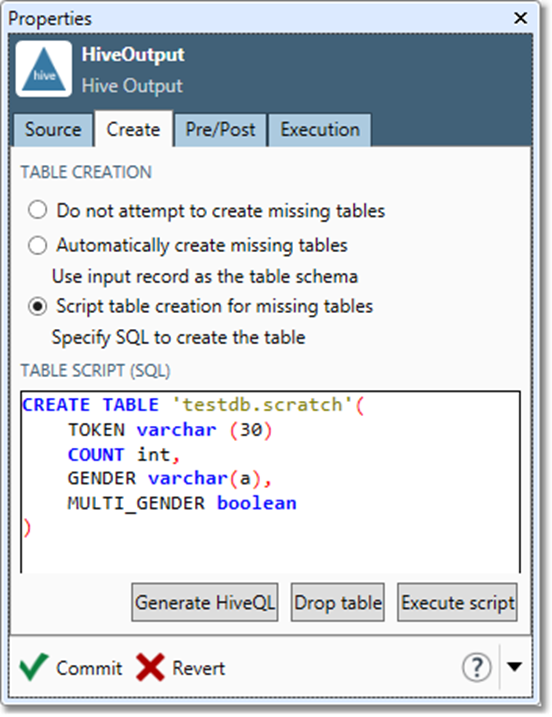
Script table creation for missing tables |
If the target output table does not exists, creates it using the specified Table create script. |
|
Table create script |
If Script table creation for missing tables is selected, SQL script used to create missing table. |
|
Create database if needed |
If selected, creates a database when you configure a Microsoft Access or Excel database connection but the database file does not yet exist. |
Pre/Post
Preload and postload scripting is deprecated. Instead, use the RDBMS In-Database Processor tool, the Gateway tool, and trigger input/output to execute SQL statements before and after output to a table.
Redshift
The Redshift tab is only available if you specify a Redshift data connection or select AWS Redshift Bulk Load as your database provider on the Source tab. See Redshift Bulk Load.
Configure the RDBMS Output tool
-
Select the RDBMS Output tool.
-
Go to the Source tab.
-
Configure a database connection, or select Use data connection and then select a data source from the list.
-
If the target database and table already exist, go to step 4.
-
Databases other than Microsoft Access and Excel files must be created outside Data Management using your RDBMS administration tools.
-
If you have configured a Microsoft Access or Excel database connection but the database file does not yet exist, select the Create tab, select Create database, and then proceed to step 5 (you do not have to create the database now, but if you don't you will not be able to view a list of output available columns).
-
If the selected output table does not yet exist, select the Create tab and then select Create Table (you do not have to create the table now, but if you don't you will not be able to view a list of output available columns).
-
-
Select the Output tab, and then enter or select a Table, and optionally an output Schema. You may need to select Refresh tables to see available tables and schemas, or select Filter tables to choose which types of RDBMS objects are displayed on the Table list.
-
Optionally, you can specify when to Open table.
|
Option |
Description |
|---|---|
|
When project is started |
Open table when the project is run. |
|
When the first record is read |
Open table when the first record is read. If you select this, you can optionally select Run scripts when no records are present. |
|
After the last record is read |
Output records are cached and not written to the table until the tool receives the final record. If you select this, you can optionally select Run scripts when no records are present. |
-
Define Insert, Update, and Delete operations. You can perform concurrent operations into the same table:
-
Insert: adds new records.
-
Update: changes columns in existing records.
-
Delete: removes existing records.
-
-
If you are performing some combination of insert, update, and delete operations in a single RDBMS output tool, you must specify a Condition expression for each operation. The Condition expressions must be mutually exclusive—you can insert, update, or delete any record, but never more than one operation at a time. A convenient way to organize these combined operations is to add an Action field to your input record, and assign a code to each record:
Ifor insert,Ufor update, orDfor delete. This makes each Condition expression simple:-
For insert: Action="I".
-
For update: Action="U".
-
For delete: Action="D".
-
-
If you are performing Update or Delete operations, specify how to Use temp tables: Never, Batch only, or Always. If you select Always or Batch only, you must specify a temporary table. If the table doesn't already exist, or exists but is of the wrong schema, select Create table to create the temporary table. Each operation must have a unique temporary table; they cannot be shared.
-
Use the Schema grid to map input record fields onto the columns of the RDBMS table.
-
For each SQL field, select the corresponding Input field grid cell and select the field to which output should be mapped. This determines which upstream fields will be written to which database columns.
-
If your input record and RDBMS table have a 1:1 name mapping, select Mapping and select Default.
-
If your input record and RDBMS table will have a 1:1 name mapping, but the RDBMS table doesn't yet exist, select Mapping and select All. This will force mapping of input fields.
-
If your input record and RDBMS table do not have a 1:1 name mapping, map each RDBMS column individually by selecting each Input field box and choosing the correct field from the drop-down list. You may find it convenient to start with the Default mapping and edit as necessary.
-
Select Key for all key columns being updated or deleted. Select Update for all columns being updated.
-
Select Clear to remove all mappings, or Reload to refresh the grid.
-
Optionally, select the Options tab and configure database options.
-
If the desired output table may not exist when the project is run, select the Create tab and specify how to handle missing tables:
-
Automatically create missing tables lets the tool run even if the table doesn't exist by creating it as needed. Data Management creates the output table using the input records as the table schema, choosing the nearest data types supported by the RDBMS and creating the table with all columns nullable, no default values, and no indexes. Select Create table to create the table immediately (see step 4). Select Drop table to delete the table being configured.
-
If you need more precise control over the new table, select Script table creation for missing tables and enter an SQL script that will create the table. Select Generate SQL to generate a default script using Data Management's Script Generator.
-
-
Select which columns to Create, which are Nullable, and which must be Unique, and then select Generate script. You can edit the generated SQL to suit your needs. Select OK to transfer the script to the Create tab of the RDBMS Output tool. Select Execute script to create the table immediately. Select Drop table to delete the table.
-
If you have configured a Microsoft Access or Excel database connection but the database file does not yet exist, and you did not create a database in step 3, select Create database if needed.
Do not select the Pre/Post tab and specify preload and postload scripts. Preload and postload scripting is deprecated. Instead, you may optionally use the RDBMS In-Database Processor tool, the Gateway tool, and trigger input/output to execute SQL statements before and after output to a table.
-
Optionally, go to the Execution tab and Enable trigger output, configure reporting options, or set Web service options.
Insert records
Conditional record insertion lets you control which records are inserted in an RDBMS load process with combined Insert, Update, and Delete operations. You select records by defining an expression that evaluates to True or False.
To insert records:
-
Select Insert on the Output tab of the RDBMS Output tool's Properties pane.
-
To insert all input records, leave Condition empty. To combine Insert with Update and/or Delete, specify a Condition in the Insert options section. This must be an expression that always evaluates to a value of True or False.
Only those records for which the expression evaluates to True will be inserted. For example if the upstream records contained an ACTION field that is set to I for insertions, you would define the expression as ACTION="I".
Special considerations for block inserts
Some databases can deadlock if you combine bulk insert and single-record update or delete. If the RDBMS Output tool (or referenced Data Connection) specifies an Insert type of Block Insert or irowsetfastload on the Options tab, you must use a temp table for any update and delete, and you must not "chunk" the update or delete. If you cannot use these options, do this:
-
Configure separate RDBMS Output tools for the insert, update, and delete operations.
-
Chain these tools together, and enable trigger output on RDBMS Output tools #1 and #2.
-
Insert Gateway tools (configured to trigger on End of Records) between RDBMS Output tools #1 and #2, and between #2 and #3.
Handling of out-of-range integer values
SQL Server and related databases may behave erratically if you attempt to insert an out-of-range integer value into a column. If the Treat errors as warnings option is selected on the Execution tab of the RDBMS Output tool, attempts to insert an out-of-range integer value will generate a recoverable error, and Data Management will truncate the value consistent with the range of the target data type.
|
Target data type |
Range |
|---|---|
|
|
|
|
|
|
|
|
|
If the Treat errors as warnings option is not selected, attempts to insert an out-of-range integer value will generate a fatal error, and Data Management will abort the project run.
Update records
Record update lets you control which records are updated in an RDBMS load process with combined Insert, Update, and Delete operations. You select records for updating by specifying "key fields" of the input records. For each input record, all records in the database table whose keys match the keys of the input record are found, and the selected "value" columns are updated with corresponding values from the input record. Each input record can cause the update of zero, one, or many database records.
To update records:
-
Select Update on the Output tab of the RDBMS Output tool's Properties pane.
-
To update all input records, leave Condition empty. To combine Update with Insert and/or Delete, specify a Condition in the Update options section. This must be an expression that always evaluates to a value of
TrueorFalse. Only those records for which the expression evaluates toTruewill be updated. For example, if the upstream records contained anACTIONfield that was set toUfor updates, use the expressionACTION="U". -
In the Use temp table box, select how you want to use temporary tables to assist the key query.
-
Batch Only
-
Never
-
Always
When temporary tables are used, the keys and update values are written to a temporary table in the database. A special query retrieves records using a join against the temporary table. When temporary keys are not used, individualUPDATEstatements are issued for each input record. Using temporary tables lets you process a larger number of keys. Usually you will want to accept the default Batch Only setting, in which temporary tables are used during batch execution but not in real-time services.
-
-
If you select Always or Batch Only in step 3, type a name for the temporary table in the Table name box. If the table doesn't already exist, or exists but is of the wrong schema, select Create Now to create the temporary table. Select Drop now to delete the temporary table.
-
Optionally, select Drop after use to delete temp tables when they are no longer in use.
-
Optionally, select Use chunking and specify a chunk size. This will cause Data Management to issue an Update every
Nrecords, instead issuing a single large Update at the end. -
In the Columns grid, select the Key box for each field that is a key, and select the Update box for each field that you want to update.
Keys are unique IDs in the target table. Ask your RDBMS administrator for this information if you don't know it.
For each input record, the RDBMS table will find every RDBMS record with keys equal to those of the input record, and change all of the Update columns to match those of the input record.
Delete records
Record delete lets you control which records are deleted in an RDBMS load process with combined Insert, Update, and Delete operations. You select records for deletion by specifying "key fields" of the input records. For each input record, all records in the database table whose keys match the keys of the input record are found and deleted. Each input record can cause the deletion of zero, one, or many database records.
To delete records:
-
Select Delete on the Output tab of the RDBMS Output tool's Properties pane.
-
To delete all input records, leave Condition empty. To combine Delete with Insert and/or Update, specify a Condition in the Update options section. This must be an expression that always evaluates to a value of
TrueorFalse. Only those records for which the expression evaluates toTruewill be deleted. For example if the upstream records contained anACTIONfield that was set toDfor deleted, use the expressionACTION="D". -
In the Use temp table box, select how you want to use temporary tables to assist the key query.
-
Batch Only
-
Never
-
Always
When temporary tables are used, the keys and update values are written to a temporary table in the database. A special query retrieves records using a join against the temporary table. When temporary keys are not used, individualDELETEstatements are issued for each input record. Using temporary tables lets you process a larger number of keys. Usually you will want to accept the default Batch Only setting, in which temporary tables are used during batch execution but not in real-time services.
-
-
If you select Always or Batch Only in step 3, type a name for the temporary table in the Temp table name box. If the table doesn't already exist, or exists but is of the wrong schema, select Create Now to create the temporary table. Select Drop now to delete the temporary table.
-
Optionally, select Drop after use to delete temp tables when they are no longer in use.
-
Optionally, select Use chunking and specify a chunk size. This will cause Data Management to issue a Delete every N records, instead issuing a single large Delete at the end.
-
In the Columns grid, select the Key box for each field that is a key. Keys are unique IDs in the target table. Ask your RDBMS administrator for this information if you don't know it.
For each input record, the RDBMS table will delete every RDBMS record with keys equal to those of the input record.
Some databases can deadlock if you combine bulk insert and single-record update or delete. If the RDBMS Output tool (or referenced Data Connection) specifies an Insert type of Block Insert or irowsetfastload on the Options tab, you must use a temp table for any update and delete, and you must not "chunk" the update or delete.
If you cannot use these options, do this:
-
Configure separate RDBMS Output tools for the insert, update, and delete operations.
-
Chain these tools together, and enable trigger output on RDBMS Output tools #1 and #2.
-
Insert Gateway tools (configured to trigger on End of Records) between RDBMS Output tools #1 and #2, and between #2 and #3.
Preload and postload scripts
In previous versions of Data Management, the Pre/Post tab of the RDBMS Output tool was used to specify SQL scripts to be executed before and after Insert/Update/Delete operations. This feature is now deprecated. Instead, use the RDBMS In-Database Processor tool, the Gateway tool, and trigger input/output to execute SQL statements before and after output to a table.
Azure Bulk Load
The bulk load options in this section apply to the Legacy Azure database providers. For details about bulk load options for the next-generation Azure database providers, refer to the RDBMS providers: Azure section on Using bulk load and bulk query.
If you specify Azure Bulk Load on the RDBMS Output tool's Source tab, an Azure tab will be displayed where you can define Azure settings or override those configured in the data connection. Select Override to edit these settings.
|
Setting |
Description |
|---|---|
|
Account
|
Azure access key pair. Access key pairs consist of an Azure Storage Account name (for example, |
|
Enable compression |
If selected, data will be compressed via GZip compression before it is copied to the destination. This can reduce the volume of data being transferred. |
|
Field delimiter |
If specified, the ASCII character or characters used to separate fields in the input records, such as a pipe character ( |
|
Concurrent uploads |
Number of concurrent bulk data uploads to your storage account. Default is 1. |
|
Single blob threshold |
Threshold size for writing a single blob. Range is 1 MB to 64 MB, with 32 MB default. |
|
Stream write size |
Number of bytes to buffer when writing to a blob output stream. Range is 16 KB to 100 MB, with 16 KB default. |
|
Number of upload files |
If greater than the default of 1, the number of files to split the input records into before (optional) compression and upload. |
|
Distribution strategy |
Select the distribution strategy: Round Robin (the default) or Hash. Start with Round Robin, but aspire to a hash distribution strategy to take advantage of a massively parallel architecture.
|
|
Partition range
|
If Partition range is Left or Right, select a Partition column and enter Partition values to define partitioned tables for faster parallel bulk importing of data. See Microsoft's Azure documentation for details. |
|
Do not cleanup |
If selected, do not destroy/drop temporary Azure resources. |
Redshift Bulk Load
If you specify AWS Redshift Bulk Load on the RDBMS Output tool's Source tab, a Redshift tab will be displayed where you can define AWS Redshift settings or override those configured in the data connection. Select Override to edit these settings.
|
Setting |
Description |
|---|---|
|
AWS access key
|
Amazon Web Services (AWS) access key pair. Access key pairs consist of an Access key ID (for example, |
|
Enable S3 acceleration |
Optionally enable use of optimized network protocols and the AWS edge infrastructure to accelerate Amazon S3 data transfers. |
|
S3 bucket |
Name of the AWS S3 bucket to be used to stage data files. |
|
S3 region |
Region of the specified S3 bucket. While the bucket needn't be in the same region as your Redshift cluster, it will be cheaper and faster if they reside in the same region. |
|
Enable compression |
If selected, compresses data with GZIP before uploading it to S3. |
|
Explicit IDs |
If selected, override the auto-generated ID with explicit values from input records in target tables that include an identity column. |
|
Trim whitespace |
If selected, removes leading and trailing blanks. |
|
Do not load data |
If selected, performs a "dry run" without actually loading data. |
|
Field delimiter |
If specified, the single ASCII character that is used to separate fields in the input records, such as a pipe character ( |
|
Max errors |
Specifies the number of errors |
|
Stat update |
If selected, forces statistics to be updated regardless of whether the table is initially empty. |
|
Other options |
Specifies additional options that should be injected into the COPY command. |
Snowflake Bulk Load
The bulk load options in this section apply to the Legacy Snowflake database providers.
If you specify Snowflake Bulk Load on the RDBMS Output tool's Source tab, a Snowflake tab will be displayed where you can define Snowflake settings or override those configured in the data connection. Select Override to edit these settings.
Data Management’s Snowflake Bulk data provider interprets the literal string “NULL” or “null” as a logical NULL. When it encounters a record field whose value is a literal “NULL” or “null”, it will insert a logical NULL into the corresponding table column. This behavior stems from limitations in the bulk loader’s file format. Redpoint may explore addressing this in a future version of Data Management. Customers whose business logic depends on inserting a literal “NULL” or “null” are advised to use the non-bulk Snowflake data provider and set Insert type to Single record or Block.
|
Setting |
Description |
|---|---|
|
Upload file size |
Threshold size for writing a single file. Range is 1 MB to 1000 MB, with 32 MB default. |
|
Upload parallelism |
If selected the Snowflake Bulk Loader will use multiple concurrent threads to upload small files (<16 MB) concurrently, or to break up larger files into chunks and upload the chunks concurrently to the staging area. If cleared, the Snowflake Bulk Loader will use a single thread to upload each file to the staging area. |
|
Debug verbosity |
Level of detail output by error processes. |
|
Do not cleanup |
If selected, do not destroy/drop temporary Azure resources. |