

Overview
The XML Input tool reads XML-formatted data, and outputs records from a file or field to the downstream tools. You can configure the number of fields, as well as the size and type of each field. To automate field definition, you can also import a layout file specifying field names, field descriptions, and (optionally) field sizes.
The XML Input tool supports three different types of XML data file: Simple Tags, Simple Attributes, and SOAP. All of these formats are simple formats, in that they can only represent a flat array of record data, with no nesting structure. For more complex XML structures, see XML2 Input.
Because XML Input and XML Output tools are complementary, it is useful to experiment with XML Output and observe the formats it produces. You can then use that information to configure the XML Input tool to produce a matching input file format.
Simple XML formats
Simple tags
Simple tag XML defines a simple array data structure using element nesting. The first element to follow the XML declaration (typically of the form <?xml version='1.0' encoding='utf-8'?>) is the root element. This encloses a series of row elements, each of which defines a record. Within each row element, fieldname elements enclose field values. For example the record data in the table below corresponds to the following XML file.
|
FIRMNAME |
CONTACT |
|---|---|
|
Unicorp |
John Smith |
|
... |
... |
<ROOT>
   <ROW>
      <FIRMNAME>Redpoint Global Inc.</FIRMNAME>
      <CONTACT>John Smith</CONTACT>
   </ROW>
  ...
</ROOT>
Simple attributes
Simple attribute XML defines a simple array data structure using elements for each row, but attributes for the field values. For example this record data.
|
FIRMNAME |
CONTACT |
|---|---|
|
Unicorp |
John Smith |
|
... |
... |
<ROWS>
   <ROW FIRMNAME="Redpoint Global Inc." CONTACT="John Smith"/>
   ...
</ROWS>
SOAP format
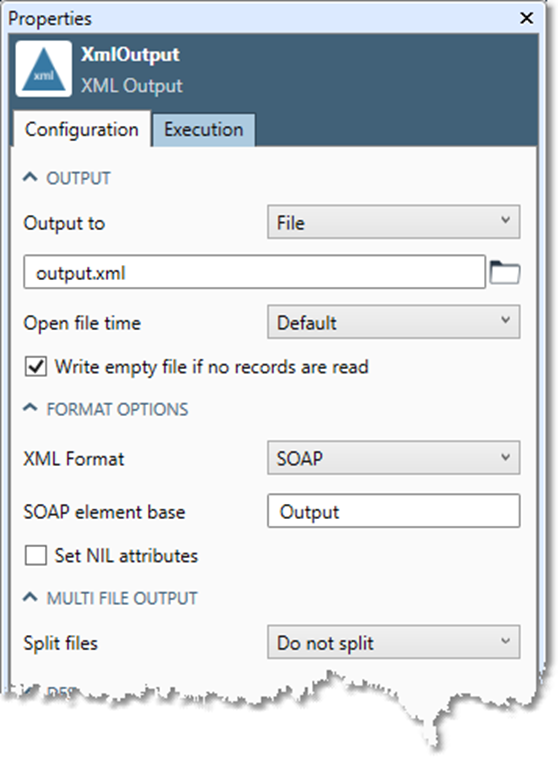
SOAP is an XML protocol designed for exchanging structured information in a decentralized, distributed environment. Normally you would specify SOAP in an XML Input or XML Output tool when you are creating a project that will be published as a web service. If you configure an XML Output tool as in the image below, with the input data from the following table, the output XML is shown after the table.
|
COMPANY |
CONTACT |
|---|---|
|
Unicorp |
John Smith |
|
Megabank |
Joan Riley |
<?xml version="1.0" encoding="UTF-8" standalone="no"?>
<SOAP-ENV:Envelope xmlns:SOAP-ENV="http://schemas.xmlsoap.org/soap/envelope/"
                    xmlns:SOAP-ENC="http://schemas.xmlsoap.org/soap/encoding/"
                    xmlns:soap="http://schemas.xmlsoap.org/wsdl/soap/"
                    xmlns:tns="http://www.Data Management.com/dles_soap"
                    xmlns:xsd="http://www.w3.org/2001/XMLSchema"
                    xmlns:xsi="http://www.w3.org/2001/XMLSchema-instance">
    <SOAP-ENV:Body>
        <OutputArray xmlns="http://www.Data Management.com/dles_soap">
            <OutputRecord>
                <COMPANY>Unicorp</COMPANY>
                <CONTACT>John Smith</CONTACT>
            </OutputRecord>
            <OutputRecord>
                <COMPANY>Megabank</COMPANY>
                <CONTACT>Joan Riley</CONTACT>
            </OutputRecord>
        </OutputArray>
    </SOAP-ENV:Body>
</SOAP-ENV:Envelope>
When SOAP format is specified in the XML Input and XML Output tools, these tools read or write simple SOAP documents in which every record is contained in an element whose tag consists of the SOAP element base followed by a record element (the <OutputRecord> element in the above example). Within the record elements, each column is surrounded by a tag derived from the column name (<COMPANY> and <CONTACT> in the example).
Suppose that we construct a simple project using XML Input and XML Output tools to read and write records with COMPANY and CONTACT columns. If you queried that WSDL, you would see this.
<?xml version="1.0" encoding="UTF-8" standalone="no"?>
<wsdl:definitions xmlns:wsdl="http://schemas.xmlsoap.org/wsdl/"
                  targetNamespace="http://www.Data Management.com/dles_soap"
                  xmlns:SOAP-ENC="http://schemas.xmlsoap.org/soap/encoding/"
                  xmlns:SOAP-ENV="http://schemas.xmlsoap.org/soap/envelope/"
                  xmlns:soap="http://schemas.xmlsoap.org/wsdl/soap/"
                  xmlns:tns="http://www.Data Management.com/dles_soap"
                  xmlns:xsd="http://www.w3.org/2001/XMLSchema"
                  xmlns:xsi="http://www.w3.org/2001/XMLSchema-instance">
    <wsdl:types>
        <xsd:schema attributeFormDefault="unqualified" elementFormDefault="qualified" targetNamespace="http://www.Data Management.com/dles_soap">
            <xsd:complexType name="InputRecord">
                <xsd:sequence>
                    <xsd:element maxOccurs="1" minOccurs="0" name="COMPANY" nillable="true" type="xsd:string"/>
                    <xsd:element maxOccurs="1" minOccurs="0" name="CONTACT" nillable="true" type="xsd:string"/>
                </xsd:sequence>
            </xsd:complexType>
            <xsd:element name="InputRecord" nillable="true" type="tns:InputRecord"/>
            <xsd:complexType name="InputArray">
                <xsd:sequence>
                    <xsd:element maxOccurs="unbounded" minOccurs="0" name="InputRecord" nillable="true" type="tns:InputRecord"/>
                </xsd:sequence>
            </xsd:complexType>
            <xsd:element name="InputArray" nillable="true" type="tns:InputArray"/>
            <xsd:complexType name="OutputRecord">
                <xsd:sequence>
                    <xsd:element maxOccurs="1" minOccurs="0" name="COMPANY" nillable="true" type="xsd:string"/>
                    <xsd:element maxOccurs="1" minOccurs="0" name="CONTACT" nillable="true" type="xsd:string"/>
                </xsd:sequence>
            </xsd:complexType>
            <xsd:element name="OutputRecord" nillable="true" type="tns:OutputRecord"/>
            <xsd:complexType name="OutputArray">
                <xsd:sequence>
                    <xsd:element maxOccurs="unbounded" minOccurs="0" name="OutputRecord" nillable="true" type="tns:OutputRecord"/>
                </xsd:sequence>
            </xsd:complexType>
            <xsd:element name="OutputArray" nillable="true" type="tns:OutputArray"/>
        </xsd:schema>
    </wsdl:types>
    <wsdl:message name="Request">
        <wsdl:part element="tns:InputArray" name="parameters"/>
    </wsdl:message>
    <wsdl:message name="Response">
        <wsdl:part element="tns:OutputArray" name="parameters"/>
    </wsdl:message>
    <wsdl:portType name="dlesPortType">
        <wsdl:operation name="webservice">
            <wsdl:input message="tns:Request"/>
            <wsdl:output message="tns:Response"/>
        </wsdl:operation>
    </wsdl:portType>
    <wsdl:binding name="dlesSoapHttpBinding" type="tns:dlesPortType">
        <soap:binding style="document" transport="http://schemas.xmlsoap.org/soap/http"/>
        <wsdl:operation name="webservice">
            <soap:operation soapAction="http://www.Data Management.com/dles_soap/webservice" style="document"/>
            <wsdl:input>
                <soap:body use="literal"/>
            </wsdl:input>
            <wsdl:output>
                <soap:body use="literal"/>
            </wsdl:output>
        </wsdl:operation>
    </wsdl:binding>
    <wsdl:service name="dles">
        <wsdl:port binding="tns:dlesSoapHttpBinding" name="dles">
            <soap:address location="http://rpb-desk-3:12345/"/>
        </wsdl:port>
    </wsdl:service>
</wsdl:definitions>
The XML Input and XML Output tools cannot read and write an arbitrary SOAP document. They perform formatting; if you use them in a published web service, Data Management generates the corresponding WSDL. If you have existing SOAP documents and want to read or write that format, use the XML Input2 and XML Output2 tools and analyze a sample of the document.
XML Input tool configuration parameters
The XML Input tool has two sets of configuration parameters in addition to the standard execution options.
Configuration
|
Parameter |
Description |
|---|---|
|
Input from |
The source of the data:
The Split list data source is for Redpoint Global Inc. internal use only. Do not set this manually! |
|
Input file |
If Input from is File, the file containing the records, or a wildcard pattern matching multiple files. |
|
Input field |
If Input from is Field, the field from which the data will be read. If you are connecting to an upstream Web Service Input tool, this is |
|
Include input fields |
If Input from is Field, optionally passes through the "extra" input fields to the "root" record. This can be useful in certain kinds of processing where it is desirable to carry through identifying information that is not represented in the XML documents. |
|
Use repository schema |
If selected, configure the field layout using the specified Schema instead of configuring fields directly. |
|
Schema |
If Use repository schema is selected, a schema must be specified. |
|
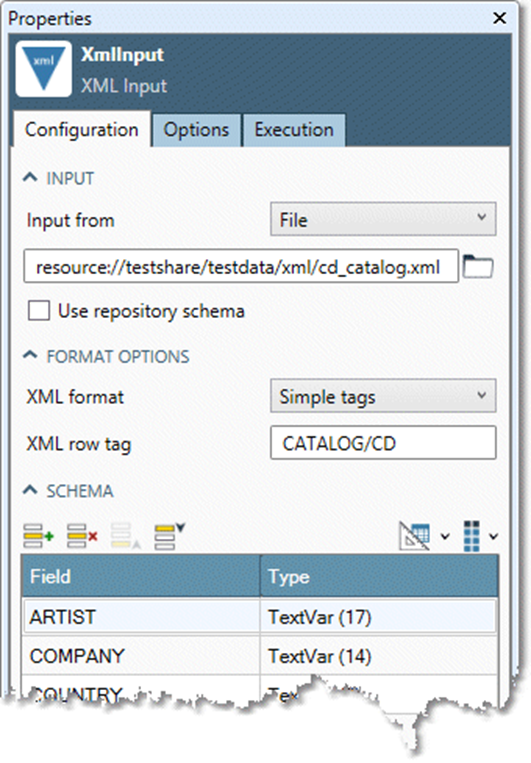
XML format |
Select the type of XML input data: Simple tags, Simple attributes, or SOAP. This is optional and defaults to Simple attributes. |
|
XML row tag |
If XML format is Simple tags or Simple attributes, specifies the XML tag under which rows can be found. |
|
SOAP element base |
If XML format is SOAP, specifies the XML tag containing the input record. |
|
Field |
Name that uniquely names the field amongst all fields in the record. |
|
Type |
Sub-configuration describing the type of the new field. See Configuring Data Types. |
Options
|
Parameter |
Description |
|---|---|
|
Produce file name field |
If selected, the file name will be output as a record field. |
|
Output full path |
If Produce file name field is selected, optionally outputs the entire path to the record file name field. |
|
Output URI path |
If Output full path is selected, express path as a Uniform Resource Identifier (URI). |
|
Field name |
If Produce file name field is selected, name of the column to be used for the file name. This is optional and defaults to |
|
Field size |
If Produce file name field is selected, size of the field to be used for the file name. This is optional and defaults to |
|
Error handling |
Configures how errors in the input data will be handled:
|
|
Parsing errors |
Specify how to handle input containing invalid XML that cannot be processed. The Issue warning option is not available for this type of error. |
|
Conversion errors |
Specify how to handle input data that cannot be correctly converted to its specified data type (such as converting "Jane Smith" to a Date). |
|
Truncation errors |
Specify how to handle input with truncated field values (such as storing "John Smithson" in a Unicode(1) field). |
|
Missing fields |
Specify how to handle input with fields that are missing or contain empty values. |
|
Extra fields |
Specify how to handle input with extra elements that are not defined in the tool's configuration. |
|
Send errors to Message Viewer |
If selected, all error types configured to either Issue warning or Reject record will send warnings to the Message Viewer. The Report warnings option must be selected on the Execution tab. |
|
Send errors to Error Report connector |
If selected, creates an E "Error Report" output connector. All error types configured to either Issue warning or Reject record will send detailed error messages to that connector. Attach a downstream Data Viewer or other output tool to review these messages. |
Configure the XML Input tool
To configure an XML Input tool, you need the following information about the input file:
-
The input file or field name
-
The XML type (either Simple Tags, Simple Attributes, or SOAP)
-
The XML row tag
-
The list of fields and their types
Data Management provides several ways to specify this information.
|
If you have... |
Do this |
|---|---|
|
An XML schema for this file already defined in the repository. |
Configure the XML Input tool using a predefined schema. |
|
A layout file. |
Configure the XML Input tool using a layout file. |
|
None of the above. |
...using a predefined schema
To use this method of configuring an XML Input tool, you must have an XML schema for the input file already defined in the repository.
To configure the XML Input tool using a predefined schema:
-
Select the XML Input tool.
-
Go to the Configuration tab on the Properties pane.
-
Select Input from and choose a data source.
|
Input from |
Do this |
|---|---|
|
File |
Specify the input file or files. You can use wildcards to configure a single XML Input tool to read a sequence of files with the same layout and format. |
|
Field Field data must be binary. If necessary, use an upstream Calculate tool configured with the BinaryRecastFromText function to convert the input data to type binary. |
Select Commit Select the Input field from which the data will be read. If you are connecting to an upstream Web Service Input tool, this is |
The Split list data source is for Redpoint Global Inc. internal use only.
-
Select Use repository schema, and then select the desired schema from the list.
-
Examine the Format options and Schema grid to verify that the format is correct.
-
If the fields and options appear incorrect, choose or create a different schema appropriate for the input file, or use another method to configure the XML Input tool.
-
Optionally, select the Options tab and configure advanced options:
-
If you don't want to process the entire file, select Limit records and type the desired number of records to process.
-
To include the name of the input file as a new field, select Produce file name field and specify a Field name and Field size. Select Output full path to include the complete file specification. This can be useful when reading a wildcarded set of files. Select Output URI path to express the complete file specification as a Uniform Resource Identifier.
-
Configure error handling.
-
-
Optionally, go to the Execution tab and Enable trigger input, configure reporting options, or set Web service options.
...using a layout file
To use this method of configuring an XML Input tool, you must have a multi-column layout file for the input file.
To configure the XML Input tool using a layout file:
-
Select the XML Input tool.
-
Go to the Configuration tab on the Properties pane.
-
Select Input from and choose a data source.
|
Input from |
Do this |
|---|---|
|
File |
Specify the input file or files. You can use wildcards to configure a single XML Input tool to read a sequence of files with the same layout and format. |
|
Field Field data must be binary. If necessary, use an upstream Calculate tool configured with the BinaryRecastFromText function to convert the input data to type binary. |
Select Commit Select the Input field from which the data will be read. If you are connecting to an upstream Web Service Input tool, this is |
The Split list data source is for Redpoint Global Inc. internal use only.
-
Select

-
Examine the Format options and field grid to verify that the format is correct.
-
If the fields and options appear incorrect, choose or create a different schema appropriate for the input file, or use another method to configure the XML Input tool.
-
Optionally, select the Options tab and configure advanced options:
-
If you don't want to process the entire file, select Limit records and type the desired number of records to process.
-
To include the name of the input file as a new field, select Produce file name field and specify a Field name and Field size. Select Output full path to include the complete file specification. This can be useful when reading a wildcarded set of files. Select Output URI path to express the complete file specification as a Uniform Resource Identifier.
-
-
Configure error handling.
-
Optionally, go to the Execution tab and Enable trigger input, configure reporting options, or set Web service options.
...using Analyze
If the input schema is changed after you configure the XML Input tool using Analyze, you must repeat the configuration process.
To configure the XML Input tool using Analyze:
-
Select the XML Input tool.
-
Go to the Configuration tab on the Properties pane.
-
Select Input from and choose a data source.
|
Input from |
Do this |
|---|---|
|
File |
Specify the input file or files. You can use wildcards to configure a single XML Input tool to read a sequence of files with the same layout and format. Select Analyze |
|
Field Field data must be binary. If necessary, use an upstream Calculate tool configured with the BinaryRecastFromText function to convert the input data to type binary. |
Select Commit Select the Input field from which the data will be read. If you are connecting to an upstream Web Service Input tool, this is Optionally, select the Analyze tab and enter a formatted sample of the expected XML input. Select Analyze |
The Split list data source is for Redpoint Global Inc. internal use only.
-
Examine the Format options and field grid to verify that the format is correct.
-
If the fields and options appear incorrect, choose or create a different schema appropriate for the input file, or use another method to configure the XML Input tool.
-
Optionally, select the Options tab and configure advanced options:
-
If you don't want to process the entire file, select Limit records and type the desired number of records to process.
-
To include the name of the input file as a new field, select Produce file name field and specify a Field name and Field size. Select Output full path to include the complete file specification. This can be useful when reading a wildcarded set of files. Select Output URI path to express the complete file specification as a Uniform Resource Identifier.
-
Configure error handling.
-
-
Optionally, go to the Execution tab and Enable trigger input, configure reporting options, or set Web service options.
...manually
Use this method to configure an XML Input tool if the other available configuration options do not correctly describe your input data.
To configure the XML Input tool manually:
-
Select the XML Input tool.
-
Go to the Configuration tab on the Properties pane.
-
Select Input from and choose a data source.
|
Input from |
Do this |
|---|---|
|
File |
Specify the input file or files. You can use wildcards to configure a single XML Input tool to read a sequence of files with the same layout and format. |
|
Field Field data must be binary. If necessary, use an upstream Calculate tool configured with the BinaryRecastFromText function to convert the input data to type binary. |
Select Commit Select the Input field from which the data will be read. If you are connecting to an upstream Web Service Input tool, this is |
-
Select the XML format from the list.
-
If you specify Simple tags or Simple attributes, enter the XML row tag identifier (without angle braces
< >). -
If you specify SOAP array, enter the SOAP argument name, SOAP array name, and SOAP record name.
-
-
Configure field Name, Type, and optional Description of input fields. For each field:
-
Select the cell in the Field column, and type the desired name.
-
Select the cell in the Type column, and specify the field's data type and size, if different than the name assigned by default. Available options depend on the type selected. See Configuring data types. You don't need to set the data type unless you will perform calculations or comparisons using the field, or intend to export the information to a strongly-typed database.
-
-
Optionally, select the Options tab and configure advanced options:
-
If you don't want to process the entire file, select Limit records and type the desired number of records to process.
-
To include the name of the input file as a new field, select Produce file name field and specify a Field name and Field size. Select Output full path to include the complete file specification. This can be useful when reading a wildcarded set of files. Select Output URI path to express the complete file specification as a Uniform Resource Identifier.
-
Configure error handling.
-
-
Optionally, go to the Execution tab and Enable trigger input, configure reporting options, or set Web service options.