

Overview
Version 8.0 of Data Management introduced a new web proxy service, with Web Service Input and Web Service Output tools. The web proxy service:
-
Supports RESTful web services by processing JSON payloads and creating web services to process the method, URL, and headers of the request.
-
Spawns and monitors web service project instances.
-
Maps request URLs to web services.
-
Tracks web-service projects, restarting or disabling as needed.
-
Scales up to run multiple web service instances in parallel, and load-balances requests between those instances.
-
Scales up web services across multiple execution servers.
Advantages to this new approach include the ability to examine and act on the request headers, path, and method, as well as provide control over the response headers. Note that when XML Input and XML Output tools are used as the parser and formatter for a web service-enabled project, Data Management generates a valid WSDL response for the service.
Create a web services project
You can create projects for web services by using Web Service Input and Web Service Output tools as the service end points.
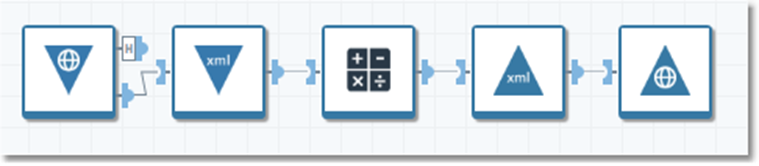
To create a web service project:
-
Connect the Web Service Input tool's output connector to an input parser such as an XML Input tool or JSON Input tool, configured to accept input from a field named
requestBody. -
The XML Input tool or JSON Input tool parses the request body and passes it to downstream tools for processing.
-
Processing results are fed to an output formatting tool (such as an XML Output or JSON Output tool), configured to output to Field.
-
Connect the output formatting tool to a Web Service Output tool, and select the formatted output field as the Response Body field.
-
Save the project to the repository, and then configure the project as a web service.
The projects in the Samples\Web Services\ repository folder contain examples you can use as a starting point to create and publish your own web services.
Integrated OAuth2 support
Version 8.3 of Data Management introduced integrated support for the OAuth2 standard: support for two-legged authentication designed to work between a web service client application and a published web service. There are two parts to this support: client-side (consumption) and service-side (publication).
Client-side OAuth2 support in Web Service Call tool
The Web Service Call tool supports integrated OAuth2 authentication. It can automatically communicate with an authentication server, passing some credentials to that server, and upon successful authentication receiving an access token which is added to the web service call as proof that the caller is authorized to make the web service call.
Authenticated grants
You can configure the Web Service Call tool to authenticate requests against an OAuth2 server and obtain an authorization grant. The Web Service Call tool supports the following grant types:
-
Credentials: the Web Service Call tool presents a Client ID and Client secret to the OAuth2 authentication server, and receives an access token.
-
Password: the Web Service Call tool presents a Username, Password, Client ID, and Client secret to the OAuth2 authentication server, and receives an access token.
-
Google JWT: the Web Service Call tool constructs a JSON Web Token from a JSON web service key, signs it, and makes a request to the OAuth2 server using the JWT grant type.
-
Generic JWT: the Web Service Call tool constructs a JSON Web Token from components entered into the tool properties, signs it, and makes a request to the OAuth2 server using the JWT grant type.
The grant type you choose depends on the web service you want to call. Refer to the web service's OAuth2 documentation to know which grant type to select. Some rules of thumb:
-
If the web service requires a user name and password, select the Password grant type. For example, Reddit uses the password grant type.
-
For a Google web service API, select the Google JWT grant type.
-
You must have a service key in JSON format.
-
-
If the web service specifies JWT but isn't Google, select the Generic JWT grant type. This will require some knowledge of JWT details.
-
Otherwise, use the Credentials grant type. For example, Facebook and Twitter use the credentials grant type.
The WebServiceCall tool will automatically obtain an access token from the OAuth2 server, add the access token to the Authorization header for all web service calls, and renew that token before its expiration time.
Signed tokens
The Web Service Call tool can also sign JSON Web Tokens and send the result directly in the Authorization header, bypassing the step of authentication by a separate OAuth2 server. In this model, two grant types are supported:
-
Google JWT: the Web Service Call tool constructs a JSON Web Token from a JSON web service key, signs it, and places the signed token in the Authorization header of the web service call.
-
Generic JWT: the Web Service Call tool constructs a JSON Web Token from components entered into the tool properties, signs it, and places the signed token in the Authorization header of the web service call.
In both of these cases, the web token is signed using a private RSA key that you control. It is assumed that the service being called has already been given access to your public RSA key.
Sample projects using client-side OAuth2 authentication
Several repository projects in Samples\Web Services\ demonstrate how to use the Web Service Call tool to interact with web services that require OAuth2 authentication:
-
Call with OAuth2 Client Credentials: demonstrates configuring the Web Services Call tool with the Credentials grant type to interact with web services that require authentication via "two-legged," "application-only," or "server-to-server" OAuth2.
-
Call with OAuth2 Google Credentials: demonstrates configuring the Web Services Call tool with the Google JWT grant type.
-
Call with OAuth2 Authenticated JWT: demonstrates configuring the Web Services Call tool with the Generic JWT grant type.
-
Call with OAuth2 Signed JWT: demonstrates configuring the Web Services Call tool with the Generic JWT grant type and a signed token.
Configure OAuth2 in Web Service Call tool
To configure the Web Service Call tool for OAuth2, you need the following information about the target web service:
-
The grant type: either Credentials, Password, Google JWT, or Generic JWT.
-
Parameters associated with the selected grant type (see the table below).
-
Any access scopes required by the target web service.
-
Any additional fields or claims required by the target web service.
|
Grant type |
Parameter |
Meaning |
|---|---|---|
|
Credentials, Password |
Authentication server URI |
URI of the OAuth2 authentication server. |
|
Password |
Username |
Resource owner's user name. |
|
Password |
Password |
Resource owner's password or Key Vault reference. |
|
Credentials, Password |
Client ID |
Client ID portion of the credential |
|
Credentials, Password |
Client secret |
Client secret portion of the credential. |
|
Google JWT, Generic JWT |
JWT usage |
Specify whether the JSON Web Token (JWT) is to be Authenticated by the OAuth2 server, or Signed and placed in the Authorization header of the web service call. |
|
Generic JWT |
JWT properties |
JWT Claims needed for this request. Obtain these from the target web service's API documentation. |
|
Generic JWT |
Private key source |
Private key to be used to sign the request. You may enter enter the key manually, or specify a file containing an RSA private key. |
|
Generic JWT |
Lifetime |
Grant token lifetime. |
|
Generic JWT |
JWT signature type |
Algorithm used to sign the JWT, either RS256 or ES256. |
|
Google JWT |
Google service key |
JSON format key file typically generated from the Google console. |
|
Credentials, Password
|
Allow self-signed certificates |
Specify whether self-signed SSL certificates will be accepted. |
|
All |
Access scopes |
Defines the level of access granted to a service. These are typically URLs for specific services being called. |
|
All |
Additional fields
|
Name/value pairs to be added to the request form/claims section of the JWT if the OAuth2 server requires them. |
|
Google JWT |
Additional claims |
Name/value pairs to be added to the request form/claims section of the JWT if the OAuth2 server requires them. |
...with the Credentials grant type
To configure the Web Service Call tool for the Credentials grant type, you'll need to provide the following information about the target web service:
-
URI for the authentication server. This is usually different than the URI for the web service itself.
-
Client ID and Client secret. These are usually obtained from a management page on the web site of the service being called.
-
Any other parameters required by the target web service (access scopes, additional fields, additional claims).
The repository project Samples\Web Services\Call with OAuth2 Client Credentials demonstrates using the Web Services Call tool configured with the Credentials grant type to interact with web services that require authentication via "two-legged," "application-only," or "server-to-server" OAuth2.
To enable the Web Service Call tool to call OAuth2-secured web services with the Credentials grant type:
-
On the Web Service Call tool's Properties pane, select the OAuth2 tab.
-
Select Enable OAuth2.
-
Select Grant type and choose Credentials.
-
Select Auth server URI and enter the URI for the authentication server.
-
Optionally, select Allow self-signed certificates if the OAuth2 server does not present a security certificate signed by an authority. Normally, you would only enable this for development and debugging of internal web services, or for on-premises environments.
-
Enter the Client ID and Client secret, which may be a Password or Key Vault reference.
-
If the web service being called requires Access scopes, open the Access scopes section and enter one or more URLs. Refer to the documentation of the API being called for details.
-
If the OAuth2 server requires Additional fields, open the Additional settings section and enter name/value pairs to be added to the request form.
-
If the OAuth2 server requires Additional claims, open the Additional settings section and enter name/value pairs to be added to the claims section of the JWT.
...with the Passwords grant type
To configure the Web Service Call tool for the Passwords grant type, you'll need to provide the following information about the target web service:
-
URI for the authentication server.
-
User name and password of the resource owner.
-
Client ID and client secret.
-
Any other parameters required by the target web service (access scopes, additional fields).
To enable the Web Service Call tool to call OAuth2-secured web services with the Password grant type:
-
On the Web Service Call tool's Properties pane, select the OAuth2 tab.
-
Select Enable OAuth2.
-
Select Grant type and choose Password.
-
Select Auth server URI and enter the URI for the authentication server. This is usually different than the URI for the web service itself.
-
Optionally, select Allow self-signed certificates if the OAuth2 server does not present a security certificate signed by an authority. Normally, you would only enable this for development and debugging of internal web services, or for on-premises environments.
-
Enter the Username and Password (or Key Vault reference).
-
Enter the Client ID and Client secret, which may be a Password or Key Vault reference.
-
If the web service being called requires Access scopes, open the Access scopes section and enter one or more URLs. Refer to the documentation of the API being called for details.
-
If the OAuth2 server requires Additional fields, open the Additional settings section and enter name/value pairs to be added to the request form.
...with the Google JWT grant type
To configure the Web Service Call tool for the Google JWT grant type, you'll need to provide the following information about the target web service:
-
Google service key file. This is typically generated from the Google console, and must be JSON format.
-
Any other parameters required by the target web service (access scopes, additional fields).
The repository project Samples\Web Services\Call with OAuth2 Google Credentials demonstrates using the Web Services Call tool configured with the Google JWT grant type to interact with Google web services that require OAuth2 authentication.
To enable the Web Service Call tool to call OAuth2-secured web services with the Google JWT grant type:
-
On the Web Service Call tool's Properties pane, select the OAuth2 tab.
-
Select Enable OAuth2.
-
Select Grant type and choose Google JWT.
-
Leave JWT usage set to the default of Authenticated.
-
Leave Auth server URI set to the default of blank.
-
Optionally, select Allow self-signed certificates if the OAuth2 server does not present a security certificate signed by an authority. Normally, you would only enable this for development and debugging of internal web services, or for on-premises environments.
-
Browse to the Google service key file.
-
Leave JWT signature type set to the default of RS256 unless your web service requires ES256.
-
If the web service being called requires Access scopes, open the Access scopes section and enter one or more URLs. Google APIs usually require a list of access scopes.
-
if the OAuth2 server requires Additional fields, open the Additional settings section and enter name/value pairs to be added to the request form.
-
if the OAuth2 server requires Additional claims, open the Additional settings section and enter name/value pairs to be added to the claims section of the JWT.
...with the Generic JWT grant type
To configure the Web Service Call tool for the Generic JWT grant type, you'll need to provide the following information about the target web service:
-
URI for the authentication server. This is usually different than the URI for the web service itself.
-
JWT properties needed for this request. Obtain these from the web service API documentation.
-
Private key to be used to sign the request. You may enter enter the key manually, or specify a file containing an RSA private key.
-
Any other parameters required by the target web service (access scopes, additional fields, additional claims).
The repository project Samples\Web Services\Call with OAuth2 Authenticated JWT demonstrates using the Web Services Call tool configured with the Generic JWT grant type to interact with Google web services that require OAuth2 authentication.
To enable the Web Service Call tool to call OAuth2-secured web services with the Generic JWT grant type:
-
On the Web Service Call tool's Properties pane, select the OAuth2 tab.
-
Select Enable OAuth2.
-
Select Grant type and choose Generic JWT.
-
Leave JWT usage set to the default of Authenticated.
-
Select Auth server URI and enter the URI for the authentication server.
-
Optionally, select Allow self-signed certificates if the OAuth2 server does not present a security certificate signed by an authority. Normally, you would only enable this for development and debugging of internal web services, or for on-premises environments.
-
Enter the JWT properties needed for this request.
-
Select Private key source and choose how you will provide the private key used to sign your request:
-
Select Enter here and then choose Private key and enter the key, OR
-
Select File and then browse to the file containing your RSA private key.
-
-
Optionally, select Lifetime and specify a grant token lifetime other than the default of 600 seconds (10 minutes).
-
Leave JWT signature type set to the default of RS256 unless your web service requires ES256.
-
If the web service being called requires Access scopes, open the Access scopes section and enter one or more URLs. Refer to the documentation of the API being called for details.
-
if the OAuth2 server requires Additional fields, open the Additional settings section and enter name/value pairs to be added to the request form.
-
if the OAuth2 server requires Additional claims, open the Additional settings section and enter name/value pairs to be added to the claims section of the JWT.
...with a Google JWT signed token
To configure the Web Service Call tool for the Google JWT grant type with a signed JWT, you'll need to provide the following information about the target web service:
-
Google service key file. This is typically generated from the Google console, and must be JSON format.
-
Any other parameters required by the target web service (access scopes, additional fields).
To enable the Web Service Call tool to call OAuth2-secured web services with a signed token from a Google service key file:
-
On the Web Service Call tool's Properties pane, select the OAuth2 tab.
-
Select Enable OAuth2.
-
Select Grant type and choose Google JWT.
-
Select JWT usage and choose Signed.
-
Browse to the Google service key file.
-
Leave JWT signature type set to the default of RS256 unless your web service requires ES256.
-
If the web service being called requires Access scopes, open the Access scopes section and enter one or more URLs. Google APIs usually require a list of access scopes. Refer to the documentation of the API being called for details.
-
If the OAuth2 server requires Additional fields, open the Additional settings section and enter name/value pairs to be added to the request form.
-
if the OAuth2 server requires Additional claims, open the Additional settings section and enter name/value pairs to be added to the claims section of the JWT.
...with a Generic JWT signed token
To configure the Web Service Call tool for the Generic JWT grant type with a signed JWT, you'll need to provide the following information about the target web service:
-
JWT properties needed for this request. Obtain these from the web service API documentation.
-
Private key to be used to sign the request. You may enter enter the key manually, or specify a file containing an RSA private key.
-
Any other parameters required by the target web service (access scopes, additional fields).
The repository project Samples\Web Services\Call with OAuth2 Signed JWT demonstrates using the Web Services Call tool configured with the Generic JWT grant type and a signed token to interact with web services that require OAuth2 authentication.
To enable the Web Service Call tool to call OAuth2-secured web services with a signed token built from component settings:
-
On the Web Service Call tool's Properties pane, select the OAuth2 tab.
-
Select Enable OAuth2.
-
Select Grant type and choose Generic JWT.
-
Select JWT usage and choose Signed.
-
Enter the JWT properties needed for this request. Obtain these from the web service API documentation.
-
Select Private key source and choose how you will provide the private key used to sign your request:
-
Select Enter here and then choose Private key and enter the key (which may be a Password or Key Vault reference), OR
-
Select File and then browse to the file containing your RSA private key.
-
-
Leave JWT signature type set to the default of RS256 unless your web service requires ES256.
-
If the web service being called requires Access scopes, open the Access scopes section and enter one or more URLs. Refer to the documentation of the API being called for details.
-
if the OAuth2 server requires Additional fields, open the Additional settings section and enter name/value pairs to be added to the request form.
-
if the OAuth2 server requires Additional claims, open the Additional settings section and enter name/value pairs to be added to the claims section of the JWT.
Service-side OAuth2 support in Data Management published web services
Data Management can publish web services that are secured by OAuth authentication. When OAuth2 support is enabled, Data Management will automatically:
-
Publish an OAuth2 server at a designated URL endpoint.
-
Manage access token issuance and expiration.
-
OAuth2-secure published web services.
-
Require that OAuth2-secured web services are published only over SSL (https:// URLs).
You can override these default OAuth2 settings on a project-by-project basis.
Data Management published web services only support the Credentials grant type.
The OAuth2 authentication token lifetime in Data Management published web services is limited to 3,600 seconds (one hour).
Data Management cannot be configured to delegate its OAuth2 authentication to an external authentication service.
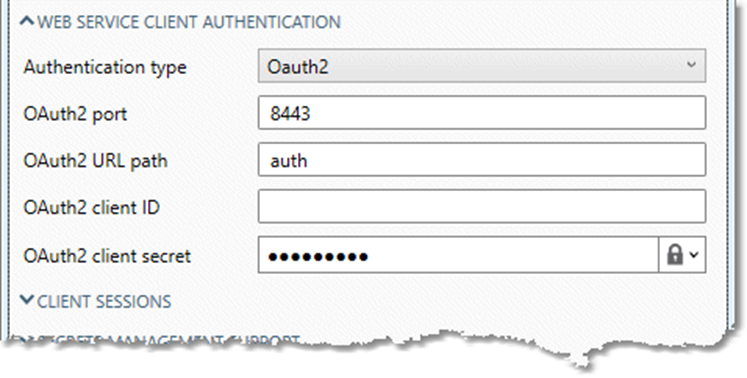
Configure OAuth2 in published web services
To configure OAuth2 support in published web services, you must enable OAuth2 for the entire Data Management site.
-
Open the Site folder under Settings in the repository.
-
On the Properties pane, open the Web service client authentication group on the Security tab.
-
Select Authentication type and choose OAuth2.
-
Enter an OAuth2 port and OAuth2 URL path for the OAuth2 service. These describe the location of the Oath2 service. For example, given the settings shown below, the OAuth service would be reached at
https://hostname:8443/oauth2/auth, where hostname is the external DNS name of the Data Management site server. -
Enter an OAuth2 client ID and OAuth2 client secret, which may be a Password or Key Vault reference. These are the credentials that web service clients must present to the Data Management OAuth2 service to obtain an access token. You can override these on a service-by-service basis.
SSL/TLS client authentication
Version 9.4 introduced support for web service client authentication with trusted endpoints that require certificate-based authentication. You can configure web service client authentication at the site level, and optionally override the site-level client certificate defaults for individual web services or Web Service Call tools.
Web service configuration parameters
Web services have a single set of configuration parameters.
Service
|
Parameter |
Description |
|---|---|
|
Service name |
The name of the web service as it appears in logs and generated WSDL. This is the same as the object’s name in the repository. |
|
Enabled |
Turn on or off the web service. This is also available from the web services Repository context menu. |
|
Username
|
Logon credentials for the specified server. |
|
Publish over HTTPS |
Applies the SSL https:// security protocol to the connection. |
|
Server(s) |
Specifies the servers on which the web service instances will be run:
This parameter is only useful when the web service is run in an environment with Data Management execution servers distributed across multiple physical (or VM) servers. If this is not the case, you should accept the default value of * so you don't have to reconfigure the web service if you later decide to move the location of your single execution server. Note that the number of servers utilized is the lesser of the number of Parallel instances and the number of identified Server(s). If the number of Parallel instances is less than the number of identified execution servers, it is indeterminate as to exactly which executions severs will be utilized, vs those that are not. |
|
URL path |
URL path enables multiple web services to be hosted on the same server. All requests are received by the same web service proxy, and then routed to the correct service based on URL path. If an explicit URL path is specified, requests must be fully qualified with that path. If no URL path is specified, all requests to that server will be handled by the same (default) service. |
|
TCP/IP port |
Port portion of the URL on which the web service is published. This can be any port on your computer network that has the necessary permissions. You may need to obtain this information from your systems administrator. |
|
Parallel instances
|
The number of Parallel instances determines the number of project instances that will be launched to handle web service requests. Project instances are distributed evenly across all execution servers specified by Server(s). The Per-server instance limit determines the maximum number of instances that will be launched on any single execution server. This helps to keep instances of services from overloading remaining servers when some are shut down. The actual number of project instances that will be launched is the lesser of the number of Parallel instances and the number of execution Server(s), multiplied by the Per-server instance limit. For example, if you specify 25 Parallel instances, but have a Per-server instance limit of 10 with 2 execution Server(s), only 20 project instances will actually be available (10 on each of the 2 execution servers). Web service requests are then routed to the project instance with the fewest number of outstanding pending requests. If all available project instances have an equal number of outstanding requests (or none), requests will be routed in a round robin fashion across all available project instances. |
Failure/Restart Policy
Select Override in the Failure/Restart Policy group to override the defaults specified under Site settings. You can tailor the failure/restart behavior of each web service individually.
|
Parameter |
Description |
|---|---|
|
Retry interval (seconds)
|
These parameters specify web service retry and restart policies.
Restart service when project is modified: If selected, any change to an enabled web service project will cause the web service to be stopped and restarted. Enabling this option allows for smoother upgrades since you never have to turn off the service. |
External URL
Select Override in the External URL group to override the default URL, which is the name of the host machine.
|
Parameter |
Description |
|---|---|
|
External URL |
If the web service is asked for its WSDL (Web Services Description Language), External URL will be used in the WSDL definition. Note that WSDL is only supported when the output is XML, and is not supported for JSON output. |
Client authentication
Select Override in the Client authentication group to override the defaults specified in Site settings.
|
Parameter |
Description |
|---|---|
|
Authentication type |
|
|
Client ID
|
If Authentication type is OAuth2, the credentials that this web service must present to obtain an access token. The Client secret may be a Password or Key Vault reference. |
|
Trusted CA certificate
|
If Authentication type is 2-Way SSL, specifies the Trusted CA certificate to use for this web service. You may optionally select Validate client certificate to ensure that client certificates are not self-signed. Expired client certificates are considered inherently invalid, and will always trigger a "certificate expired" warning. |
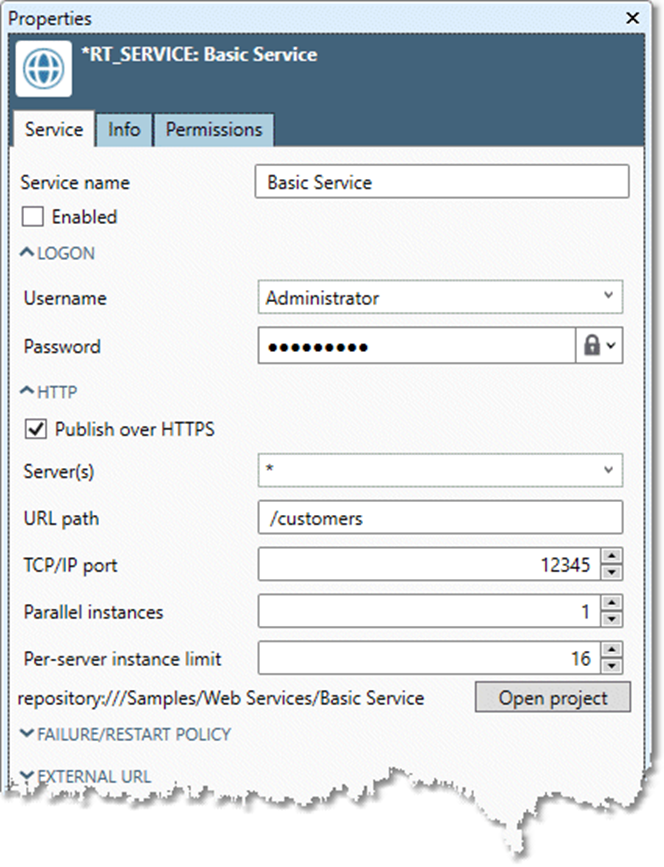
Configure web services
To configure a project as a web service
-
Save the project to the repository, if necessary. The project must contain:
-
One Web Service Input tool.
-
One or more XML Input, XML Input2, and/or JSON Input tools.
-
One or more XML Output, XML Output2, and/or JSON Output tools.
-
One Web Service Output tool.
-
It can have any number of additional inputs and outputs.
-
In the repository, right-click the project name, and then select Make Web Service.
-
On the Service tab of the Properties pane, select Enabled.
-
Optionally, select Publish over HTTPS to apply the SSL security protocol to the connection.
-
Optionally, select a Server other than the default wildcard specification of
*. -
Optionally, specify a URL path, other than the implicit URL path of
/. -
Specify a TCP/IP port. This can be any port on your computer network that has the necessary permissions. You may need to obtain this information from your systems administrator.
-
Optionally, select Parallel instances and Per-server instance limit and configure multi-instance web services.
-
Specify the Logon for the selected Server.
-
Optionally, open the Failure/Restart Policy section and select Override to adjust the service start Retry interval and Maximum retries options. These control how long (in seconds) Data Management will wait to retry a web service that fails to start or run, and how many retry attempts it will perform. You may optionally enable Restart service on any error.
-
Optionally, open the External URL section and select Override to specify an External URL that will be used in the WSDL definition (XML output only).
-
Optionally, open the Client authentication section and select Override site settings to change authentication settings:
-
To turn off client authentication for this web service:
-
Select Authentication type and choose None.
-
-
To override site-level OAuth2 default credentials:
-
Select Authentication type and choose OAuth2, then specify the Client ID and Client Secret for this web service.
-
-
To override site-level client certificate defaults:
-
Select Authentication type and choose 2-Way SSL, then specify a Trusted CA certificate. You may optionally select Validate client certificate to ensure that client certificates are not self-signed. Expired client certificates are considered inherently invalid, and will always trigger a "certificate expired" warning.
-
-
-
Select Commit

You can view the services activity history in the Log Viewer.
To edit a web service
-
In the repository, double-click the Web Services icon

-
On the Service tab of the Properties pane, make the desired changes.
-
Select Commit when done.
To remove a web service
-
In the repository, double-click the Web Services icon

-
Select Delete from the shortcut menu.
Web services run options
Running web services have two phases:
-
Initialization is a project run of a subset of the tools before the first transaction is handled.
-
Transaction is when a request is received from the outside.
In a web service, all tools normally run during the transaction phase. The exceptions are the Table Lookup, Window Compare, Token Creation, and Join2 tools. These tools typically use tables that are are loaded once and used many times, so Data Management loads the tables during initialization. This means that everything upstream of these connectors must also run during initialization. Thus by default:
-
The Table Lookup tool and the Join 2 tool run their “T” input to load the table, and all tools upstream of the “T” input connection also run.
-
The Token Creation tool runs its “K” and “S” inputs to load those tables if specified (they are optional), and any tools upstream of those connections also run.
-
The Window Compare tool runs its “A” input(s) to load those tables if specified (they are optional and with multiple connections), and any tools upstream of those connections also run.
Under some circumstances, you can change these default behaviors by setting web service options on a tool's Execution tab during tool configuration.
These options are rarely needed, and you should consult Redpoint Global Inc. support before using them to ensure that you are using them correctly.
Web Service Option: In a web service, run during transaction
Both the Table Lookup and Join2 tools use a table created from the data on one input to aid in the processing of all records on the other input. However, if the table should be created from the web service input data, you can configure these tools to run during the transaction phase, creating a table on every transaction.
-
On the tool’s Properties pane, select the Execution tab, and then select select In a web service, run during transaction.
Web Service Option: In a web service, run during initialization
Normally, all tools except for Table Lookup and Join2 run during the transaction phase. If your project has an entirely separate section of the data flow graph that is completely unconnected from the web service inputs and outputs, you can configure this section to run only once, during initialization.
-
Find all of the terminal tools of this section (those with no downstream connectors).
-
On each tool’s Properties pane, select the Execution tab, and then select In a web service, run during initialization.
Enable and disable web services
Once you have configured a web service, you can turn it on and off in several ways:
-
Right-click the web service in the repository tree, and then select Enable or Disable.
-
Select the web service in the repository tree, and then check or clear Enabled on the Service tab of the Properties pane.
-
Find the web service in the Web Services section of the Management Dashboard, select its Status icon

Call web services
Once you have enabled a web service, you can access it using a URL constructed using the properties you defined during configuration: http://$MACHINE:$PORT/.
-
$MACHINEis the hostname or IP address of the execution server on which the web service has been deployed, as defined by the Machine property for this web service. -
$PORTis the port defined by the TCP/IP port property for this web service.
If Publish over HTTPS is selected, the URL protocol will be https instead of http.
If you are working with SOAP tools that understand WSDL, it can be fetched by adding ?WSDL to the URL like this: http://$MACHINE:$PORT/?WSDL
With SSL on: https://$HOST:$PORT/$URLPATH
With SSL off: http://$HOST:$PORT/$URLPATH
You can append anything you want after a / following $URLPATH, and it will be sent to the same service.