

Overview
This topic will walk you through a hypothetical scenario to illustrate how to build an audience with the Audience Builder.
Build an audience with multiple levels of splits
As a marketer, you’re setting up an audience for a winter campaign. For this campaign, the audience starts with…
-
An initial universe of all active customers
-
Suppresses any customers who do not want to receive ANY marketing communication
-
Then splits by loyalty tier (Gold/Silver/Bronze)
-
And then splits again by channel preference (Email/SMS)
While you could accomplish the same end result in the linear build-an-audience workflow, it would require more granular segments, which hinders reusability.
Let’s build the audience:
-
To launch the Audience Builder, in the left menu, go to Smart Activation > Audience and click Audience Builder (Beta).
-
Name your Audience (hover to the right of the untitled audience and click the pencil icon that appears) and optionally add a description.
-
To add a Campaign Code (required), click the additional settings icon in the top section and choose Metadata, and then enter your Campaign Code and click Save.
-
In the Audience Canvas, configure your initial “universe” of all active customers:
-
Select the UNIVERSE audience node.
-
In the left Configuration panel, click Add Segment. Choose the segment that represents all customer accounts (in our example, it’s Customer Account – All) and click Add Selected Segments.
-
You can also optionally add a name for the node (in our example, we named it All Customers).
-
-
Add and configure your suppression node:
-
Click the plus button under the first node on the Audience Canvas and click the plus button next to Suppression.
-
In the left Configuration panel, click Add Segment. Choose the segment that represents customers who do not want to receive any marketing communication (in our example, it’s No Marketing Communication) and click Add Selected Segments.
-
You can also optionally add a name for the node (in our example, we named it Suppress No Comm).
-
-
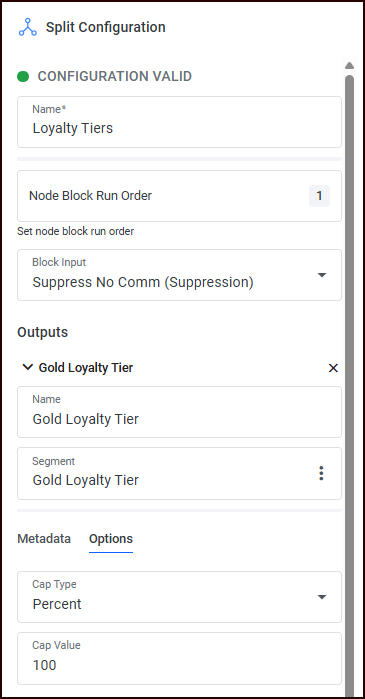
Add a split for loyalty tiers.
-
Click the plus button under the suppression node on the Audience Canvas and click the plus button next to Split.
-
Click the new split node to select it, and in the left Configuration panel, name your split so you can easily differentiate it from the next splits (in this example, we named it Loyalty Tiers).
-
Next you’ll add your three outputs that correspond to the loyalty tiers you’re targeting in your campaign. These must be ordered properly, with most important segment at the top; the segment targets will be run in order and are mutually exclusive.
-
In the Outputs section, name the output (Gold Loyalty Tier) and select the corresponding segment.
-
In the Options section, set the Cap Value to 100 (which means that the Gold Loyalty Tier can have up to 100% of the customers).
-
Click Add Output at the bottom of the Configuration panel and repeat the Output configuration twice; once for the Silver Loyalty Tier and once for the Bronze Loyalty Tier. (You won’t set a Cap Value for these Outputs.)
-
-
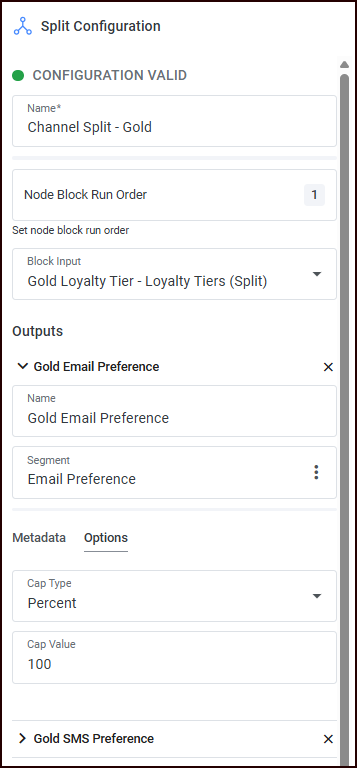
Next you’ll split the Loyalty Tier split for channel preferences.
-
Click the plus button under the split node on the Audience Canvas, in the Split box click the + to increment the number to 3, and click the plus button to the right to create 3 split nodes off of the first split.
-
For each of the 3 new split nodes, click to select it, and in the left Configuration panel:
-
Name your split (in this example, the first split is named Channel Split - Gold; the second split is named Channel Split - Silver; the third split is named Channel Split - Bronze).
-
Select the Block Input. These are based on the outputs from the previous split node. So, for the Channel Split - Gold node, you’ll select the Gold Loyalty Tier; for the Channel Split - Silver, you’ll select the Silver Loyalty Tier; etc.
-
Next you’ll configure your outputs to correspond to channel preferences (email and SMS) so that you can target your messaging appropriately for each of the channel types and different loyalty tiers.
-
Configure the first Output: Name it uniquely (Gold Email Preference for the first output of the first node), select the appropriate segment (Email Preference), and in the Options section, set the Cap Value to 100 (which means that the Gold Email Preference output can have up to 100% of the customers).
-
Click Add Output at the bottom of the Configuration panel and repeat the Output configuration for the Gold SMS Preference. (You won’t set a Cap Value for this Output.)
-
Repeat the configuration for the other two split blocks: Channel Split - Silver and Channel Split - Bronze.
-
-
-
Click the Save Options button at the top-right, and choose what you want to do after saving your audience.
-
You’re now ready to run counts on the audience, confirm that everything looks as expected by clicking the Audience Summary tab, and move on to activating your audience.
