

Overview
You can initiate configuration of an activity by:
-
Double-clicking
-
Invoking “Show Configuration Panel” at its mini toolbar
When you do either of these, the activity’s configuration panel is displayed:
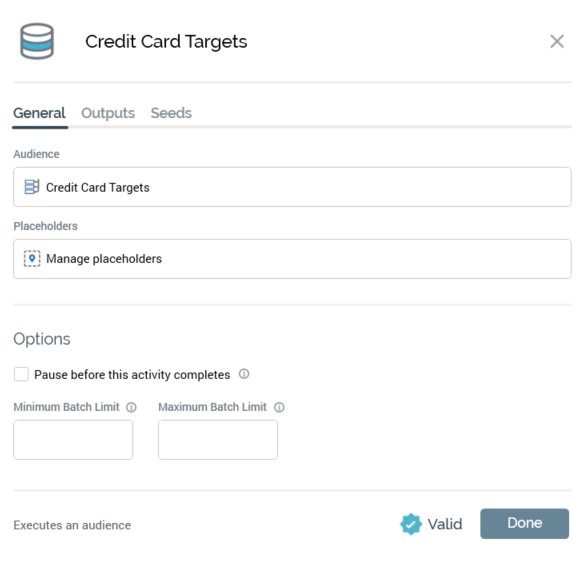
The configuration panel is static and cannot be moved around the workspace. Once displayed, selecting anywhere other than upon the configuration panel causes it to close (you can also close it using its Close button, displayed to its top right).
You can rename an activity in the configuration panel’s header by selecting its header. An updateable field is shown. An activity’s name can be a maximum of 100 characters. You can complete the activity’s name update by hitting return or by selecting off the configuration panel.
Configuration panels contain a tab set, the contents of which differ between activity types and the activity’s position in its workflow. The following tabs may be shown:
-
General: this tab is always shown. Its contents depend on the type of activity.
-
Inputs: this tab is shown only when the activity is preceded by another in the workflow. Its contents vary depending on whether an upstream fulfillment activity is present.
-
Outputs: this tab is only shown for batch audiences and interactive activities that are configured with an audience.
-
Filters: this tab is only shown when configuring a downstream activity that is not preceded by an upstream fulfillment activity.
-
Metadata: this tab is available at offers, export activities and controls.
-
Seeds: this tab is only displayed for batch audiences, and interactive activities that have been configured with an audience.
-
Advanced: this tab is only displayed for batch audiences, and interactive activities that have been configured with an audience.
Within an active or completed workflow, configuration panels displayed for activities are shown as read-only.
A validation indicator, shown at the bottom of configuration panels, indicates whether an activity is valid or otherwise with a blue checkmark or red “x” icon.
Inputs tab (standard)
When an activity is preceded by an upstream batch audience, or interactive activity configured with an audience, and is not preceded by an upstream fulfillment activity, the purpose of the Inputs tab is to allow you to specify which of the parent activity’s segments will serve as the current activity’s inputs. This is particularly significant where the parent activity provides multiple segments; for example, a batch audience may output a series of discrete segments, which can then be selected in the Inputs tab.
Where an audience activity takes another audience activity as its input source, the two audiences’ selection criteria are combined with AND: only contacts satisfying both are targeted. This is standard behaviour for any audience-type activity applying its own criteria to the population it receives.
An activity positioned immediately downstream of a trigger that has an Input Workflow configured takes its input from that workflow; its input source cannot be changed.
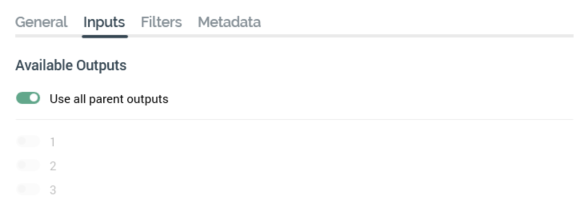
In these circumstances, the Inputs tab contains the following:
Additional Input Sources
This section allows you to rejoin other paths into this activity by adding input sources. Records from every source you add are combined. You can use this section to rejoin additional paths back into an activity, or to loop already targeted records back into the same activity to be targeted again.
Notes on specific activity types:
-
Delay: a Delay in the same workflow can be used as an additional input source. It is listed against the fulfillment activity that precedes it, shown as “activity name after hh:mm:ss”. A Delay serving as an additional input source cannot itself be fired. A Delay in a different workflow cannot be selected as an additional input source — reference the activity that feeds that Delay instead.
-
Batch Activity: a Batch Audience that takes its population from an input source does not additionally need to be configured with an audience.
-
Add an additional input source: use the green plus sign to choose an additional input source. Selecting the plus sign brings up the Add Input Source dialog, which contains the following dropdown menus:
-
Workflow: choose the workflow you want to select the activity from:
-
Activity in this workflow
-
Activity in a different workflow
-
This option is only available when there are additional workflows to choose from.
-
-
-
Activity: choose which activity from that list to take the input population from.
-
Where an activity takes its input source from an activity in a different workflow, and that source workflow has not yet produced any results, the activity enters a “Paused” state. Playing the activity before the source workflow has run leaves it “Paused”; it proceeds once results exist in the source workflow.
After choosing the workflow and activity, select Add to bring up the Edit Input Source dialog. This allows you to choose one or more output states from the treeview. Choose OK to close the Edit Input Source Dialog.
For each additional input source added, the following buttons are displayed:
-
Edit the outputs used by this input source: use the pencil button to bring the Edit Input Source dialog back into view and make any changes.
-
Remove this input source: use the red minus sign button to remove the input source from the list.
When you add one or more additional input sources, the following checkbox appears:
-
Target contacts more than once: allow a contact already processed by this activity to be processed again during a later iteration when supplied via an additional input source. When this box is checked, the following field appears below:
-
Re-evaluate audience on re-entry: re-evaluates the audience logic for contacts re-entering this activity. When checked (default), a re-entering contact is only advanced to its next iteration when it qualifies through the audience again, into whichever output selects it; a contact the audience suppresses is held at its current iteration and reenters once it qualifies—its re-entry is delayed, not cancelled. When unchecked, re-entering contacts advance without re-running the audience, automatically passing to downstream fulfillment activities. This box is only displayed when “Target contacts more than once” is checked and the Interactive Activity is configured with an audience.
-
Maximum iterations per Contact: the maximum number of times that a single contact can be processed by this activity. Leave blank for unlimited, the default is 2.
-
When this box is unchecked and one or more additional input sources are defined that re-join back into an Interactive Activity from further down the workflow, an orange warning message displayed below that reads “This activity has one or more additional input sources feeding contacts back into it, but “Target contacts more than once” is unchecked. Contacts already processed will not be re-targeted during later iterations. Check the property to enable re-targeting.”
Refer to Interaction Designer split and rejoin activities for a comprehensive guide to using this feature set.
The input source is represented in the UI by a dashed orange line to help track the flow of the input. The dashed orange line is read-only and cannot be deleted from the canvas; remove it by clearing the input source on the activity’s Inputs tab. The source is labelled above the line to the left of the activity, in the form [Workflow] / [Activity] / [Input State], and the activity’s own icon is augmented with a mini icon indicating that a non-default input source is configured.
Available outputs
This section includes the following configuration options:
-
Use all parent outputs: a slider control, selected by default. This property indicates that the audience's input will be all segments from the preceding audience.
-
Inputs list: only available if Use all parent outputs is unchecked. You can specify which of the parent audience's segments are to serve as inputs for the current audience by selecting one or more entries in the list. A horizontal scrollbar provides access to lengthy values displayed in the interaction activity configuration panel's Inputs list. A tooltip is also displayed when hovering over values therein. When you right-click the list (when available), a context menu is shown. This allows you to select all, or no, inputs as required.
When the Inputs tab is displayed in this way, the Filters tab can also be used to further refine an activity’s input data.
Inputs tab (downstream post-fulfillment activity)
When the inputs tab is displayed for one of the following activity types…
-
Interactive activity
-
Batch audience
-
Control
-
Export
-
Offer
-
Decision Offer
-
Data Process
-
Data Transfer
…the tab contains the following sections.
Where an audience activity takes another audience activity as its input source, the two audiences’ selection criteria are combined with AND: only contacts satisfying both are targeted. This is standard behaviour for any audience-type activity applying its own criteria to the population it receives.
An activity positioned immediately downstream of a trigger that has an Input Workflow configured takes its input from that workflow; its input source cannot be changed.
Input source
This section holds the input source field, which allows the activity to take its input population from an activity other than the activity that is immediately upstream.
The input source dropdown is displayed when:
-
Single workflow interaction: the activity has at least two upstream activities of the above types
-
Multi-workflow interaction: there is at least one of the above activity types in a different workflow.
Dependent on the workflow and activity type, this dropdown will have one or more of the following values:
-
Upstream activity: the default, this option has this activity take the input population from the activity immediately upstream.
-
Activity in this workflow: choosing this option makes another dropdown appear and allows you to choose which activity from that list to take the input population from.
-
Activity in a different workflow: this option is only available when there are multiple workflows, and makes the following two dropdowns appear:
-
Workflow: choose the workflow you want to select the activity from.
-
Activity in this workflow
-
Activity in a different workflow
-
This option is only available when there are additional workflows to choose from.
-
-
-
Activity: choose which activity from that list to take the input population from.
-
Where an activity takes its input source from an activity in a different workflow, and that source workflow has not yet produced any results, the activity enters a “Paused” state. Playing the activity before the source workflow has run leaves it “Paused”; it proceeds once results exist in the source workflow.
When the input source is set to either “Activity in this workflow” or “Activity in a different workflow”, a dotted orange line connects the input source activity to the activity you just configured.
When an input source is set, the line connecting the activity to its immediate upstream activity also changes from solid grey to dotted grey, and shows a tooltip confirming this. This line still indicates the sequence of activity execution (the downstream activity still runs after the upstream activity completes); it no longer indicates provision of data.
Additional Input Sources
This section allows you to rejoin other paths into this activity by adding input sources. Records from every source you add are combined. You can use this section to rejoin additional paths back into an activity, or to loop already targeted records back into the same activity to be targeted again.
Notes on specific activity types:
-
Delay: a Delay in the same workflow can be used as an additional input source. It is listed against the fulfillment activity that precedes it, shown as “activity name after hh:mm:ss”. A Delay serving as an additional input source cannot itself be fired. A Delay in a different workflow cannot be selected as an additional input source — reference the activity that feeds that Delay instead.
-
Batch Activity: a Batch Audience that takes its population from an input source does not additionally need to be configured with an audience.
-
Add an additional input source: use the green plus sign to choose an additional input source. Selecting the plus sign brings up the Add Input Source dialog, which contains the following dropdown menus:
-
Workflow: choose the workflow you want to select the activity from:
-
Activity in this workflow
-
Activity in a different workflow
-
This option is only available when there are additional workflows to choose from.
-
-
-
Activity: choose which activity from that list to take the input population from.
-
After choosing the workflow and activity, select Add to bring up the Edit Input Source dialog. This allows you to choose one or more output states from the treeview. Choose OK to close the Edit Input Source Dialog.
For each additional input source added, the following buttons are displayed:
-
Edit the outputs used by this input source: use the pencil button to bring the Edit Input Source dialog back into view and make any changes.
-
Remove this input source: use the red minus sign button to remove the input source from the list.
When you add one or more additional input sources, the following checkbox appears:
-
Target contacts more than once: allow a contact already processed by this activity to be processed again during a later iteration when supplied via an additional input source. When this box is checked, the following field appears below:
-
Re-evaluate audience on re-entry: re-evaluates the audience logic for contacts re-entering this activity. When checked (default), a re-entering contact is only advanced to its next iteration when it qualifies through the audience again, into whichever output selects it; a contact the audience suppresses is held at its current iteration and reenters once it qualifies—its re-entry is delayed, not cancelled. When unchecked, re-entering contacts advance without re-running the audience, automatically passing to downstream fulfillment activities. This box is only displayed when “Target contacts more than once” is checked and the Interactive Activity is configured with an audience.
-
Maximum iterations per Contact: the maximum number of times that a single contact can be processed by this activity. Leave blank for unlimited, the default is 2.
-
When this box is unchecked and one or more additional input sources are defined that re-join back into an Interactive Activity from further down the workflow, an orange warning message displayed below that reads “This activity has one or more additional input sources feeding contacts back into it, but “Target contacts more than once” is unchecked. Contacts already processed will not be re-targeted during later iterations. Check the property to enable re-targeting.”
The input source is represented in the UI by a dashed orange line to help track the flow of the input. The dashed orange line is read-only and cannot be deleted from the canvas; remove it by clearing the input source on the activity’s Inputs tab. The source is labelled above the line to the left of the activity, in the form [Workflow] / [Activity] / [Input State], and the activity’s own icon is augmented with a mini icon indicating that a non-default input source is configured.
Inputs to current activity
When the activity in question is downstream from another fulfillment activity, the Inputs tab lists fulfillment states:
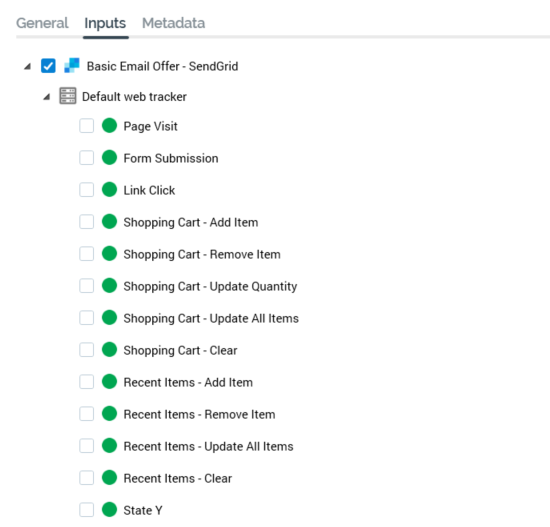
Where a channel provides both states and metrics (e.g. email), only states are available for selection in this context.
It is possible to select a subset of the records from the upstream fulfillment activity to be targeted by the downstream activity by choosing fulfillment states. Records from the upstream activity that are in any of the selected states at the time of workflow execution will be targeted by the downstream activity. Note that selection of any state(s) when executing a workflow in Test mode is equivalent to selecting the Targeted state.
Within the Inputs tab, fulfillment states are displayed using a treeview, which is expanded by default.
The first level of the treeview lists any channels of relevance to the upstream fulfillment activity. Each is accompanied by a checkbox. Checking a checkbox allows the selected channel's fulfillment states' checkboxes.
The second level of the treeview categorizes the states relevant to each channel.
The third level lists states within categories.
A channel’s fulfillment states are available when the channel is selected. Each state is accompanied by a checkbox, and you can check multiple channels’ fulfillment states concurrently. By checking checkboxes you indicate that records output by the upstream activity which are in one of the selected states at the time of workflow execution are to be targeted by the downstream activity. By default, the first channel shown in the tree and its Targeted state are checked. A validation error is raised if you do not check any fulfillment states.
A channel’s states consist of:
-
Targeted: this state is selected by default when a downstream activity is added. It represents all records output by the upstream activity.
-
Acoustic email channels only:
-
Opened
-
Opened, Not Clicked Through
-
Not Opened
-
Opted Out
-
Click Through
-
Hard Bounce
-
Soft Bounce
-
Reply Abuse
-
Reply Change Address
-
Reply Mail Block
-
Reply Mail Restriction
-
Reply Other
-
Suppressed
-
-
Cheetah Digital email channels only:
-
Soft Bounced
-
Hard Bounced
-
Click Through
-
Opened
-
Sent
-
Delivered
-
Unsubscribed
-
Targeted
-
Not Opened
-
Opened, Not Clicked Through
-
-
Eloqua email channels only:
-
Sent
-
Opened
-
Click Through
-
Bounced
-
Unsubscribed
-
Not Opened
-
Opened, Not Clicked Through
-
-
LuxSci email channels only:
-
Sent
-
Click Through
-
Spam
-
Soft Bounce
-
Hard Fail
-
Delivered
-
Failed
-
Targeted
-
Not Opened
-
Opened, Not Clicked Through
-
-
Salesforce Marketing Cloud (SFMC) email channels only:
-
Opened
-
Unsubscribed
-
Click Through
-
Forward to Social
-
Opened, Not Clicked Through
-
Forwarded
-
Not supported when RPI is configured to retrieve SFMC email results data via Redpoint Data Management.
-
-
Hard Bounce
-
Soft Bounce
-
Other Bounce
-
Not Opened
-
In addition to the standard Targeted state, a series of custom states, as defined within the channel’s http://Salesforce.com account’s configuration, are made available.
-
-
SendGrid email channels only:
-
Delivered
-
Processed
-
Dropped
-
Bounced
-
Soft Bounce
-
Deferred
-
Opened
-
Click Through
-
Unsubscribed
-
Reported As Spam
-
Not Opened
-
Opened, Not Clicked Through
-
-
Airship Push Notification channels only:
-
Targeted
-
-
Custom states
-
Web events adapter states: these consist of:
-
Standard web events adapter states. When a channel is linked to a web events adapter, and offer content contains a hyperlink with a URL compatible with the web events adapter, the following states are available at downstream workflow activities:
-
Page Visit
-
Form Submission
-
Link Click (a page visitor selected on a link in the web page).
You can right-click any of the above states to display an “Add criterion to state” context menu. This allows you to specify a specific page, form or link to which the downstream activity is to react. If you choose a page, this will typically be an RPI landing page to which the page linked to in the offer links in turn. State tracking information will then be passed through to subsequent pages.
On selecting the option, a sub-state is added below the standard web events state. The sub-state is presented in edit mode, with a default name of 'New state criterion'. Its checked status reflects that of its parent web event standard state.
Additional context menu options are available at the sub-state: -
Edit
-
Remove
-
-
Custom states as defined in any web events adapters associated with the upstream activity’s channel. These are listed in line with the standard web events states described above.
The fourth level of the treeview is only relevant to the SFMC Email Click Through state. It lists any URLs included within the SFMC email offer content and is available when the Click Through state is checked. Each URL is accompanied by a checkbox. You can check one or more checkboxes to indicate that recipients selecting on the URL(s) in question within the received in email are to be targeted by the downstream fulfillment activity.
When the Inputs tab is shown as described, the Filters tab is not shown.
Filters tab
When an activity is preceded by an upstream batch audience, or interactive activity configured with an audience, and is not preceded by an upstream fulfillment activity, the Filters tab is shown.
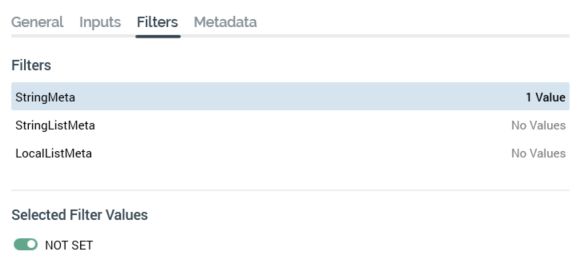
It is used to determine the subset of the parent activity’s data that is to serve as the current activity’s input data by specifying the metadata attribute values to which the current activity will apply. Metadata can be assigned at the parent audience’s audience to append data to records during audience execution; you can specify which of the assigned metadata values the current activity will act upon in the Filters tab.
The tab contains the following:
-
Filters grid: the grid lists all metadata attributes made available by the preceding activity. You can select a metadata attribute.
-
The Selected Filter Values grid: populated with all distinct values for the selected metadata attribute. You can select the metadata values to which the current activity is to apply. The number of selected values is displayed to the right of the metadata attribute in the filters grid. When you select values, when the current activity executes, only those records with the selected metadata attribute values will be acted upon by the current activity.
When the Filters tab is displayed, it can be used in conjunction with the Inputs tab to select the current activity’s input data.
Metadata tab
This tab is available at offers, export activities and controls.
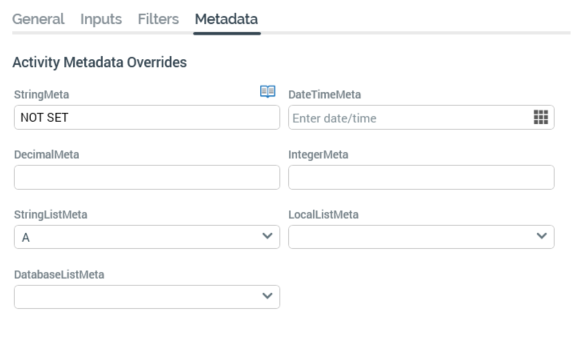
Default metadata values from audience definition are shown within the panel. Hierarchical overrides are not displayed; for example, a metadata attribute value that has been overridden at an upstream audience is not shown within the panel. You can override metadata values directly at an interaction activity using the panel; existing offer history meta records are updated with specified values prior to fulfillment. All downstream activities inherit values overridden at an interaction activity; however, they only display defaults from the audience definition.
Seeds tab
This tab is only displayed for batch audiences, and interactive activities that have been configured with an audience. It allows you to assign seed groups directly to audience segments.
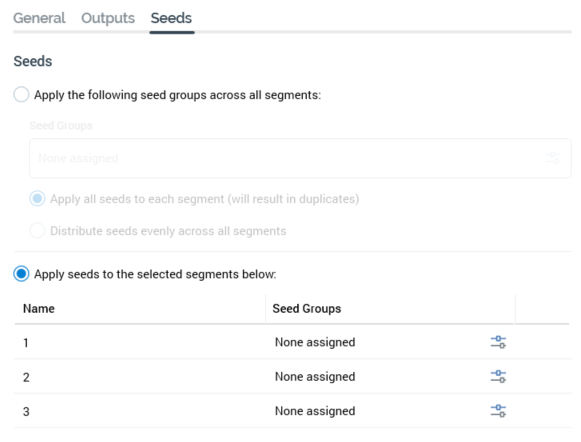
The tab contains the following:
Two outer radio buttons allow you to specify the basic type of seed assignment.
-
Apply the following seed groups across all segments: this option is not selected by default. When selected, seed groups will be applied across all segments. Additional settings allow you to refine how this will occur:
-
Seed groups: you can select the seed groups that you wish to assign across all segments. By default, no seed groups are selected for assignment. You can select the Add/Remove Seed Groups button to display the Add/Remove Seed Groups dialog, within which you can choose the seed groups to be assigned across all segments.
The dialog lists all seed groups configured for the current RPI tenant. The name of each is shown, along with its description and a checkbox (unchecked by default). Having made your selection, on selecting off the dialog, the selected seed groups are displayed at the configuration panel.
Having selected the required seed groups, two inner radio buttons allow you to define how they are to be assigned across all segments: -
Apply all seeds to each segment (will result in duplicates): this option is selected by default. If selected, as stated, all seeds within the selected seed groups will be applied to all segments generated by the audience, which, in the case of a multi-segment audience, will result in the application of the same seed across more than one segment.
-
Distribute seeds evenly across all segments: again as stated, if this option selected, seeds from the specified seed groups will be assigned evenly across all segments generated by the audience.
-
-
Apply seeds to the selected segments below: this option is selected by default. It allows you to assign seed groups to specific audience segments manually.
When selected, a grid listing all audience segments is shown. For each, the Name of the segment is displayed, along with a list of the seed groups assigned to that segment. When displayed initially, no seed groups are assigned to segments. You can select the inline Add/Remove Seed Groups button to display the Add/Remove Seed Groups dialog, within which you can choose the seed groups to be assigned to the segment. On selecting off the dialog, the selected seed groups are displayed in the grid.
Advanced tab
This tab is only displayed for batch audiences, and interactive activities that have been configured with an audience. It allows you to access one specific, advanced-level feature.
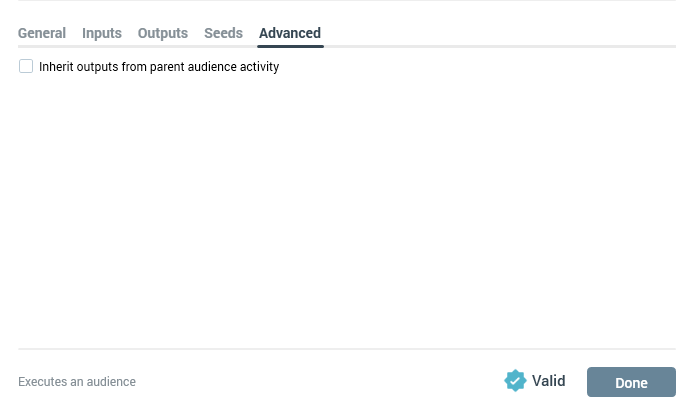
The advanced tab is only displayed if there exists at least one upstream batch audience, or interactive activity configured with an audience, within the current workflow.
The tab contains the following:
-
Inherit outputs from parent audience activity: this checkbox is unchecked by default. Checking it allows the accompanying dropdown and displays the following verbiage: "This activity's outputs will be overwritten by the selected activity's."
-
Activity: this dropdown field is available if the Inherits... checkbox is checked. It lists all upstream batch audiences and interactive activities configured with audiences. List entries are ordered as per their position within the workflow, and the last upstream activity is selected automatically.
On workflow execution, if the Inherit... checkbox is checked, segment names and metadata at the current batch audience/interactive activity will be inherited from the selected upstream activity.