

Overview
Having added a client to the cluster, you need to install it. Installing a client creates the operational databases required to persist any RPI collateral created by the client’s users, and also allows you to capture the details of the data warehouse to which the client’s users will connect to undertake customer or prospect communications.
Note that, unlike the core and node roles, there is no equivalence for updating a client.
On highlighting a client with a Status of Not Installed and Persistence state of Unchanged, the Install button is enabled. Clicking it displays the Install Client overlay.
The overlay contains the following:
Install Client Section
Installation of a client is carried out in a wizard style, using two sub-interfaces:
-
Configure
-
Install
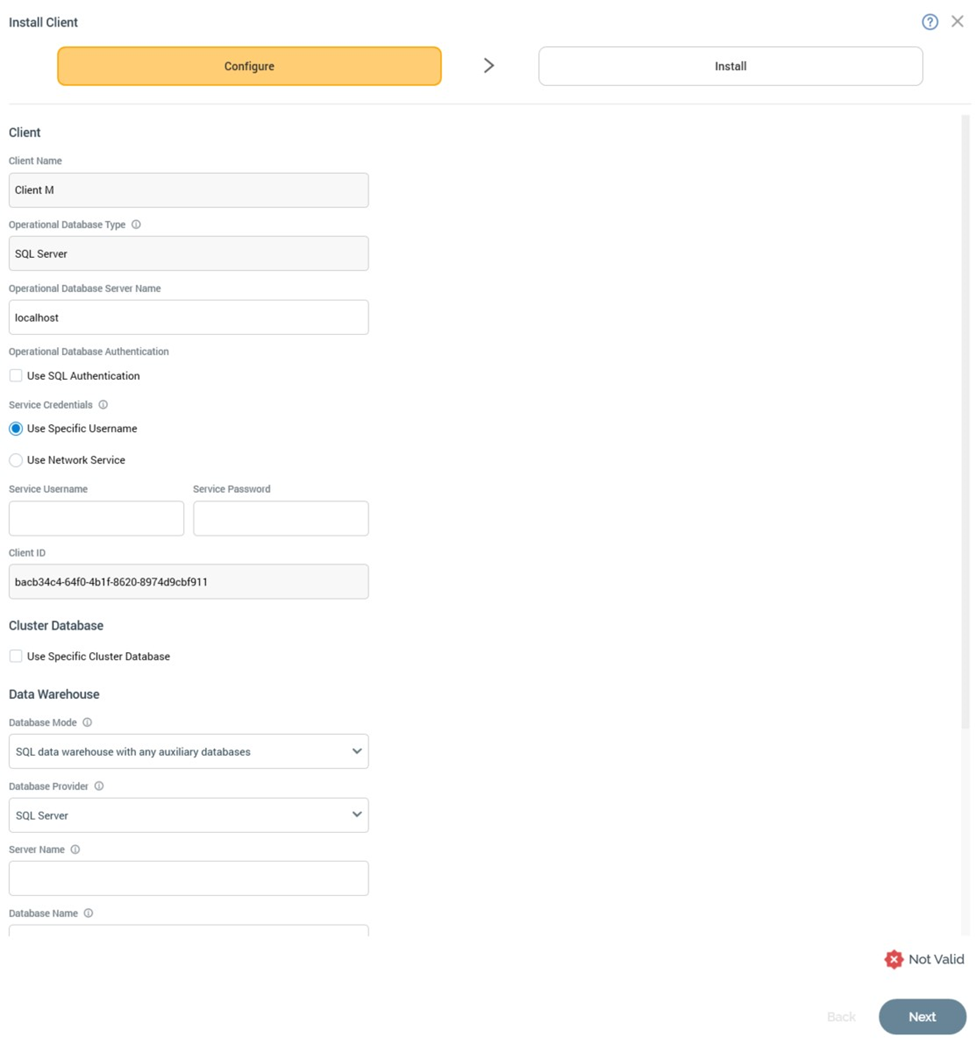
A graphical representation of current progress through the wizard is displayed within the top section:
Configure Sub-interface
The Configure sub-interface allows you define a series of properties required by Server Workbench in advance of installing the client.
It consists of Client, Cluster Database, Data Warehouse and End User License Agreement sections.
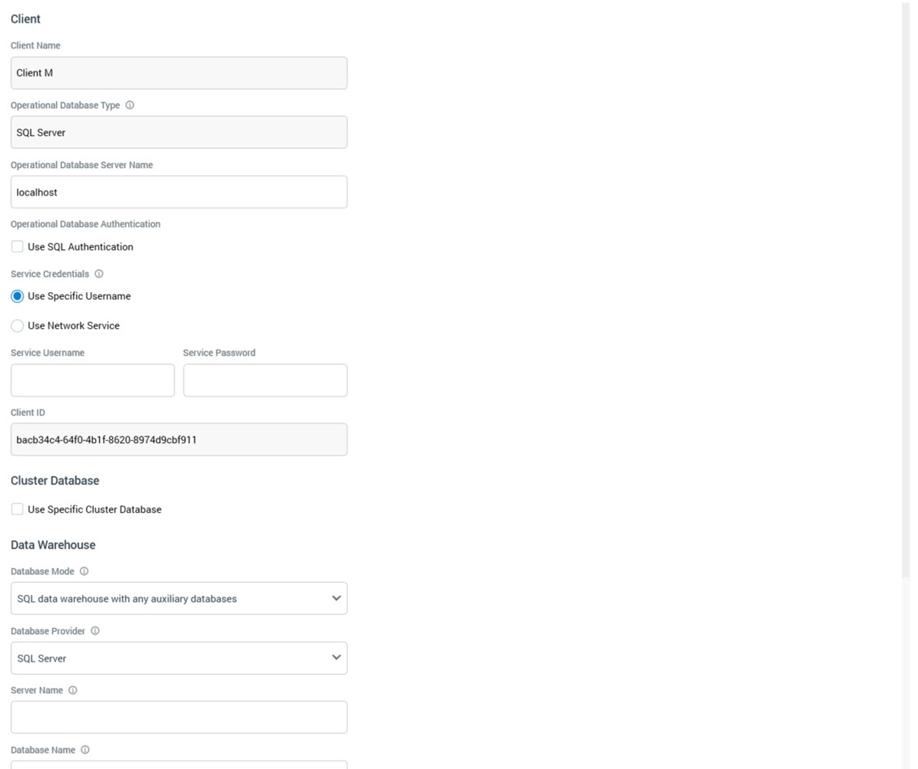
Client Section
This section allows you to define properties relating to the client’s operational databases (Interaction_XXX and InteractionAudit_XXX) and service credentials. The following are shown:
-
Client Name: read-only.
-
Operational Database Type: this read-only property displays the platform on which the operational databases are installed.
-
Operational Database Server Name: the name of the server on which the client’s operational databases are to be installed.
-
Operational Database Authentication: containing a Use SQL authentication checkbox. When unchecked, connection will be made using Windows authentication. When checked, a SQL Server login username and optional password can be provided instead.
-
Service Credentials: two radio buttons are available:
-
Use Specific Username: selected by default. When chosen, you can provide a domain Service Username (with sufficient privileges), that will be used to run the client’s Windows services. An optional Service Password can also be supplied.
-
Use Network Service: when selected, the client’s services will run under the current machine’s Network Service account. The account must be a member of the local Administrators group.
-
-
Client ID: a read-only GUID.
Cluster Database Section
This section allows you to specify the location of the cluster’s operational databases (Pulse and PulseLogging).
-
Use Specific Cluster Database: this checkbox should be checked in the event that the cluster operational databases are located on a server different to the client operational databases. It is unchecked by default. When checked, the Operational database type, Cluster database server name and Use SQL authentication properties are displayed.
-
Operational Database Type: this read-only property displays the platform on which the operational databases are installed.
-
Cluster Database Server Name: this property is displayed when Use specific cluster database is checked. It is blank by default, and mandatory if displayed.
-
Operational Database Authentication: containing a Use SQL authentication checkbox. This checkbox is displayed when Use specific cluster database is checked. It is unchecked by default. If checked, the Operational Database Username and Password properties are displayed.
-
Operational Database Username: this property is displayed when Use SQL authentication is checked. It is blank by default, and mandatory if displayed.
-
Operational Database Password: this property is displayed when Use SQL authentication is checked. An optional password-masked field, it is blank by default.
Data Warehouse Section
This section allows you to capture details of the data warehouse to which the client will connect. The following properties are shown:
-
Database Mode: this dropdown property exposes the following values:
-
SQL databases with any auxiliary databases (the default)
-
NoSQL databases only
-
NoSQL data warehouse with SQL auxiliary databases
-
-
Database Provider: a dropdown field that allows you to choose the type of database. Available values are constrained by the selected Database mode.
-
If in SQL database mode, the following databases are available:
-
Actian VectorH
-
AWS Redshift
-
Azure Database for MySQL
-
Azure Database for PostgreSQL
-
Azure Synapse Analytics
-
Azure SQL Database
-
DB2
-
Google BigQuery
-
GreenPlum
-
MariaDB
-
MySQL
-
Netezza
-
Oracle
-
PostgreSQL
-
SAP HANA
-
Snowflake
-
SpliceMachine
-
SQL Server (default)
-
SQL Server PDW
-
Sybase IQ
-
Teradata v15
-
Teradata v16
-
Vertica
-
-
If in a NoSQL database mode, the following databases are available:
-
Couchbase
-
MongoDB Document (also used for CosmosDB)
-
-
If SQL Server is selected, the following properties are shown:
-
Server name
-
Database name
-
Database schema
-
Use SQL authentication: checkbox; when checked, enables:
-
Username
-
Password
-
If Netezza is selected, the following properties are shown:
-
Data Source Name (DSN)
-
Database schema
If Oracle is selected, the following properties are shown:
-
Server name
-
Database name
-
Database schema
-
Use TNS name: if checked, the Server name will be used as the TNS name.
-
Use load balancing: checkbox
-
Use explicit credentials: checkbox; when checked, enables:
-
Username
-
Password
-
If Teradata v15 or v16 is selected, the following properties are shown:
-
Server name
-
Database schema
-
Use explicit credentials
-
Username
-
Password
If GreenPlum is selected, the following properties are shown:
-
Data Source Name (DSN)
-
Database schema
If MySQL is selected, the following properties are shown:
-
Data Source Name (DSN)
-
Database schema
If Sybase IQ is selected, the following properties are shown:
-
Server name
-
Database name
-
Database schema
-
Use explicit credentials: checkbox; when checked, enables:
-
Username
-
Password
-
If AWS Redshift is selected, the following properties are shown:
-
Data Source Name (DSN)
-
Database schema
If PostgreSQL is selected, the following properties are shown:
-
Data Source Name (DSN)
-
Database schema
If Actian VectorH is selected, the following properties are shown:
-
Data Source Name (DSN)
-
Database schema
If DB2 is selected, the following properties are shown:
-
Data Source Name (DSN)
-
Database schema
If Splice Machine is selected, the following properties are shown:
-
Data Source Name (DSN)
-
Database schema
If Azure SQL Database is selected, the following properties are shown:
-
Server name
-
Database name
-
Database schema
-
Use explicit credentials: leave this unchecked to use Azure Managed Identity.
-
Username: shown if Use explicit credentials checked
-
Password: shown if Use explicit credentials checked
If Vertica is selected, the following properties are shown:
-
Server name
-
Database name
-
Database schema
If MariaDB is selected, the following properties are shown:
-
Data Source Name (DSN)
-
Database schema
If Azure SQL Database is selected, the following properties are shown:
-
Server name
-
Database name
-
Database schema
If SAP HANA is selected, the following properties are shown:
-
Server name
-
Database name
-
Database schema
If Azure Database for MySQL is selected, the following properties are shown:
-
Data Source Name (DSN)
-
Database schema
If Azure Database for PostgreSQL is selected, the following properties are shown:
-
Server name
-
Database name
-
Database schema
-
Use explicit credentials: checkbox; when checked, enables:
-
Username
-
Password
-
If Google BigQuery is selected, the following property is shown:
-
Database schema: defaults to the value ‘default’
If Snowflake is selected, the following properties are shown:
-
Password
-
DSN
-
Database schema
If MongoDB document is selected, the following property is shown:
-
Connection configuration: this multiline field is mandatory if displayed. It defaults to the following:
JSON{ "ConnectionString": "mongodb://localhost:27017", "DatabaseName": "_dbname_" }This option is also used if connecting to an Amazon DocumentDB database. An example connection string:
JSON{ "ConnectionString": "mongodb://rpiadmin:vh93e3cXqRYi@docdb-manila.cxlh5tkbvodq.apsoutheast-2.docdb.amazonaws.com:27017?ssl=false&replicaSet=rs0", "DatabaseName": "rpi" }Note that the RPI server must be hosted on an Amazon EC2 Windows server within the same VPC.
If Couchbase is selected, the following property is shown:
-
Connection configuration: this multiline field is mandatory if displayed. It defaults to the following:
JSON{ "Username": "_username_", "Password": "_password_", "servers": [ "http://localhost:8091/pools" ] }
To leverage PartitionKey functionality at a CosmosDB database, please configure the connection string as per the following example:
{
  "ConnectionString": "mongodb://...",
  "DatabaseName": "sample",
  "BatchUploadSize": 1000,
  "UseBatchForUpdates": true,
  "PartitionKey": {
    "Mode": "CombinedProperties",
    "Keys": [
      "FieldName1",
      "FieldName2"
    ],
    "Prefix": "RPI"
  }
}
If using PartitionKey at interaction workflow execution, a partitionKey property will be appended for every NoSQL document created within a CosmosDB collection when the PartitionKey setting is configured within the Cosmos DB database's connectionstring, and one or more Keys are found in the document's properties. The partitionKey property will contain a value sourced as follows:
If Mode is set to 'CombinedProperties', Key will be set to the concatenated values of Keys found in the NoSQL Document.
If Mode is set to 'RandomSuffix', Key will be set to a random GUID.
If Mode is set to 'PreCalculatedSuffix', Key will be set to a concatenation of Prefix and a random GUID.
Keys are delimited using the underscore character. Values are always persisted as text.
If using PartitionKey in a realtime cache context, a partitionKey property will be created for every NoSQL document in the specified CollectionName. The partitionKey value will be sourced from the NoSQL document that matches the specified PartitionKeys (please see the MongoDB Cache configuration documentation). If there is no matches, a partitionKey will not be created.
Irrespective of the type of data warehouse specified, the requisite database drivers must be installed in order for connection to be made.
End User License Agreement Section
This section is displayed at the bottom of the Configure sub-interface. It contains the following:
-
Check this box to accept the Redpoint Interaction End User License Agreement: this checkbox is unchecked by default. You must accept the EULA before proceeding with installation of the client.
-
View Redpoint Interaction End User License Agreement: clicking this button displays the End User License Agreement in a separate Window.
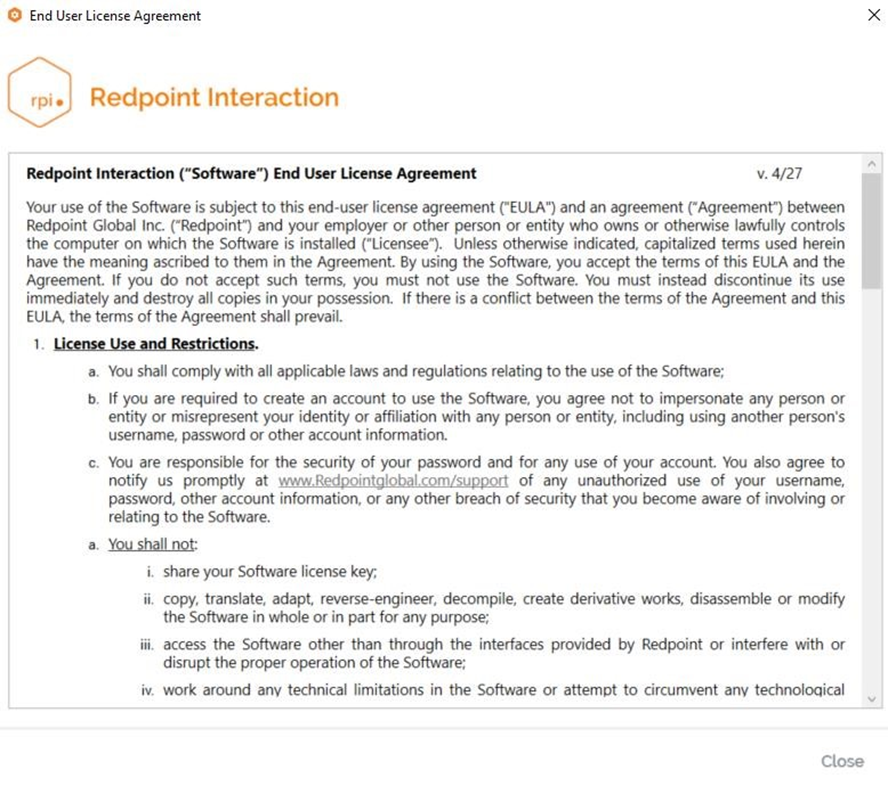
You can close the Window using the button at the bottom right.
Validation
If you have not correctly completed the mandatory fields within the Configure sub-interface, a validation errors indicator is displayed to the bottom right:
Clicking the indicator displays details of the errors in a dialog.
You cannot progress to the Install interface when outstanding validation errors remain.
If the configuration is valid, a green indicator is shown:
You may now move to the next wizard step.
Navigation
You can move forwards through the Install Client wizard by clicking on the Next button at the bottom right. Doing so presents an “Are You Sure?” dialog, prior to display of the Install subinterface.
If you click Next without accepting the EULA, a message (‘You must accept the End User License Agreement before installing the software for this client’) is shown, and you are unable to proceed with the installation.
Install Sub-interface
This interface is used to provide visibility of the tasks executed during installation of a client.
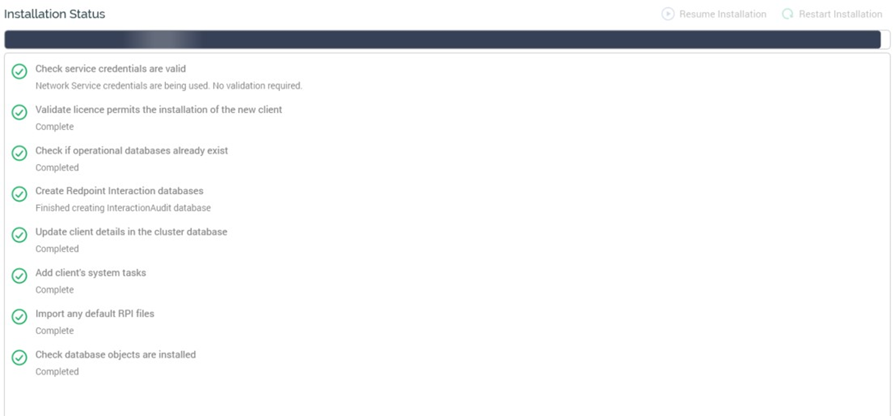
Two buttons are shown at the toolbar:
-
Resume Installation: this button is available when the installation’s status is Has Been Paused on Warnings. It allows you to carry on the installation at the point where the warning occurred.
-
Restart Installation: this button is available when the status is one of Completed with Warnings or Has a Dependent Job with Errors. It allows you to repeat the installation steps from the beginning.
Installation Steps
Details of status information provided at each installation step, and overall progress, are provided in the Core Pre-Install Checklist documentation.
Navigation
On completing the installation, the Next button, displayed at the bottom right, is replaced by a
Finish button. Clicking Finish closes the Install Client overlay and displays the Server Workbench tab set, which includes all tabs. The Clients tab is displayed, the installed client’s status is updated to Installed, and its connection strings are shown.
If you click Finish prior to completing the installation, you will be advised to wait until all steps are complete.
You can return to the Configure sub-interface using the Back button.