

Provision an SFMC Core Account
-
Request core account with:
-
"Sender Authentication Package" (SAP).
-
"Automated Interaction Management" (AIM).
-
FTP user and password.
-
-
Request disabling of the default headers and footers for the account.
-
Request to enable "Extract Tracking".
-
Request to enable "Secure Link Wrapping".
-
Confirm that the back-end Business Rule called "Enhanced Sender Profiles" is enabled.
-
Set Core Account password and provide to Operations for documenting in Master Passwords spreadsheet.
Post-Provisioning Steps
-
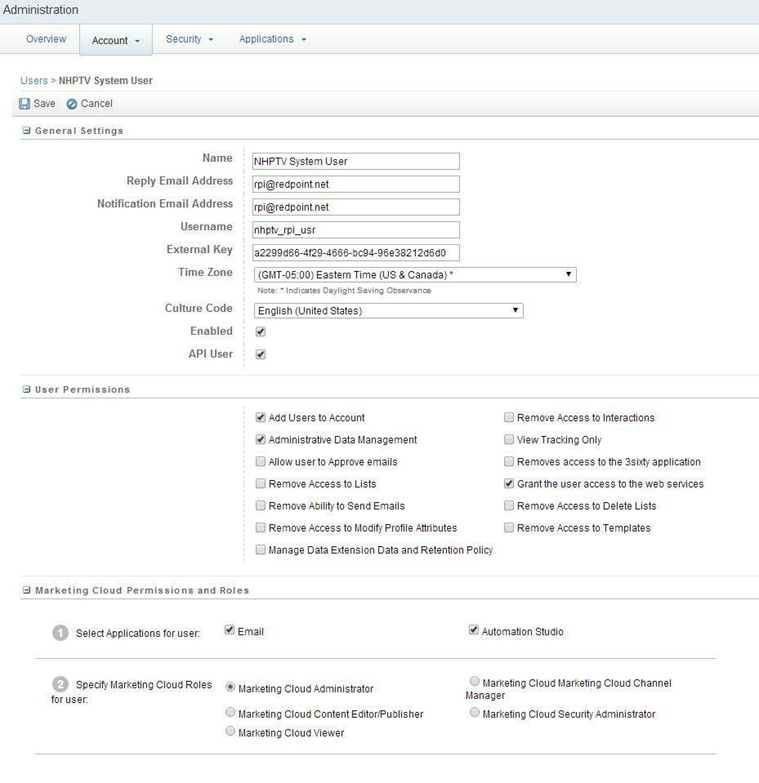
Set up RPI user for the channel configuration from Administration -> Users.
-
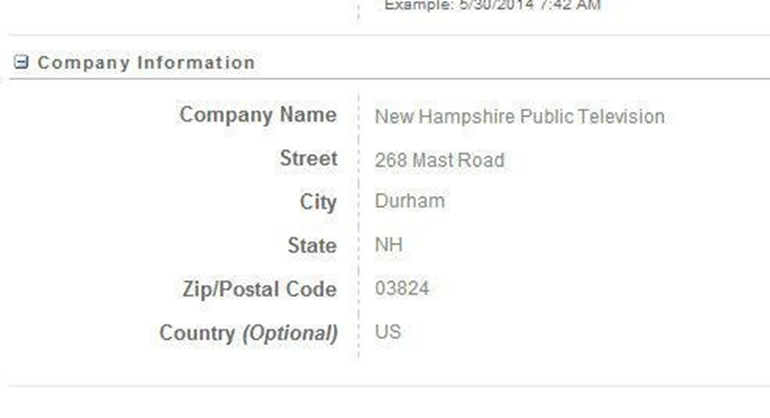
Update Company Information from Administration -> Account Settings: (this defines the information that will be put into the merge fields in RPI).
Configuring PGP Encryption for Events Data Extract
These sections describe the steps required to configure PGP encryption for the events data extract.
Creating Data Extract Activity
This section describes how to create Data Extract Activity from SFMC automation studio, which is used to pull email campaign event data from within RPI. Please follow the steps below:
-
Open the web browser and login to your SFMC account.
-
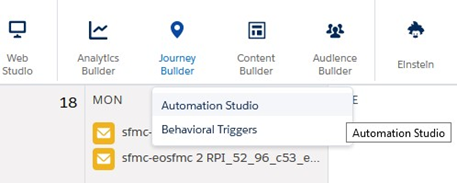
In Salesforce Marketing Cloud main page, hover over Journey Builder menu and click Automation Studio.
-
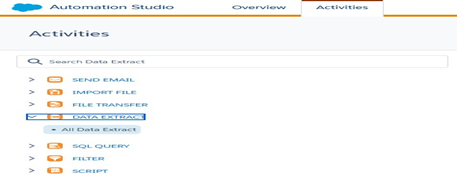
In Automation Studio main page, click Activities tab.

-
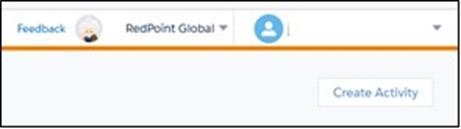
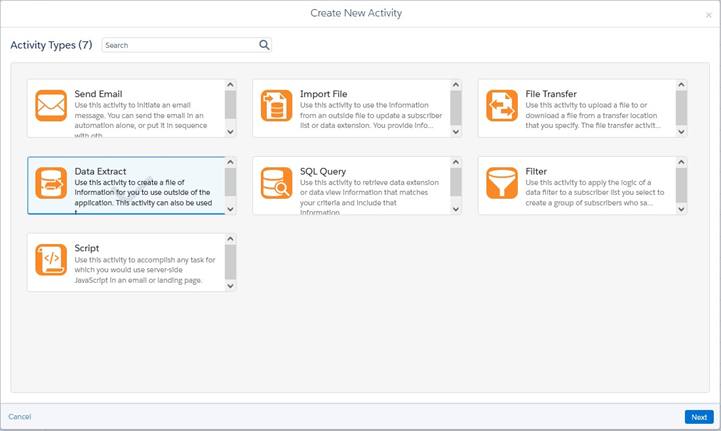
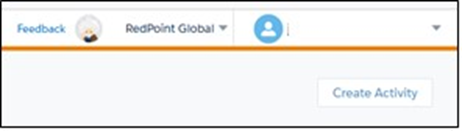
To create new Data Extract activity, click the Create Activity button located at the upper right corner of the Activities tab.
-
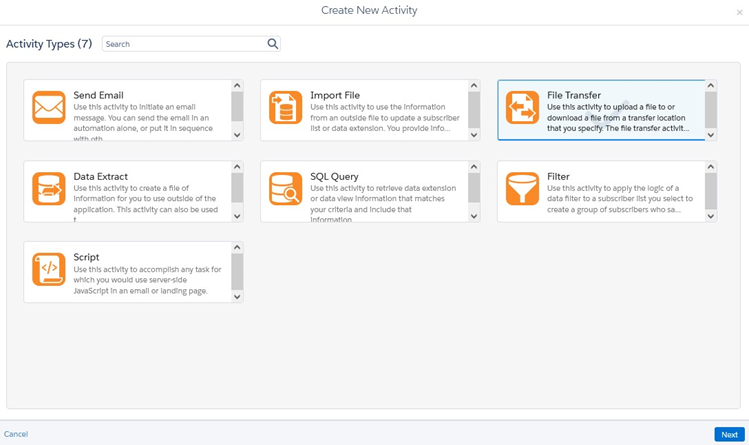
Select Data Extract activity and click Next.
-
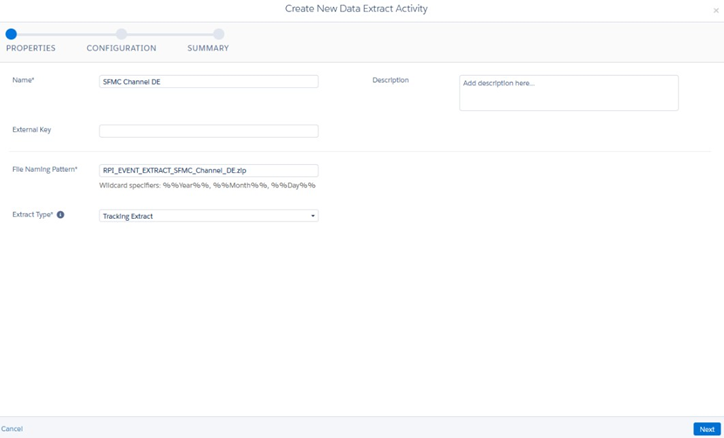
In the Properties tab, provide values for the required text fields in the Data Extract activity.
-
Name* - Descriptive name of the Data Extract activity
-
Description - Additional information about the Data Extract activity
-
File Naming Pattern* - A file name used when generating the exported email campaign event data. The file name has the following naming pattern:
RPI_EVENT_EXTRACT_<Channel Name>.zip
The<Channel Name>suffix should match the Salesforce Marketing Cloud channel name configured in RPI. If one or more spaces in the channel name itself, it should be replaced by (_) underscore character when providing the file name. For example, if channel name isSFMC Email DE, file name must be set toRPI_EVENT_EXTRACT_SFMC_Email_DE.zip. -
Extract Type* - Must always be set to Tracking Extract.
-
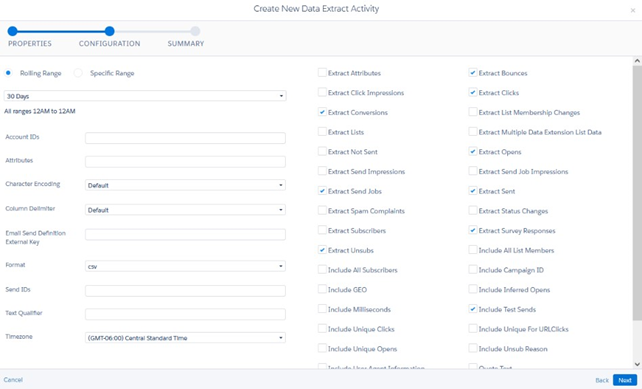
Click Next. In Configuration tab, configure the following.
-
Rolling Range* – Value must be set to 30 Days
-
Other settings must remain with their default values. Click Next.
-
-
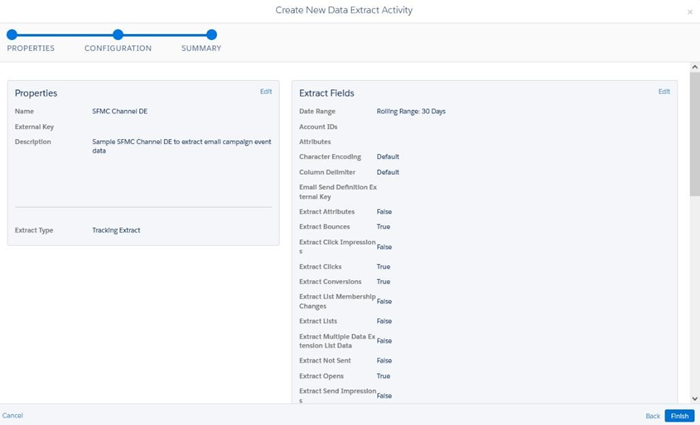
Finally, in the Summary tab, click Finish to create the Data Extract activity.
Copying Data Extract Activity ID
This section describes how to capture and copy the Data Extract Activity ID created in SFMC automation studio and used as a Tracking extract activity ID within the SFMC channel configuration settings in RPI. Please follow the steps below:
-
Hover over and click the Data Extract activity created in the prior section, from Data Extract Activities list.

-
In the address bar of your web browser, copy the Data Extract activity id that can be found in the link as shown below:
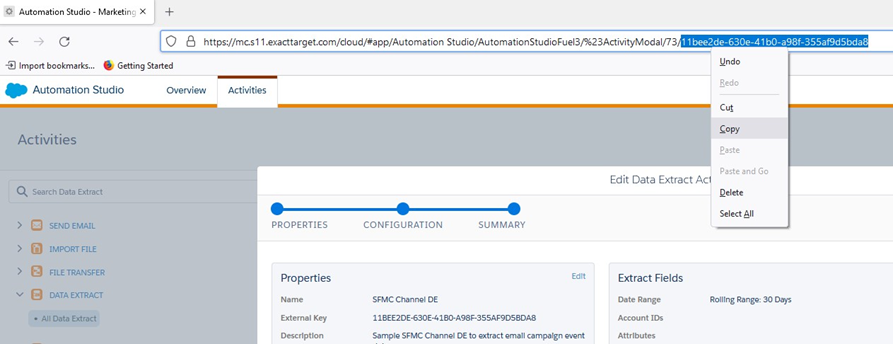
https://mc.s11.exacttarget.com/cloud/#app/Automation%20Studio/AutomationStudioFuel3/%23ActivityModal/73/11bee2de-630e-41b0-a98f-355af9d5bda8
The bolded text is the assigned Data Extract activity ID. -
Paste the value into Tracking extract activity ID field in your SFMC channel configuration settings.

Creating File Transfer Activity
This section describes how to create the File Transfer Activity within SFMC automation studio, which is used to initiate the file move from the Safehouse. Please follow the steps below:
-
Open the web browser and login to your SFMC account.
-
On Salesforce Marketing Cloud main page, hover over on Journey Builder menu and click Automation Studio.
-
To create new File Transfer activity, click Create Activity located at the upper right corner of the Activities tab.

-
Select File Transfer activity and click Next.

-
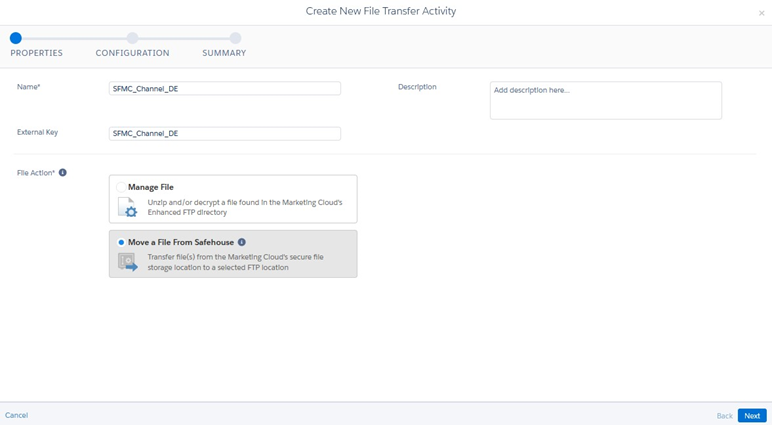
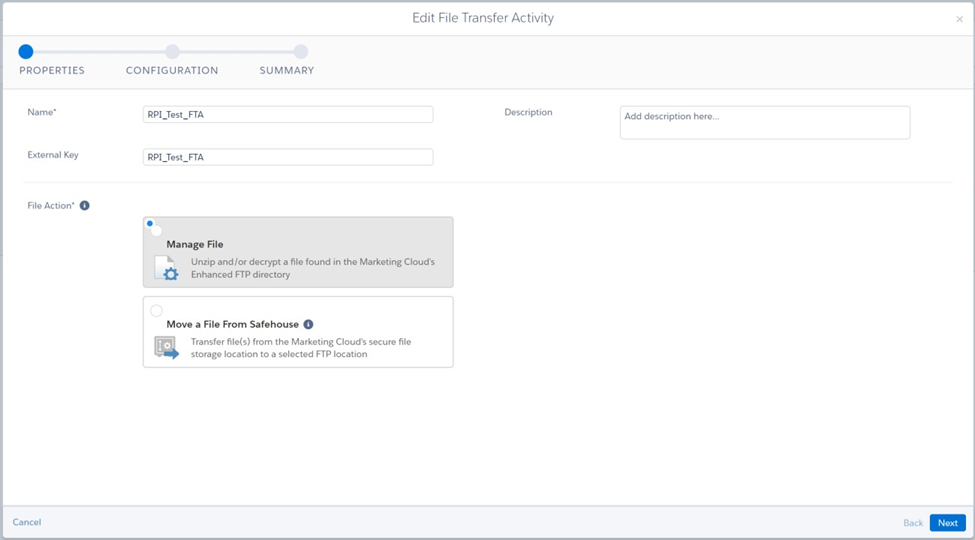
In Properties tab, provide the required text field values for the File Transfer activity.
-
Name* - Descriptive name of the File Transfer activity
-
Description - Additional information about the File Transfer activity
-
External Key* - Uniquely identifiable key name used to run File Transfer activity via RPI. NOTE: Spaces in key name are not allowed.
-
File Action* - Must always be set to Move a File From Safehouse.
-
-
Click Next. In Configuration tab, configure the following.
-
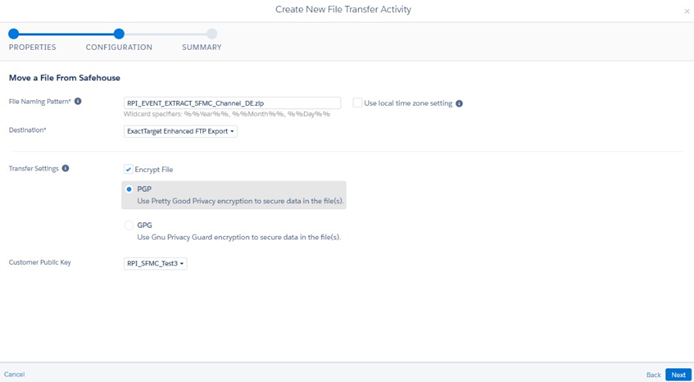
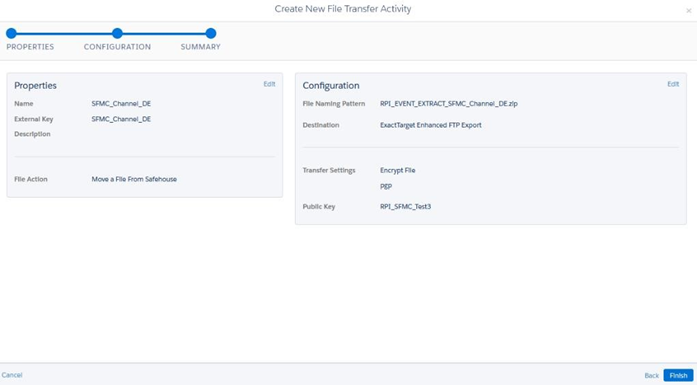
File Naming Pattern* - A file name used when the exported file generated from a safe house to the destination SFTP folder. The file name has the following naming pattern:
RPI_EVENT_EXTRACT_<Channel Name>.zip
The<Channel Name>suffix should match the Salesforce Marketing Cloud channel name configured in RPI. If one or more spaces in the channel name itself, it should be replaced by (_) underscore character when providing the file name.
For example, if channel name isSFMC Email DE, file name must be set toRPI_EVENT_EXTRACT_SFMC_Email_DE.zip -
Destination* - The SFTP export destination folder where the file is saved.
-
Transfer Settings* - Must always be set to Encrypt File and PGP.
-
Customer Public Key – Customer’s PGP public encryption key.
-
-
Click Next. In the Summary tab, click Finish to create the File Transfer Activity.
-
The External Key in File Transfer activity will be used as File transfer activity name in SFMC channel configuration in RPI as shown below:

Configuring PGP Encryption for Data Extension Extracts
These sections describe the steps required to configure PGP encryption for the data extracts used to create the data extension.
Creating File Transfer Activity
This section describes how to create the File Transfer Activity within SFMC automation studio, which will be used to decrypt the file after landing in the SFMC FTP Import folder. Please follow the steps below:
-
Open the web browser and login to your SFMC account.
-
On Salesforce Marketing Cloud main page, hover over on Journey Builder menu and click Automation Studio.

-
To create new File Transfer activity, click Create Activity located at the upper right corner of the Activities tab.
-
Select File Transfer activity and click Next.
-
In Properties tab, provide the required text field values for the File Transfer activity.
-
Name* - Descriptive name of the File Transfer activity
-
Description - Additional information about the File Transfer activity
-
External Key* - Uniquely identifiable key name used to run File Transfer activity via RPI. NOTE: Spaces in key name are not allowed.
-
File Action* - Must always be set to Manage File
-
-
Click Next. In Configuration tab, configure the following.
-
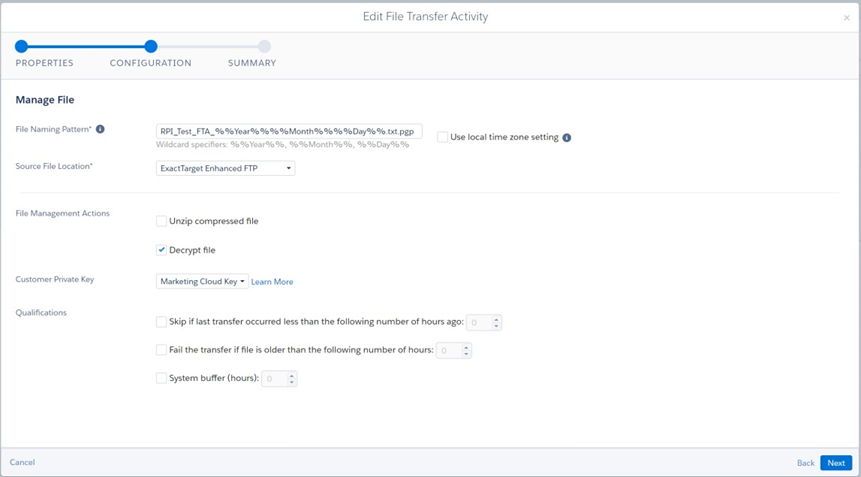
File Naming Pattern* - this is used to find the PGP file created by RPI.
It must have the following format:<external-key-name>_%%Year%%%%Month%%%%Day%%.txt.pgp
For example, if the external key configured in step 13c is calledRPI_Test_FTA, the file name convention would beRPI_Test_FTA_%%Year%%%%Month%%%%Day%%.txt.pgp
%%Year%%= wildcard for year the file was created
%%Month%%= wildcard for month the file was created
%%Day%%= wildcard for day the file was created -
Source File Location* - leave it as ExactTarget Enhanced FTP
-
File Management Actions – enable the Decrypt file option
-
Customer Public Key – Customer’s PGP public encryption key
-
-
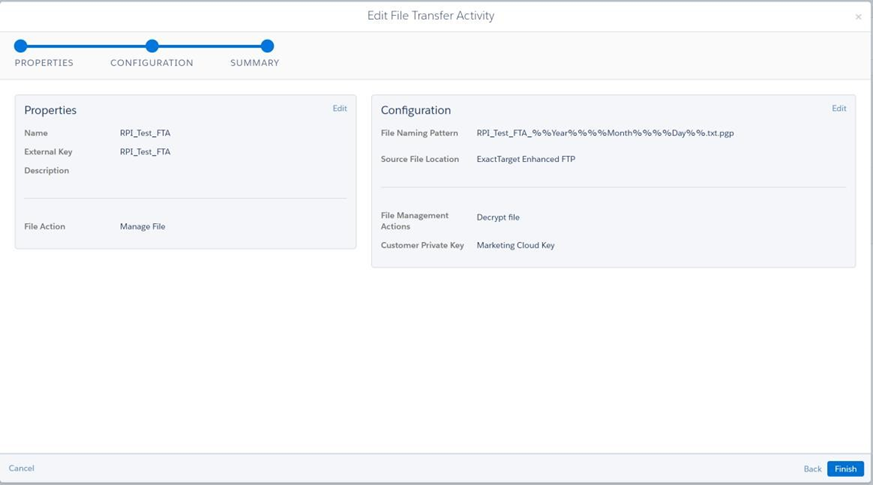
Click Next. In the Summary tab, click Finish to create the File Transfer Activity.
-
The External Key in File Transfer activity will be used as File transfer activity name in SFMC channel configuration in RPI as shown below:

Enabling OAuth Authentication for SFMC
-
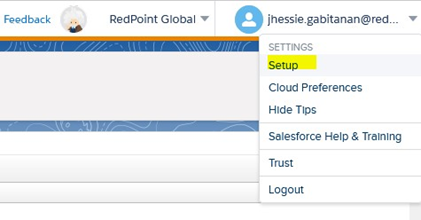
Open the web browser and login to your SFMC account.
-
From the Settings menu, click Setup.
-
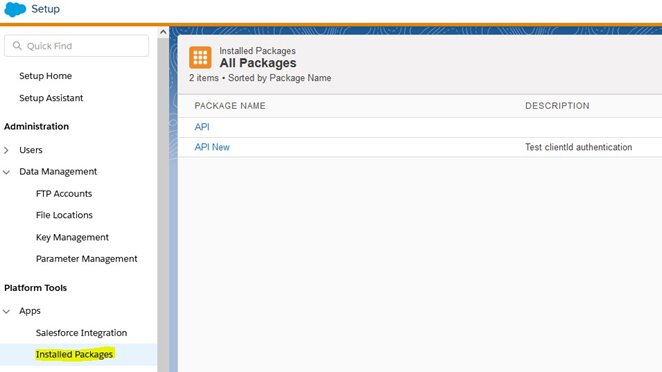
On Setup tab, expand Apps under Platform Tools group setting. Click Installed Packages.
-
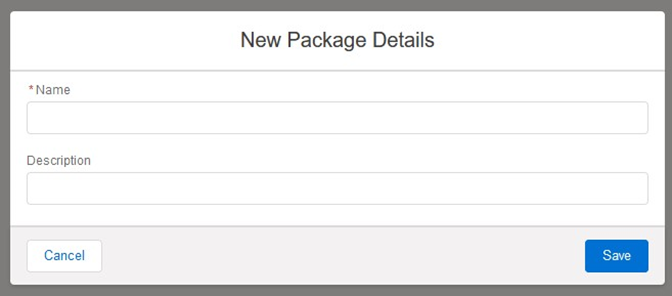
To create new OAuth package, Click the “New” button.

-
Provide the name and description of the new OAuth package. Click “Save” button:
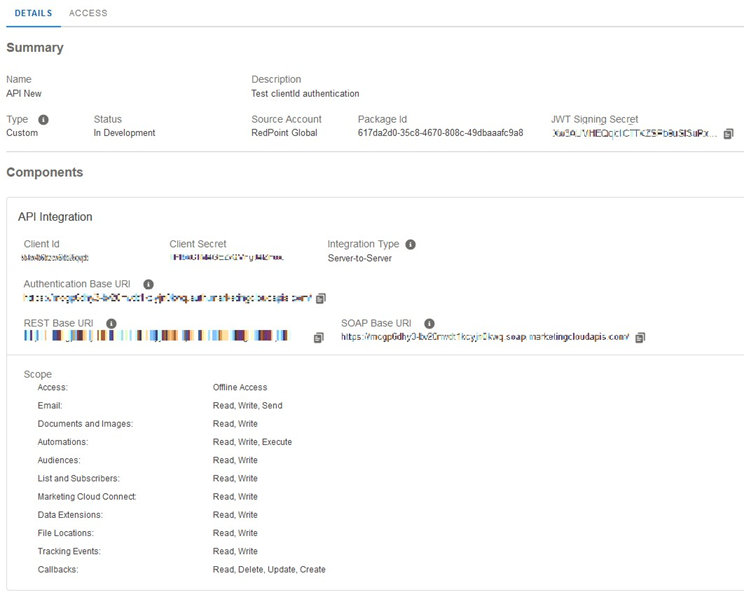
-
Below is an example of the Details Summary for a newly created OAuth package.
-
Modify the default scope of the OAuth package by clicking the “Edit” button:
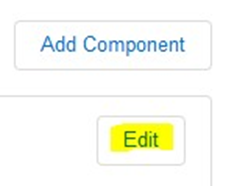
-
In the Edit dialog, select the appropriate API permissions for the OAuth package. Click the “Save” button:
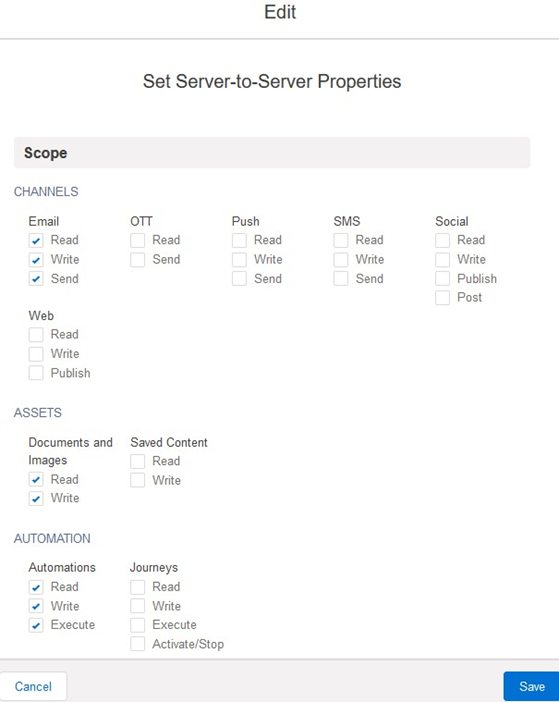
-
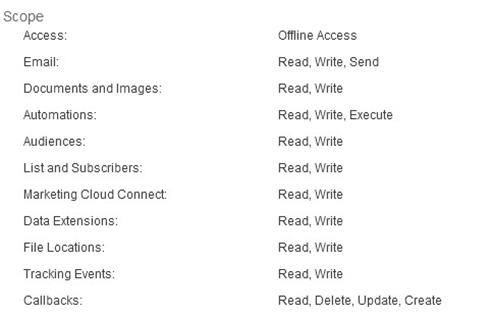
Below are the default OAuth scopes, required by Redpoint Interaction:
-
Within the configuration of the SFMC Email and Data Transfer channels, enable “Use OAuth authentication” and enter the Client Id and Client secret values, as shown on the Details Summary page in the SFMC portal.
