

Actions for all file-types
Rename
This command allows you to rename a file. A name must be supplied and can be a maximum of 100 characters in length. You cannot rename the file to the same name as another file of the same type within the same folder. Also, you cannot rename a file within the recycle bin. When you rename a file, a new version of the file is not created.
Delete
Deleting a file moves it to the recycle bin. Deletion is protected by an ‘Are you sure?’ dialog.
If you try to delete a file that has files that depend upon it, you are prevented from doing so. Examples include:
-
Trying to delete a selection rule linked dynamically within another selection rule.
-
Trying to delete a selection rule linked dynamically within an audience via a filter, suppressions block or split rule.
-
Trying to delete an audience upon which an audience activity is based within an interaction.
If you attempt to delete an interaction that contains at least one workflow that has commenced execution in Production mode, and which has not been rolled back, you will not be able to do so. A dialog is displayed ('Unable to delete [Interaction] as it contains one or more production workflows').
Copy/Paste
Copy is available in the context menu when one or more files are selected. Invocation of copy results in the display of an informational message at the bottom left of the RPI interface (‘[FileName] has been copied to the clipboard’ or ‘[n] files have been copied to the clipboard’).
When file(s) have been copied to the clipboard, you can right-click a folder, at both treeview and files list, to invoke Paste. Pasting file(s) creates a copy or copies thereof in the destination folder. New files’ versions are set to 0.1, and their Created and Modified (by) properties are set appropriately. Any linked Wiki or web pages are also copied. Pasted file(s) are displayed at appropriate ordinal position(s) in the files list.
If you paste a file into a folder, and a file with the same name and type is already present there, the file is pasted with the name '[Filename] - Copy'. If '[Filename] - Copy' already exists, an incrementable integer is appended to maintain name uniqueness.
You can also invoke Paste at the whitespace at the end of the files list.
An informational message ('[n] file(s) have been copied to [FolderName]) is displayed after a successful Paste.
Restrictions:
-
It is not possible to copy a file in the Recycle Bin
-
It is not possible to paste a file into the Recycle Bin
Move
Move is available in the context menu when the following are selected in the folders treeview or files list:
-
A single file
-
A single folder
-
Multiple files
-
Multiple folders
-
A mixture of files and folders
Invocation of Move displays the Choose Folder dialog, which lists all accessible folders in the RPI file system. The Recent Items folder and Recycle Bin are not displayed. You can select a folder to which to move file(s) and/or folder(s).
You can click Choose the selected folder to complete the move. When complete, a confirmatory information message is displayed
If you attempt to move file(s) or folder(s) to their original location, an error dialog is displayed. If you attempt to move to a folder in respect of which you only have Read-only permissions, a warning message is displayed.
You can click Cancel to abandon the move and close the Choose Folder dialog.
You may not move files from the Recent Items folder or the Recycle Bin.
Export…
This option is available when one or more files, or folders, or combination thereof is/are selected. Its availability is controlled by functional permission File System - Export.
Selecting the option displays the Browse for folder Windows file system dialog. You can choose the folder to which files are to be exported and initiate the export by clicking OK. Doing so creates an Export [n] file(s) job and displays it in the My Jobs dialog (full details of the job can be found in that interface's documentation). On the job's successful completion, an Open Folder button is displayed; clicking it opens the folder to which the file(s) was or were exported in Windows Explorer.
If more than one file is exported, all exported files are included in a zip file. If single file is exported, it is written to a single .rpf file. If the export was invoked in respect of single file that requires export of multiple files, the zip file is named '[Filename]_[DateTime]'. If invoked in respect of multiple files, the zip file is named 'RPIFileArchive_[DateTime]'.
Files are named as follows: ‘[File Name]_[GUID].rpf’, with each GUID value being unique to a specific file. Image assets’ image attachments are named ‘[File Name]_[GUID].rpa’. A file is overwritten at export if it already exists. Any dependent files are also exported - for example, if an audience contains a filter block that is configured with a selection rule, at export of the audience, the selection rule is exported at the same time.
You can also invoke Make New Folder within the Windows file system dialog, as well as being able to Cancel its display.
Exporting one or more files generates an audit record.
Copy to Other Clients…
This option is available when one or more files and/or folders are selected. It is not available when there is only a single client in the current RPI installation. Its availability is controlled by functional permission File System - Copy to Other Clients.
Selection of this option replaces the contents of the File System Dialog with the Copy Files to Other Clients overlay.
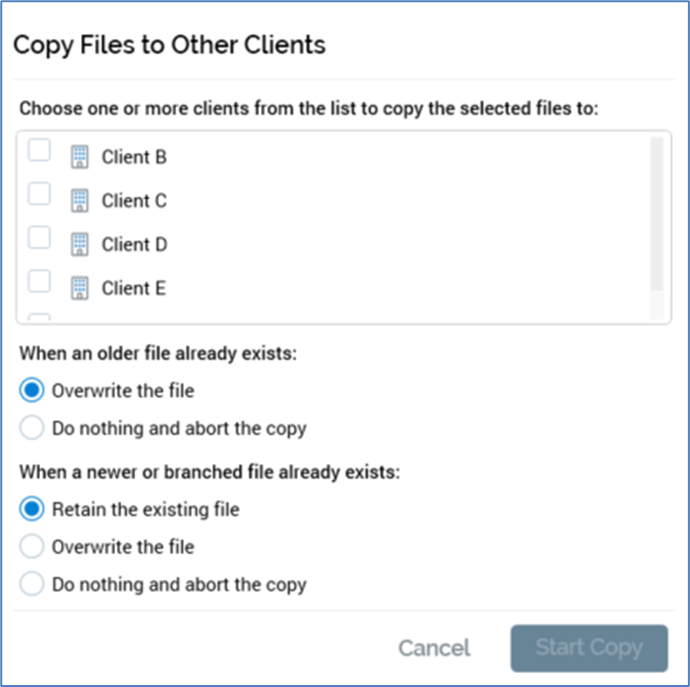
The overlay contains the following:
-
Clients list: displays a list of the other clients in the current RPI installation to which the current user has access. For each, a checkbox (unchecked by default), the client’s icon and name are shown. You can check one or more clients to which you wish to copy the selected files prior to invocation of Start Copy. A context menu is available when right-clicking clients, exposing the following options:
-
Check All
-
Uncheck All
-
Selection of multiple rows (without automatically checking them) is supported.
Two sets of radio buttons, displayed below the Clients list, allow you to specify how the file copy should behave in the event that one or more files already exists at the selected client.
-
When a previous version of the file already exists: the accompanying radio buttons allow specification of behavior should an older version of a given file already be present in the same folder at the destination client:
-
Overwrite the file (default option)
-
Do nothing and abort the copy
-
-
When a newer version of the file already exists: the accompanying radio buttons allow specification of behavior should a newer version of a given file already be present in the same folder at the destination client:
-
Retain the existing file: the default option
-
Overwrite the file
-
Do nothing and abort the copy
-
Two buttons appear in the overlay’s footer:
-
Start Copy: this button is enabled when one or more clients in the list is checked. Invocation removes the overlay from display and displays the My Jobs dialog, in which appears a Copy [x] file(s) to [y] client(s) job (for full details of the job, please see that interface's documentation). On successful completion of the job, a Copy results to clipboard button is displayed. Clicking the button copies the following details to the clipboard, for each file copied to each selected client.
-
Copied: True/False
-
File ID
-
File Name
-
File Type
-
Message
-
Results are grouped by client.
File(s) are created as per the selected options, in the same folders as per the source client (which are created if they do not already exist). Version numbers of the new files created in the destination client are set to v0.1. Any dependent files are also copied, again, into appropriate folders - for example, if an interaction that contains a batch audience which, in turn, contains a filter configured with a selection rule, is copied to another client, the dependent audience and selection rule are also copied, with all destination files created in folders that match their source equivalents. Note that a destination file will always be copied, even if it is not accessible to the user who initiated the copy. If, during the copying of a file, a file of the same type with the same name and version number is encountered in the destination folder, the copy does not take place. This applies equally to dependent files.
The act of copying a file to another client generates an audit record.
-
Cancel: clicking this button removes the overlay from display without copying files.
History
Invocation of the History option at a file’s context menu displays the file’s version history in the File Information Dialog’s History tab.
File-type conditional actions
Copy to External Folder…
This button allows you to copy an image asset to a folder within an external content provider.
It is only available when a single file is selected. Invocation displays the Save [asset name] to External Folder… File System Dialog.
Only external content providers are shown in the treeview. You can select an external file to which to save the folder and click Save to start the process of doing so. This creates an Upload asset to ECP job, details of which can be found in the My Jobs documentation.
A Publicly Accessible dropdown is available at the bottom of the File System Dialog. The is set to ‘No’ by default. If set to ‘Yes’, the file will be publicly available on completion of the copy.
Create New Audience From Template
This option is available when you right-click an audience, interaction or offer template in the File System Dialog. Invocation creates a file of the specified type, based on the template in question, and displays it in new instance of an appropriate designer.
Configure Attribute
This option is only available when right-clicking an attribute file. Invocation displays the attribute's details in the Attribute Builder. When the Builder is closed by clicking Finish, an informational message advises of the attribute’s configuration having been updated, and the files list is refreshed.
Manage Values
This option is only available when right-clicking an attribute file. When invoked at a string database column attribute, the Manage Attribute Values dialog is displayed (described in detail in the Attributes documentation). Invocation at other attribute types results in the display of a warning.
Copy Content Tag to Clipboard
This option is only available when you right click an attribute. Invocation copies the attribute's content tag to the clipboard and displays a message to this effect. On pasting the tag, it appears as per the following example (the GUID used will vary):
({Attribute;0020315f-085b-4233-a146-6906c8df65b3:Email Address})
The tag can be used when personalizing externally-authored RPI content (e.g. HTML asset or email offer). The content thus created can later be pasted into an RPI file, at which point the referenced attribute will be added as an embedded file automatically.
View Insights
This option is available at audiences and selection rules. Invocation displays insights relating to the file in question in the Insights Window, which is covered in detail in the Audience Designer and Standard Selection Rules documentation.
Preview
This option is available at offer files only. Invocation displays the Preview tab within the File Information dialog. If the Dialog is already open, it is refreshed with the new file's details.