

Overview
The RPI client application can be installed by copying the Client folder within the RPI deployment files to an appropriate location, and then running the Interaction.exe application.
Alternatively, the RPI client application can be installed using the installer package in the ClientMSIInstaller folder.
Double clicking the file launches the RPI client installer:
Follow the steps therein to install the RPI client application.
The RPI client is version aware. If a server to which it connects has been upgraded to a later version, a client upgrade will automatically take place. Details of the automatic client upgrade process can be found in the RPI User Guide.
There are contexts within which it is not desirable for the RPI client application to update itself. In these cases, settings within the Interaction.exe.config file, which can be found in the same folder as Interaction.exe, can be used to prevent automatic client updates taking place.
-
IsClientUpdateAllowed: this setting defaults to True. If True, the RPI client application will update itself automatically. If False, the client application will not be updated automatically on connecting to a later server version, and a message is displayed instead.
-
The message to be shown is controlled by setting
ClientUpdateDisallowedMessageOverride. If set to blank (the default), a default message (The RPI Client requires an update that cannot be performed automatically. Please contact your System Administrator for assistance) is displayed. Otherwise, the supplied message is shown.
The installer can also be run by navigating to the ‘installer’ folder within the Interaction website.
Microsoft Edge WebView2
The RPI client uses the Microsoft Edge WebView2 Control to display HTML content within the application.
The SkipWebView2RuntimeInstall setting, which can be found in
DeploymentFiles\Plugins\RedPoint.ClientInstaller.exe.config, controls, when Microsoft WebView2 is not already installed at an RPI client machine, whether installation of the RPI client should skip silent install of the same. The setting defaults to 'False', and must be set in advance of the upgrade to the RPI v6.3 server.
When attempting to run client in an environment when WebView2 is not installed, the following message is displayed at the Sign in dialog:
'Microsoft WebView2 Runtime was not found
This application requires the Microsoft WebView2 Runtime to be installed before it can be used. Contact your administrator or click the 'Copy to clipboard button' below to get the URL that can be used to download and install this component.'
The following buttons accompany the message:
-
Copy to clipboard: clicking this button copies the following URL to the clipboard: https://developer.microsoft.com/en-us/microsoft-edge/webview2/#download-section
-
Support: clicking this button opens Redpoint support page in the default browser.
Having upgraded server to v6.3, on connecting to the upgraded server with a previous client version, a WebView2 installer is displayed. If the installer cannot be downloaded (due to operating system or other restrictions), it will be necessary to download it manually from:
https://developer.microsoft.com/en-us/microsoft-edge/webview2/
Command Line Switches
You can initiate the RPI client application from a command Window by navigating to the folder in which the application executable is located, and issuing this command:
Interaction.exe
The following command line switches are available in this context:
-
-devmode: when this switch is applied, a new menu button is made available at the RPI client’s header:

Clicking the button displays a Developer tools context menu, exposing the following options:
-
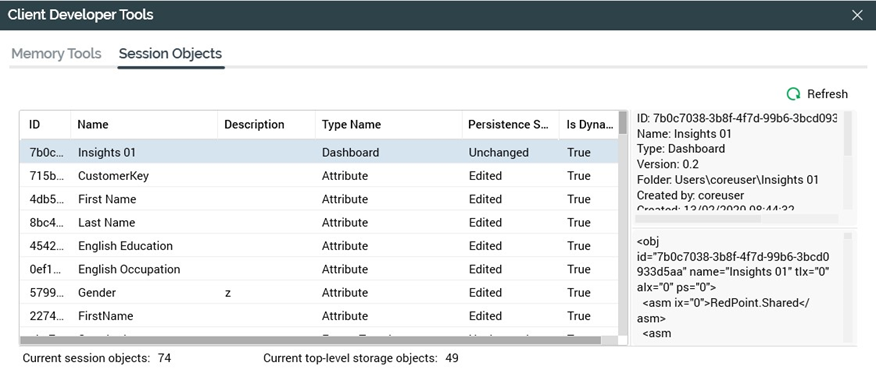
Developer Tools: selecting this option displays the Client Developer Tools dialog, with its Memory Tools and Session Objects tabs.
-
The Memory Tools tab contains the following:

-
Session Objects section: the buttons within this section allow you to manually force the clearance from memory of RPI client session and storage objects.
-
.NET Garbage Collection: the button within this section allows you to manually initiate .NET garbage collection to free up client memory.
-
Client Memory Usage section: this section provides information about the current state of RPI client application memory usage.
-
-
The Session Objects tab provides visibility of the objects current held in the RPI client application’s session memory.
-
Also when running in devmode, files' ID and VCID (Version Control ID) properties, and folders' ID properties, are shown in the following contexts:
-
File information tooltip
-
File System Dialog’s information panel
-
File Information Dialog’s Details tab
-
-
-
Force Inactivity Timeout: selecting this option causes the RPI client to behave as if signed out due to inactivity. For more information, please see the Framework section in the RPI Reference Guide.
-
-
-logfullapierrors: when applied, all exceptions thrown when calling the InteractionAPI’s methods are logged, with full details on the URI, HTTP Verb and Message Body.
-
-logfullapicalls: when applied, all calls to InteractionAPI methods are logged, will full details on the URI, HTTP Verb and Message Body.