

Overview
A grid is displayed, containing all existing web adapters.

Within the grid, the following read-only columns are displayed:
-
Name
-
Description
-
Type
-
Google Analytics
-
Web events
-
PURL adapter
-
Bitly
-
-
State
-
Unchanged
-
Added
-
Edited
-
Deleted
-
A single Web Events adapter, “Default web tracker” is provided out-of-the-box at a newly-installed RPI tenant.
Selected web adapter details
This section allows you to configure details of the web adapter selected currently in the grid. Its contents are dependent on the type of adapter selected.
Google Analytics adapter details
Refer to Web adapter provider: Google Analytics in the External Configuration guide for details about configuring Google Analytics.
When a Google Analytics adapter is selected in the web adapters list, the Selected Adapter Details section contains the following updateable fields:
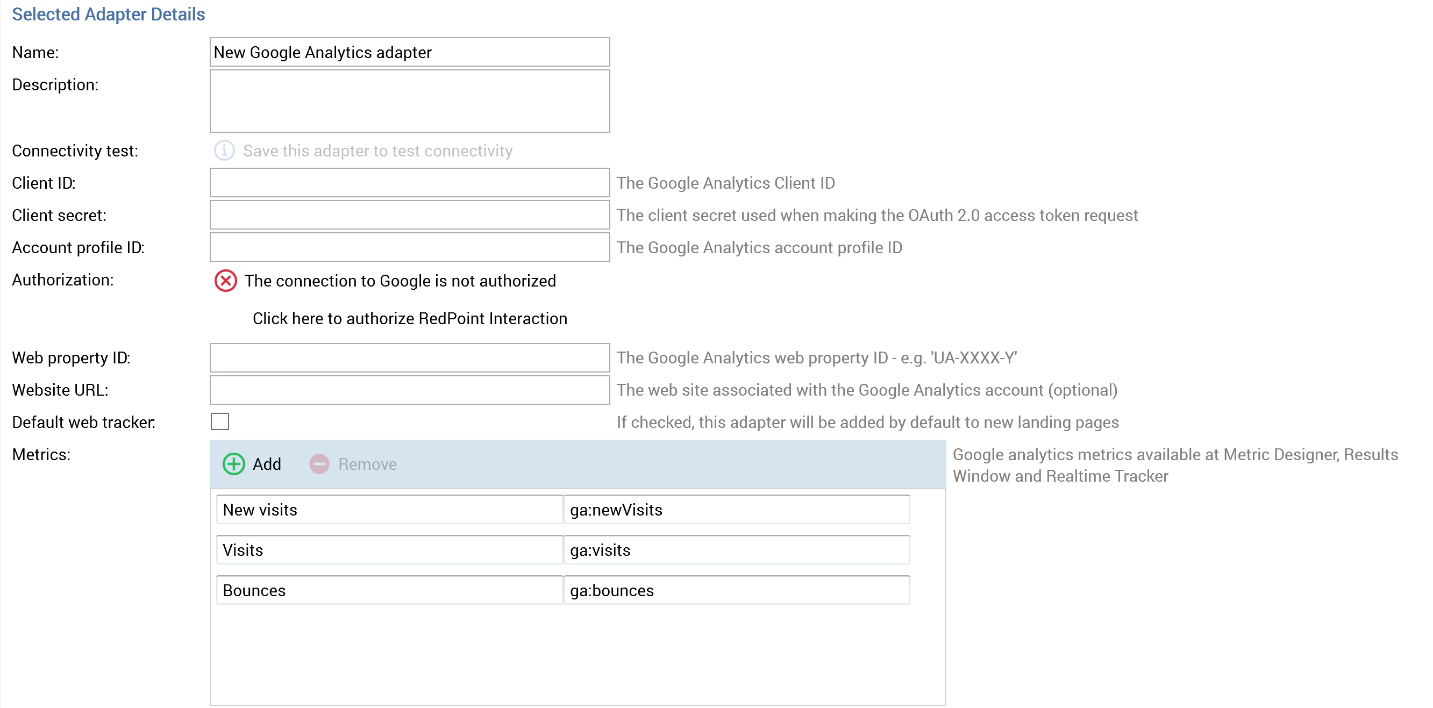
Name
A mandatory, textual field that may be a maximum of 100 characters in length. Name must be unique across all web adapters.
Description
An optional field that may be a maximum of 1000 characters.
Connectivity Test
This button facilitates determination of valid combinations of Google Analytics metrics. If any unsaved changes exist, the button is unavailable, and its text reads "Save this adapter to test connectivity". If no unsaved changes are present, the button is available, and its text reads "Create new job to test this adapter". Selecting the button creates a Connectivity test job and displays it in the My Jobs Dialog. Full details of the job and Dialog can be found in the My Jobs documentation.
Client ID
This mandatory property represents the client’s unique Google Analytics ID.
Client secret
This mandatory property is used to capture the client’s Google Analytics secret, which is used to when making the access request to Google.
Account profile ID
The Google Analytics account profile ID. The field is mandatory and can be a maximum of 100 characters.
Authorization
For a Google Analytics adapter to be used by RPI, it must be authorized. A label displays the adapter’s current authorization state. It is accompanied by a button as follows:
Prior to the adapter’s being authorized, the button displays the text “The connection to Google is not authorized”. You can select the button to display a Google Sign in page in your default web browser. On entering valid Google credentials and selecting Sign in, select the requires access permission and select Continue at the next interface.
An authorization code will then be displayed, which you can copy to the clipboard. Having obtained an authorization code from Google, a Code field is displayed at the property, accompanied by a Submit code button.
Paste the code into the field provided and select Submit code. If the code is correct, the Google Analytics adapter is deemed to have been authorized.
Following the adapter’s authorization, the text “The connection to Google has been authorized” is displayed. The adapter has now been authorized and can be saved (note that it is not possible to save an unauthorized Google Analytics adapter).
Web property ID
Provision of this Google-supplied value, with a format of “UA-XXXXXXXX-1”, is mandatory.
Web site URL
The web site associated with the Google Analytics account. Provision of this value is optional, and the field supports a maximum of 1000 characters. If set, the Google Analytics parameter is attached to URLs in an email offer that contain the specified sequence of characters. If not set, the parameter is attached to all URLs in the email content. Note that the [space], ? and & characters are prohibited in this field.
Default web tracker
A checkbox, unchecked by default. If checked, the adapter will be automatically added to any newly-created landing pages. A validation error is raised at save if more than one default web tracker of a given type of web adapter has been defined.
Metrics
This grid allows you specify the subset of Google Analytics metrics that will be made available at the Results Window.
The grid contains the following:
-
Toolbar
-
Add: invocation of this option adds a new metric to the grid. Its default name is “New metric”. If this value already exists, an integer is appended to ensure uniqueness (this number can be incremented if required). The new metric’s default Google Analytics name is "ga:".
-
Remove: this option is only available if a metric is selected. Invocation removes the metric from the grid.
-
-
Columns
-
Name: mandatory, and a maximum 100 characters. The metric’s name must be unique within the Google Analytics adapter.
-
Google Analytics Name: mandatory, and a maximum of 100 characters. The metric’s Google Analytics name must be unique within the Google Analytics adapter, and must begin with "ga”. Note that it is not valid to specify the "ga:visitors" metric. The value supplied must consist only of alphabetic and/or numerical characters.
-
[Remove button]: this button is displayed when hovering over a metric. Invocation removes the metric from the grid.
-
Three default metrics are provided to get you started:
-
New visits/ga:newVisits
-
Visits/ga:visits
-
Bounces/ga:bounces
It is mandatory to provide at least one metric or goal within a Google Analytics adapter.
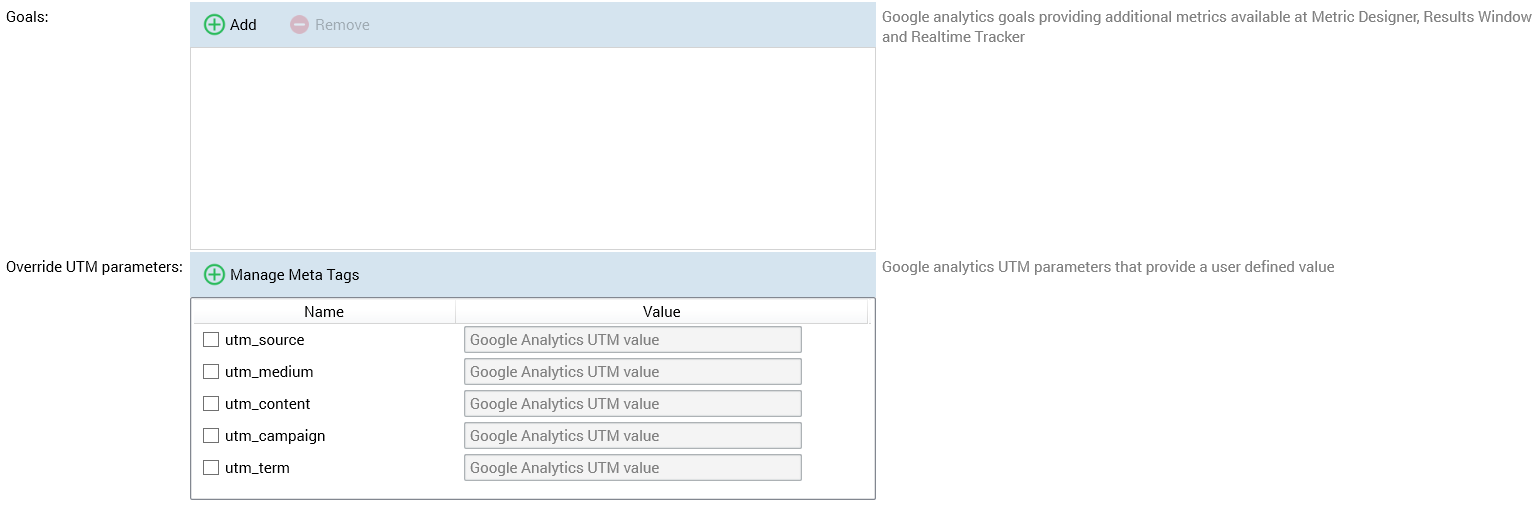
Goals
Google Analytics goals represent just that—demonstrable outcomes that may occur during a visit to a website. Typically, goals are associated with a sales funnel; a landing page may be followed by a sequence of informational and interrogative pages before ending with a goal—for example, confirmation that a purchase has been made successfully. Each page in such a sequence can be assigned a unique identifier within the Google Analytics interface, and the reference numbers utilized within a Google Analytics adapter’s goals to represent outcomes achieved during a website visit. Each such goal provides three metrics that can then be accessed at the Results Window:
-
starts (indicating that a visitor embarked upon the sales funnel journey).
-
completions (indicating successful completion of the journey).
-
value (a financial amount determined by multiplying the number of successful completions by a value configured directly within Google Analytics’ own interface).
Google Analytics goals are managed in a grid. The grid contains the following:
-
Toolbar
-
Add: invocation of this option adds a new goal to the grid. Its default name is “New goal”. If this value exists already, an integer is appended to ensure uniqueness. This number can be incremented if required. The new goal’s default Goal Index is 1.
-
Remove: this option is only available if a goal is selected. Invocation removes the goal from the grid. Remove is not protected by an “Are You Sure?” dialog.
-
-
Columns
-
Name: a mandatory field that can be a maximum of 100 characters in length. A goal’s name must be unique within the Google Analytics adapter.
-
Goal Index: a mandatory field, Goal index must be an integer, and must be greater than 0. It must also be unique within the Google Analytics adapter.
-
[Remove button]: This button is displayed inline when hovering over a goal. Invocation removes the goal from the grid. Remove is not protected by an “Are You Sure?” dialog.
-
In contrast to metrics, default goals are not provided.
It is mandatory to provide at least one metric or goal within a Google Analytics adapter.
Override UTM parameters
This property allows you to override the names of the standard Google UTM parameters, which are added to tracked URLs by Google Analytics. The property consists of a toolbar and a list. The toolbar exposes a single button:
-
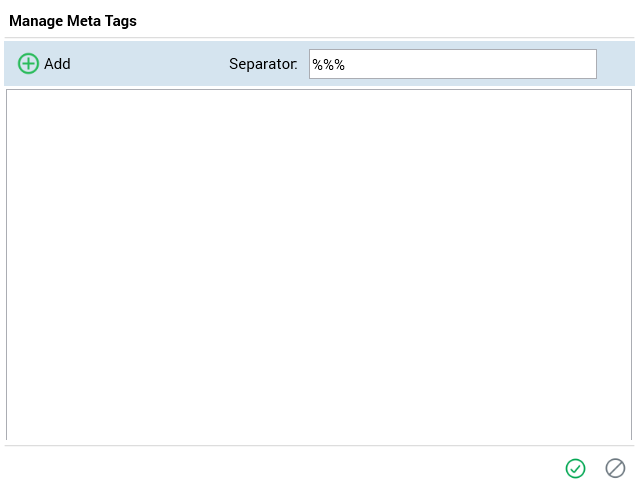
Manage Meta Tags: when this button is selected, the Manage Meta Tags dialog is shown.
The dialog allows you to manage meta tags, which can later be assigned to UTM parameters in the Override UTM parameters list.The popup contains a toolbar, list and buttons.
-
Toolbar: exposing the following:
-
Add: selecting this button adds a new, unconfigured meta tag to the list.
-
Separator: this mandatory text field allows you to define a sequence of characters that will be used to separate meta tags. It defaults to the value "%%%".
-
-
List: each defined meta tag is displayed in the list. For each meta tag, a Meta Tag Name and Meta Tag Value must be defined. An inline Remove button is shown on hovering over a meta tag; selecting it removes the meta tag without displaying an "Are You Sure?" dialog.
-
OK: selecting this button saves changes to meta tags and closes the dialog.
-
Cancel: selecting this button abandons changes and closes the dialog. Selecting off the dialog has the same effect.
-
The list presents a list of UTM parameters. Each is accompanied by a checkbox. If you check a UTM parameter, its accompanying Value field is available. The field is mandatory and accepts a value of up to 128 characters in length.
If UTM parameters are overridden, the values provided are substituted at runtime for their “utm_” equivalents (e.g. “utm_campaign=123” becomes “Custom_value=123”).
“utm_term” is only included in URLs when overridden.
Meta tags can be managed at a UTM parameter using inline Select and Clear buttons shown to the right of each selected UTM parameter on hover.
-
Add: selecting this button displays the Select Meta Tags dialog. The dialog lists all configured meta tags. You can select meta tags by checking the checkboxes to the left. OK and Cancel buttons are provided at the bottom of the dialog. On selecting meta tags, they are displayed at a UTM parameter's Value as "[Tag Name 1][Separator][Tag Name 2]...".
-
Clear: you can use this button to clear any meta tags assigned at a UTM parameter.
If UTM parameters are not overridden, the default values provided at runtime are as follows:
-
utm_source: RPI
-
utm_medium: channel's delivery method name e.g. Email
-
utm_content: channel execution ID. If a test send, the default value is 0.
-
utm_campaign: offer activity name
Web Events adapter details
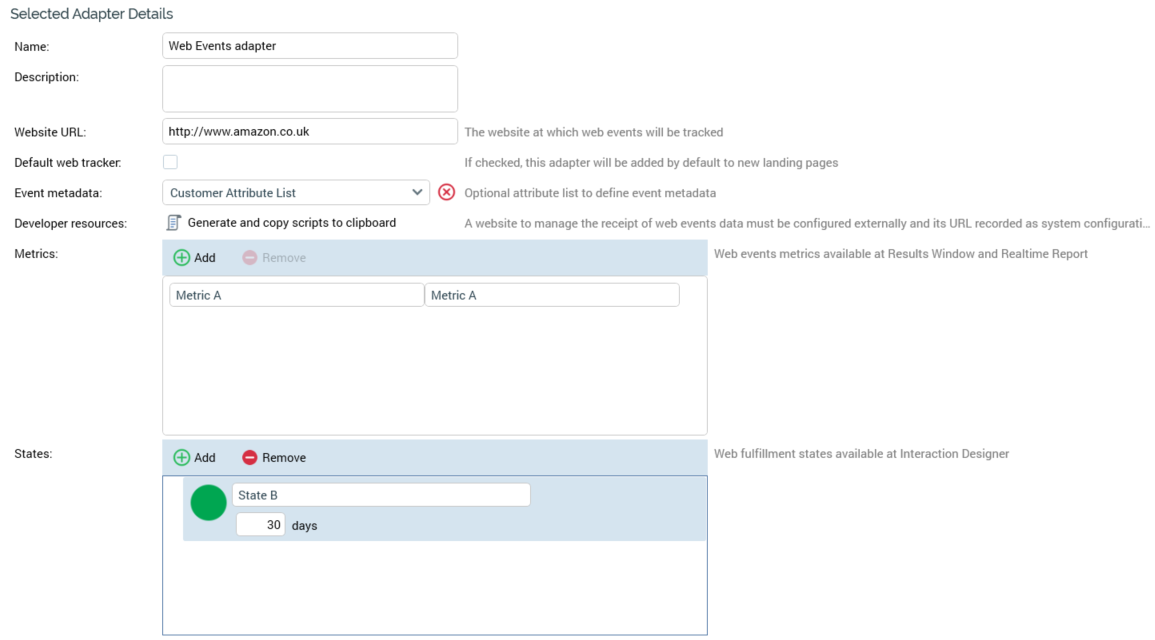
When a web events adapter is selected in the web adapters list, the Selected Adapter Details section contains the following updateable fields:
-
Name: a mandatory text field that can be a maximum of 100 characters in length.
-
Description: an optional text field that can be a maximum of 1000 characters in length.
-
Website URL: this mandatory field can be a maximum of 1000 characters in length. Web Events parameters are attached to all instances of the specified URL within the offer channel content (matching when the string as stated is found in the URL). Note that the following characters are forbidden: [space], "?" and "&".
-
Default web tracker: a checkbox, unchecked by default. If checked, the adapter will be automatically added to any newly-created landing pages. A validation error is raised at save if more than one default web tracker of a given type of web adapter has been defined.
-
Event metadata: this property allows you to optionally select an attribute list, which can be used when configuring Event Metadata criteria in a Web Realtime decision. A dropdown property, it lists all configured non-Placeholder attribute lists. Nothing is selected by default. Having chosen an attribute list, you can clear your selection.
-
Developer resources: selecting the Generate and copy scripts to clipboard allows a web developer to generate scripts that can then be inserted at appropriate positions in an external website. Note that a website to manage the receipt of web events data needs to be configured externally, and its URL recorded as system configuration setting
WebEventTrackingAddress. The button is not available until the web adapter is saved. Two scripts are created and copied to the clipboard:-
Set Cookie Script: this script sets cookies on the machine of the person viewing the website, which are based on the URL parameters appended to the URL which he or she traversed to browse to the site.
-
Send Metric Script: this script is used to call the web events website to advise of metric or state updates.
-
A confirmatory message is displayed post-copy.
A warning is displayed if WebEventTrackingAddress has not been set.
-
Metrics: these represent cumulative numerical values collated at the website, even across several visits; for example, Total Sales Value. Web event adapter metrics are listed in a grid, above which is displayed a toolbar that exposes the following options:
-
Add: invocation of this option adds a new metric to the grid. Its default name is "New metric". If a metric of that name exists already, an integer is appended, and may be incremented if required. The new metric’s default Web parameter name is blank.
-
Remove: this option is only available if a metric is selected. Invocation removes the metric from the grid.
The Metrics grid, contains the following columns: -
Name: a metric’s name is mandatory and may be a maximum of 100 characters. The name must be unique within the web events adapter.
-
Web parameter Name: mandatory, and a maximum of 100 characters. The web parameter name must match a value configured within a tag at the website, is case sensitive and must be unique within the web events adapter.
-
[Remove button]: displayed when hovering over a metric. Invocation removes the metric from grid.
-
-
States: a state represents the number of visitors that assume a given state at the website—for example, “Made a Purchase”. States are displayed in a treeview, above which is displayed a toolbar exposing the following options:
-
Add: invocation adds a new, unconfigured top-level state to the bottom of the top level in the treeview. Its default name is "New initial state". If "New initial state" already exists, an integer is appended and may be incremented if required. The newly-added state appears as restored.
-
Remove: this button is available when a state is selected in the treeview. Invocation removes the selected state from the list. Any descendent states are also removed. The States treeview may contain multiple top-level states. States are shown as treeview nodes. Initial states can contain child states; however, there are no functional ramifications for parent/child relationships, and they are provided to allow you to organize states in a logical manner. You can nest multiple levels of child state if you wish. When the interface is displayed initially, existing initial states are shown as rolled up. All states' details are hidden. You can expand or roll up states as required. When expanded, child states are shown as indented. When a state is selected, the cursor occupies full available treeview width.
A state contains the following: -
Positive/Negative/Transitional state icon: on hovering over the icon, a menu is displayed, allowing you to change the property. Note that the definition of a state as Positive, Negative or Transitional is purely to add comprehensibility, having no functional impact.
-
Name: mandatory, and a maximum of 100 characters. A state’s name must be unique within a web events adapter.
-
Duration: the length of time after channel execution within which the state can be assumed.
-
Add a new Child State: this button is shown to the right of the state at hover. Invocation adds a new, child state to the bottom of the list of the current state's children. The new child state’s default name is "New child state". If "New child state" already exists, it is called "New child state 2". This number may be incremented if required.
-
Remove: this button is shown to the right of the state at hover. Selecting it removes the state from the adapter.
-
On save, if a state has been added, or an existing state's database field has changed, a Validate Audience Definitions job is created, and displayed in the My Jobs Dialog. Full details of the job and Dialog can be found in the My Jobs documentation. When complete, this job adds database field columns to all audience definitions’ offer history tables as appropriate.
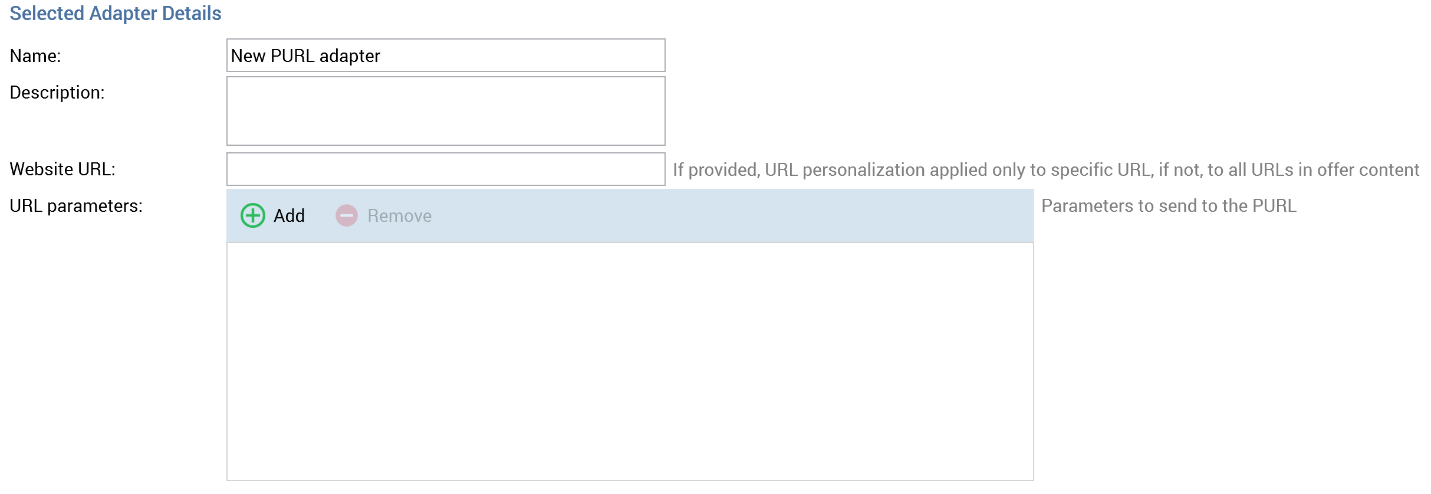
PURL adapter details
When a PURL adapter is selected in the web adapters list, the Selected Adapter Details section contains the following updateable fields:
-
Name: a mandatory text field that can be a maximum of 100 characters in length. Set by default to "New PURL Adapter" (an integer can be appended to ensure uniqueness).
-
Description: an optional text field that can be a maximum of 1000 characters in length.
-
Web site URL: an optional text field that can be a maximum of 1000 characters in length. If a web site URL is provided, the parameters appended to any URLs within a message’s content are applied only to instances of the specified URL. The value provided must be a valid URL.
-
URL parameters: this list allows you to define the adapter’s parameters. Note that it is mandatory to provide at least one URL parameter. A toolbar is shown at the top of the list, exposing the following options:
-
Add: invocation adds a new URL parameter to the grid. Its attribute is not set, and its default name is set to “NewParameter” (an integer can be appended to ensure uniqueness).
-
Remove: invocation removes the selected parameter, without displaying an “Are You Sure?” dialog.
The list itself displays two columns: -
Attribute: provision of an attribute to map to the parameter is mandatory. You can provide an attribute using drag and drop, or you can browse for one using the recent items chooser or File System Dialog. Parameter attributes are supported. Once an attribute has seen selected for the parameter, you can invoke View Information (to view its details in the File Information dialog). You can also Clear the selected attribute.
-
Parameter name: provision of a name for the parameter is mandatory, and the value can be up to 100 characters long. The name provided must be unique within the adapter.
-
Default Value: this optional property supports a maximum of 100 characters. It can be used to provide a default value, to be substituted in the event of a null attribute value.
-
When you hover over a URL parameter a Remove button is displayed to the right; invocation thereof removes the parameter without displaying an “Are You Sure?” dialog.
Parameter tracking of links sourced from attributes is not supported; use Insert Link or well-formed URL text instead.
Refer to the Best Practices topic Configure PURL adapters to use Offer History metadata for a specific use case using a PURL adapter.
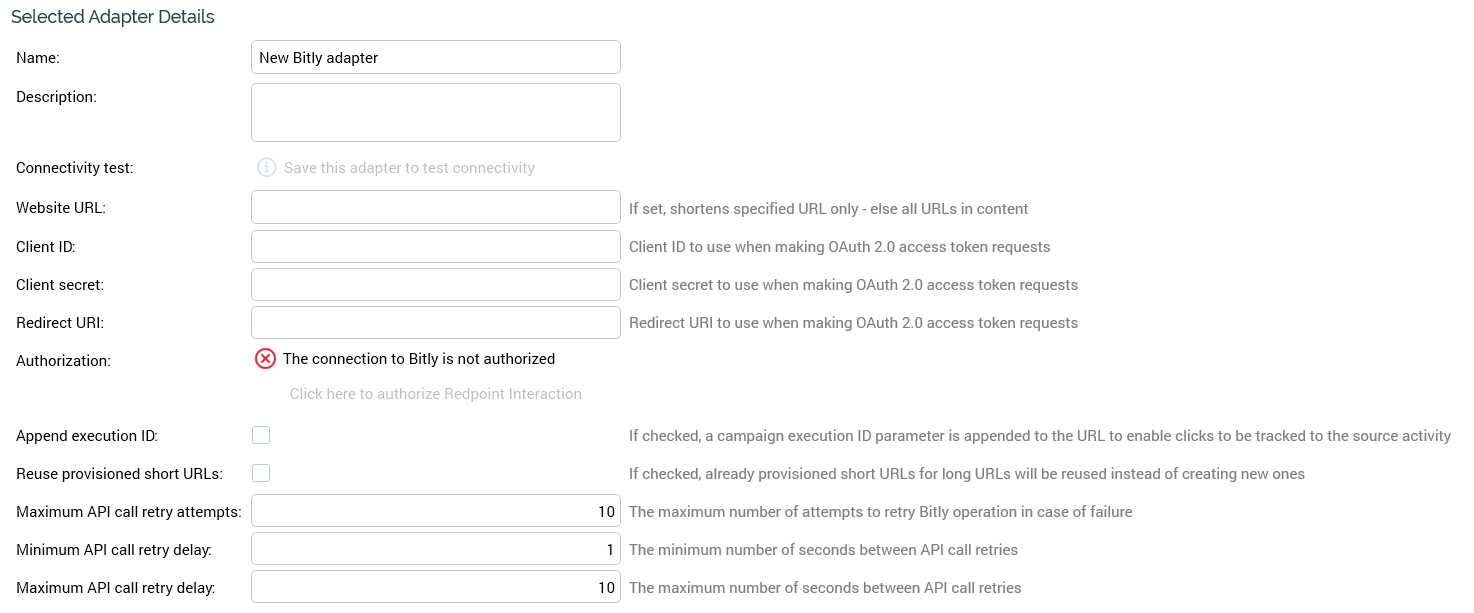
Bitly adapter details
Refer to Web adapter provider: Bitly in the External Configuration guide for details about configuring Bitly.
Bitly does not allow special characters, only letters, numbers, dashes (-), and underscores (_). Refer to the Bitly support article for details.
When a Bitly adapter is selected in the web adapters list, the Selected Adapter Details section contains the following updateable fields.
-
Connectivity test: selecting this button creates a Connectivity test job and displays it in the My Jobs Dialog. Full details of the job and Dialog can be found in the My Jobs documentation.
-
Website URL: if a URL is provided, only URLs based on the provided value are shortened. The property is optional; if not provided, all URLs in the content are shortened. The field is blank by default and can be a maximum length of 1000 characters. If a value is provided, it must be a well-formed URL.
-
Client ID: this mandatory text field represents the client ID used when making OAuth 2.0 access token requests.
-
Client secret: this password-masked field is used in conjunction with Client ID when making OAuth 2.0 access token requests.
-
Redirect URI: this mandatory text field represents the redirect URI used when making OAuth 2.0 access token requests.
-
Authorization: the web adapter must be authorized by Bitly before it can be used.
-
Append execution ID: if this checkbox is checked, a campaign execution ID parameter is appended to the URL to enable clicks to be tracked to the source activity. It is unchecked by default.
-
Reuse provisioned short URLs: this checkbox is unchecked by default. If checked, any short URLs already provisioned at Bitly will be substituted for long URLs, avoiding the unnecessary creation of new ones.
-
Maximum API call retry attempts: this numeric property allows you to specify the maximum number of retry attempts to be undertaken in case of a call to the Bitly service resulting in a failure. It defaults to 10, and accepts a range of values from 1 to 100.
-
Minimum API call retry delay: this numeric property allows you to specify the minimum number of seconds between API call retries. It defaults to 1, and accepts a range of values from 1 to 600.
-
Maximum API call retry delay: this numeric property allows you to specify the maximum number of seconds between API call retries. It defaults to 1, and accepts a range of values from 1 to 600.
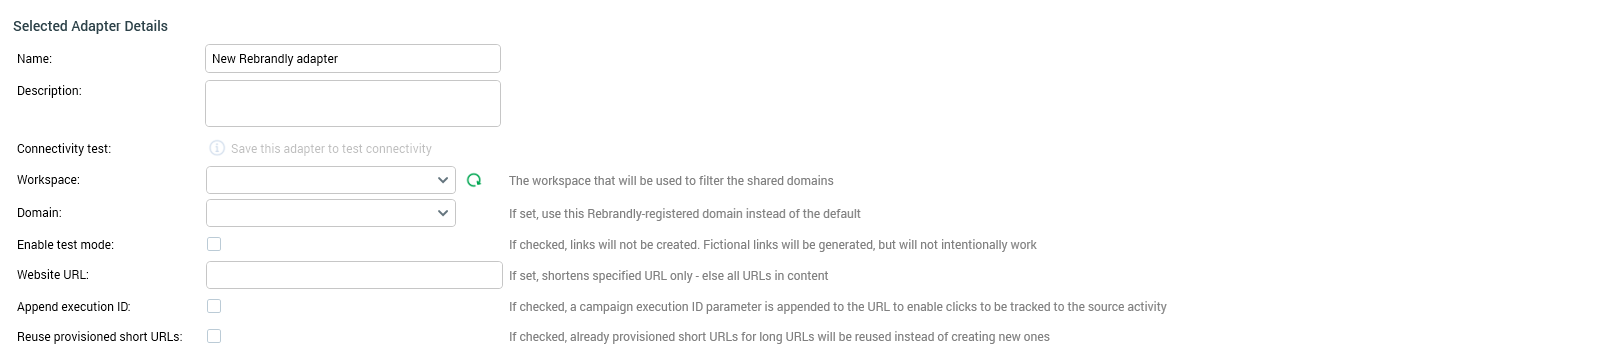
Rebrandly adapter details
Refer to Web adapter provider: Rebrandly in the External Configuration guide for details about configuring Rebrandly.
RPI v7.7 introduces a refactored Rebrandly adapter; please refer to the RPI v7.7 release notes for important details.
When a Rebrandly adapter is selected in the web adapters list, the Selected Adapter Details section contains the following updateable fields.
-
Connectivity test: selecting this button creates a Connectivity test job and displays it in the My Jobs Dialog. Full details of the job and Dialog can be found in the My Jobs documentation.
-
Workspace: select a workspace from the dropdown. The Rebrandly channel adapter must be saved for the workspace to appear in the dropdown.
-
Domain: select domains related to the workpace. The a workspace must be chosen and the Rebrandly channel adapter must be saved for domains to populate.
-
Enable test mode: when checked, the API won’t call the Rebrandly API, but will do everything else. This allows for testing without the overhead or rate limits imposed by Rebrandly.
-
Website URL: if a URL is provided, only URLs based on the provided value are shortened. The property is optional; if not provided, all URLs in the content are shortened. The field is blank by default and can be a maximum length of 1000 characters. If a value is provided, it must be a well-formed URL.
-
Append execution ID: this checkbox allows you to specify that a campaign execution ID parameter should be appended to the Rebrandly-generated URL, facilitating click tracking.
-
Reuse provisioned short URLs: this checkbox already provisioned short URLs will be reused instead of creating new ones.