

Overview
This page walks you through configuring Rebrandly to work with RPI.
RPI v7.7 introduces a refactored Rebrandly adapter; please refer to the RPI v7.7 release notes for important details.
Creating Redirect URL, OAuth Client ID, and Client Secret keys
This section describes how to create Rebrandly’s Redirect URL, OAuth Client ID, and Client Secret keys. Please follow the steps below:
-
On your web browser, log in to https://app.rebrandly.com.
-
Go to the Integrations tab.

-
Under Categories, select Build With Us.
-
Enter the Application name and Redirect URL and then select Save.
-
Select Generate credentials. The app will be created successfully.

-
Copy and store your credentials; these credentials will be used for the Rebrandly connector configuration:
-
URL: Redirect URL Configuration on Rebrandly connector
-
Client Public Id: Client Id Configuration on Rebrandly connector
-
Client Secret Id: Client Secret Configuration on Rebrandly connector (Client Secret will only be shown once, so save this securely)
-
Creating a Rebrandly workspace
This section describes how to create a Rebrandly Workspace. Rebrandly uses the Main Workspace as its default workspace. If you want to create new workspace, please follow steps below:
-
On your web browser, navigate to https://www.rebrandly.com; choose Signup or Log in.
-
Once signed in, go to the Workspaces tab on the main page.
-
Select New Workspace.
-
Enter a name for the workspace. The name must be at least 4 characters long to proceed.
-
Your workspace requires at least one custom domain. Select Include branded domains to associate your custom domain to your workspace.
-
Select Create to create new workspace. Learn more about how to create a Rebrandly workspace.
Linking your Rebrandly domain
This section describes how to create a new Rebrandly Domain. Rebrandly uses rebrand.ly as its default domain. If you want to create a custom domain, please follow the steps below:
-
On your web browser, navigate to https://www.rebrandly.com; choose Signup or Log in.
-
After signing in, register or link a Domain using the New Domain button.
-
Follow the instructions provided on the page to register or link your domain.
-
Once the domain is created, you can use it in the Domain field of your Rebrandly Web Adapter configuration in Redpoint Interaction.
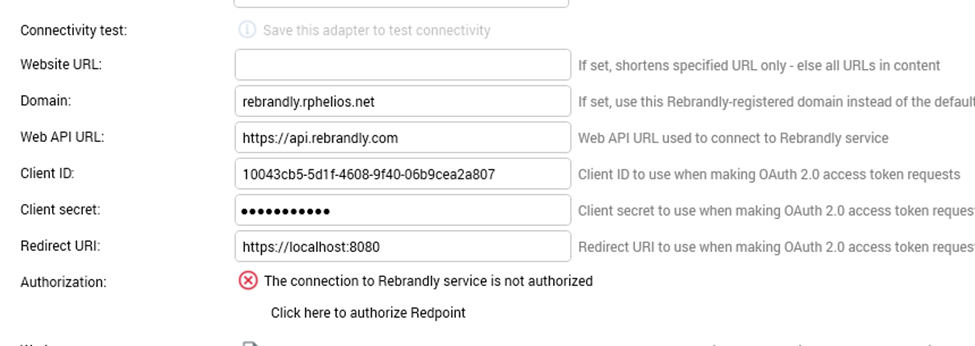
OAuth Configuration to successfully connect to Rebrandly Token
This section describes how to successfully retrieve the Rebrandly Token.
-
Open RPI.
-
Go to Configuration > Connectors > Web Adapters.
-
Add/Update New Rebrandly adapter.
-
Fill out configuration for the following:
-
Domain: you can get this on Linking Rebrandly Domain section.
-
Client Id: you can get this on Create Client Id, Secret section.
-
Client Secret: you can get this on Create Client Id, Secret section.
-
Redirect URI: you can get this on Create Client Id, Secret section.
-
-
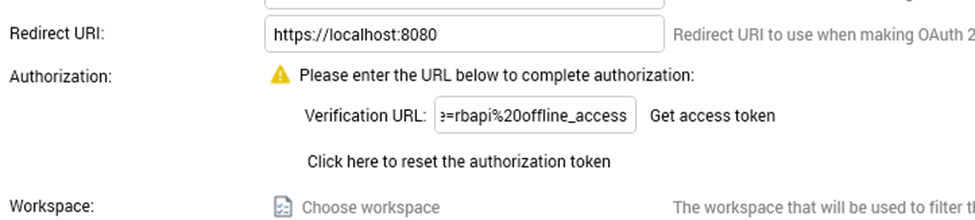
Click ‘Click here to authorize Redpoint’.
-
Opens up a browser; copy the URL.

-
Enter the URL in Verification URL, then click Get access token.
-
The Rebrandly token should be generated, and you should now be authorized.

Old Accounts
This section describes where to find URL information for old accounts.
-
On your web browser, log in to https://app.rebrandly.com.
-
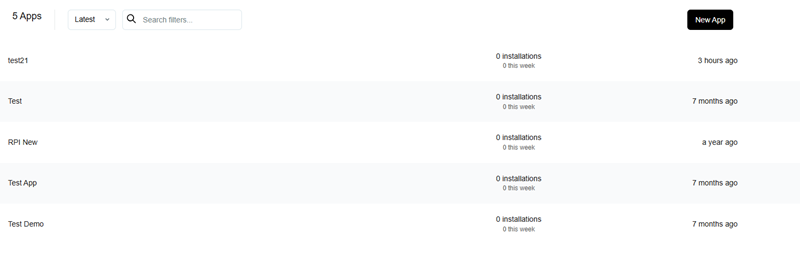
Go to the My Apps tab.
-
It will show a list of Apps that have been created.
-
You can highlight one item on the right side and click the Edit icon.

-
A pop up will appear that displays the Application Name, URL List, and Client public ID.
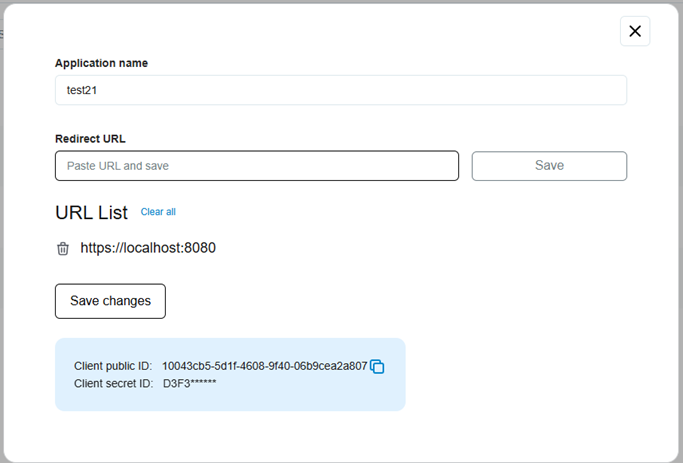
The Client Secret is displayed only once at the time of creation. You will no longer able to view the Client Secret again, so make sure copy and securely store Client Secret when it’s displayed.
Rate Limits
Rebrandly differentiates its API rate limits based on the type of link (Evergreen vs. Campaign) and the workspace being used. Refer to the Rebrandly documentation for additional information.
Standard API Rate Limits
For standard accounts, the limits are divided into two main categories:
-
Classic Workspaces (Evergreen Links):
-
Rate: 10 API calls per second.
-
Throughput: 1 link per request (Total: 10 links per second).
-
-
Extended Workspaces (Campaign Links):
-
Rate: 1 API call per second.
-
Throughput: up to 25 links per request (Total: 25 links per second).
-
-
General Hourly Limit: Maximum of 20,000 API calls per hour across the account.
Enhanced Rate Limits (Paid/Enterprise Plans)
Paid plans offer significantly higher capacity. For example:
-
Evergreen Links: hourly limit can increase from 20,000 to 36,000.
-
Campaign Links: throughput can increase to 50 links per second. Hourly limit can increase to 180,000 API calls.